Calibration: take two

The black level crush issue, while Scott (TSE) had some great advice – seems to have ended up being a problem with the signal I’m sending the Ampro from my quadscan. The quadscan seems to be having problems with near black video levels – I brought my Dell 20″ widescreen ultrasharp LCD monitor downstairs and found that I was seeing exactly the same thing I was seeing on the Ampro.

The Sony DVD player seems to also have some issues with crushing the blacks. Doing an A/B vs. the Toshiba and using the LCD as a display – it was obvious that the black level coming out of the Sony was lower. I was only able to get equivalent black levels with the “custom” display setting on the DVD player and maxing the brightness to +5. Raising the brightness on the quadscan from the default 16 to 20 allowed me to see one of the two black bars in the AVIA black bars pattern. Even with these brightness increases – there is still clearly a problem with the quadscan as the crossed stepped scale pattern shows the top part of the 10IRE bar on the left, but the right (bottom) 10IRE bar is the same as the black next to it.

Despite the issues with the quadscan, I figured that I’d run the DVD player with the custom display setting (brightness +5) and the increased brightness on the quadscan (20) and see how things looked after calibrated.
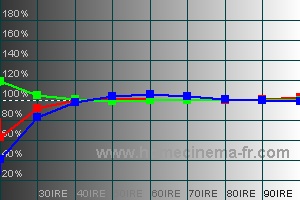
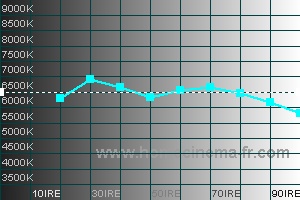
Gray Scale 3Colour Temperature 3

Comparing my calibration efforts to previous attempts shows that I’m getting better at this.  Watching the 5th Element looks as good as it ever has on any system.  Checking out the Bourne Identity which I remember not looking all that great – things seem much more balanced.  I’m certainly hooked on calibrated displays – and there is still more for me to learn.
Black level crush

I’ve been struggling with getting my black level detail correct. The black bars pattern from AVIA is showing me a completely black screen – even on the tube face I couldn’t see the moving black bars.

I was certain that I had in the past had done the brightness and contrast setup, but since then I’ve changed cables, DVD player, and other factors. So I’ve spent some time going back to verify that cables didn’t make a difference, and checked the setup on my DVD player. Nothing seemed to make a difference.

I looked for help on Curt Palme’s CRT forums with this posting. The users there are very helpful, and TSE (scott – an Ampro expert) pitched in with exactly the advice I needed.

The sub-brite controls can put the darker video levels out of range of the video amplifiers. If too low the dark information is gone. Turn contrast to a low level like 20 or 30. Set brite to 70. Turn up G-2 so tube screen is totally lit up. Adjust sub-brite so lowest video levels are visible. Look in lens to see. Then set G-2 properly. The SB50 pics have sub-brite set so darkest video information is just visible. SB11 pics have sub-brite set toward low end of range. With sub-brite too low the lower levels of the stairstep pattern are not there. The tube is lit up but there is no information. Don’t turn the sub brites too high as it makes the amplifiers run hotter than they need to. Just enough for the dark information to show.

Scott

He even provided screen shots and scope shots!  I’m sure I can fix this black level problem now.  More when I get a chance to poke at the projector.

Calibration: initial sensor based adjustments

In my first set of sensor based readings the results were somewhat less than optimal. Since then I’ve tinkered with my video processor and overall video chain, and toyed around with astig and focus (but have yet to actually do any serious tweaking in that regard). Tonight I got a chance to see if I could improve things using the SpyderII sensor and HCFR software.

I set out to do two things:

  • Check and set my G2
  • Do an initial grayscale

Setting G2: There are several ways to go about setting G2. The suggested Ampro way is outlined here. I used this basic method – cut-off all 3 tubes, then set G2 on each such that the raster is barely lit (usually checked by looking into the tubes). An alternate manner is suggested here – I used this to verify my G2 setting.

An interested observation I had when setting G2 was that while my brightness is set to 95% (normal for an Ampro) some of the AVIA test patterns for black level were not resolving properly. The almost black and nearly black bars were basically invisible. Raising the brightness to max didn’t help – I need to investigate the output of the new Sony DVD player or possibly change the Quadscan to compensate for this. The net effect is that my shadow detail isn’t great at the moment.

Initial grayscale: I focused on two primary measurements 30IRE and 70IRE. The controls I used where the green, red and blue sub-brightness (pictured here), and the 3 small RGB trimpots by the BNC connectors on the back of the same card. If we look way back in time to this posting I had issues with these trimpots being turned way down and had moved them all to max.

Using the HCFR software in continuous measures mode I then setup AVIA with the full gray field test patterns. For 30IRE – I used the sub-brightness controls to try to get the RGB levels as close to 100% as I could. The sub-brightness trimpots are very sensitive, an almost inperceptible change affects the image. For the 70IRE pattern I used the 3 small RGB trimpots to reduce the incoming signal to get the RGB levels to close to 100%.

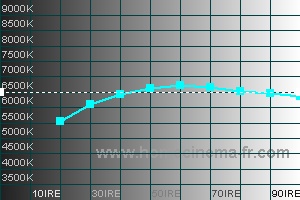
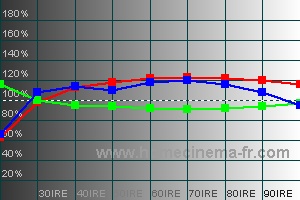
Gray Scale 2Colour Temperature 2

This is much better and the color temperature seems relatively sensible as well. Ignore readings below 20IRE as the SypderII sensor really doesn’t give you reasonable numbers there it seems.
Having finally watched Pirates of the Caribbean: Dead Man’s Chest the other night, I popped it in for a quick review while I sat down to write this. The black detail is improved over what it was, and the colors appear much more realistic than then did in the past. Some very dark scenes feel like I’ve got too much green, but that may be my imagination. Green forests stand out as looking better than they had, and peoples faces seems more naturally coloured – the costumes also seem seem to have more definition and texture. This seems like a big improvement.

Edit: A few notes from the morning after.  It is interesting that while I tuned for an accurate 70IRE, the final grayscale chart doesn’t show the same level of accuracy that I seemed to have with the continuous measurement.  The overall shadow detail is improved, but my near black is overly green (obvious by looking at the tubes) – this is likely because I raised the green vs. lowering the blue and red.  This is something I’ll have to go back and adjust.  Defocusing the blue a bit will probably help with the higher IRE levels for blue.