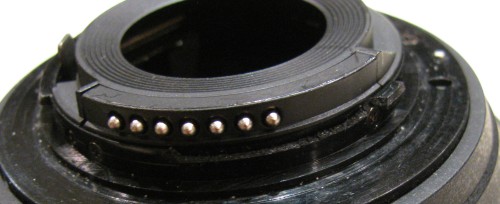
Nothing is quite as sad as a broken bit of equipment. Sadder still when it’s a fairly expensive component and repair costs at a shop are hundreds of dollars. This Nikon DX AF-S 18-55 VR lens took a kid + dog caused tumble to the ceramic floor, it was mounted on the camera and the impact busted the plastic mounting tabs (if you look closely at the picture above you can see the busted tabs).
On the bright side, if the tabs hadn’t given way something else might have taken more impact and broken. By carefully holding the lens on the camera it was possible to verify that it appeared to still be working fine.. if only it would stay mounted. Glue might have worked, but I wasn’t brave enough to slap a little glue onto an expensive lens. A few calls to local camera shops left me a bit shocked at the cost of repairs, it was not worth repairing as a new lens was almost the same price. What I found interesting was that even buying the parts from a local shop wasn’t an easy option, it seems Nikon is making it more difficult for repair shops to get parts.
I did find some reasonable web resources out there giving step-by-step information on replacing the mount. You can also pick up the required part via ebay. It turns out you can order the part directly from Nikon as well. Their email support was responsive within 24hrs, and I was able to call them directly with a credit card and have it shipped to me in a couple of days.
 So with the correct part in hand, it was time to take things apart. I used both #0 and #00 Phillips screwdriver bits, my fingers and patience. I’ll avoid duplicating the instructions found elsewhere and simply provide a few comments on my experience:
- The screws are very, very small. You’ll want to work in a brightly lit area with care not to lose any.
- When reassembling and I was reaching with my fingers to get the tab with the electrical contacts from where it rested “inside” the lens, I managed to get a fingerprint on the lens. Using more caution you can avoid my mistake.
- I messed up the first reassembly, the bayonet part of the new mounting ring needs to be in the ‘right’ place. Refer to the photo below: At about 10 o’clock there is a small metal pin. The bayonet should be clockwise side of that (say 11 o’clock). Everything fit, but the lens didn’t operate correctly on the camera.
- Those metal rings, you don’t want to move them if possible. The good news is that three of the screws you take out fit down through those rings, making it relatively easy to get lined back up if you move them a bit.
I’d never done this type of repair before and I was done well under an hour total. The second re-assembly was 15mins tops. Total cost: $10 + $15 shipping direct from Nikon Canada. If you opt for the ebay route, you may need to transfer the bayonet metal part from the original as most of them only offer the plastic ring – the official part is complete.


Wow, I can’t believe you can see that, never mind DIY repair job. Well done and at $25, it is hard to beat.