iPod woes

Almost 2 years ago I joined the iPod cult by winning a raffle at work where the prize was a new 30G iPod Video.  Just the other day the iPod stopped working.  Over its lifetime there were a few times when a hard reboot was required, but now the device doesn’t power up at all.  Rebooting it doesn’t do anything – I just have a dark screen and that’s it.

As I’ve past the default 1 year warranty, I’m on my own to fix (or replace) it.  Looking at the Apple site, repair will cost me $149 + tax + shipping.  It seems via various 3rd party resellers, I can pick up a refurbished 30G Video for around the same price.  The Apple store has refurbished 80G Classics for $189, and the 8G Touch for $209.  I may look around to see if there is repair option locally that is a bit cheaper.

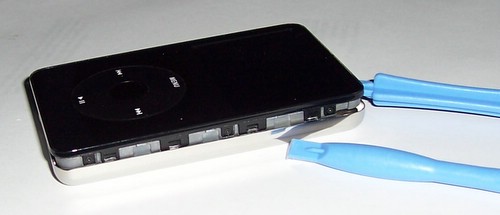
Of course – I love to open stuff up, and Karl had a set of the tools to lend me so I had no excuse.  Using instructions from ifixit.com I was able to get a good feeling for what I was in for.  Opening the case was actually easier than I thought it would be.

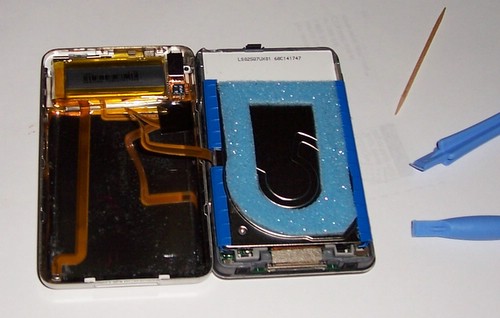
I then detached the battery using a toothpick in place of the “spudger” tool the instructions reference.  Originally I was thinking that maybe I should try to see if there is something funky with the battery not holding a charge, but looking at the ribbon cable I’m not sure how I’d get a multi-meter in there to test it.

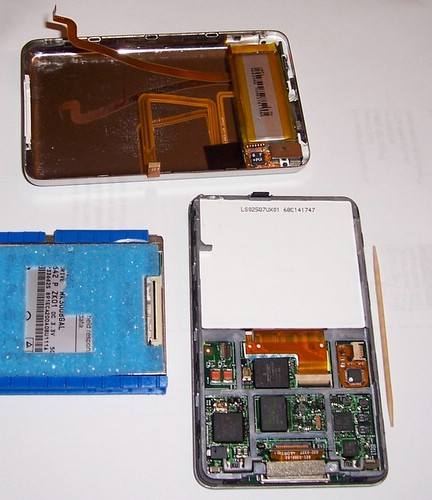
So I detatched the headphone jack ribbon cable, and hard drive to get a good look at things.  Usually if something electronic has failed badly, you can smell the burning components.  In this case, the logic board looked (and smelled) just fine.

I tried plugging the iPod into my PC in various states of “taken apart”.  I wanted to see if my PC would supply power / recognize the device.  Now, I know basically nothing about diagnosing iPods – so it is entirely possible that once you disconnect the battery nothing will work at all.  Either way, nothing seemed happy when I applied power to it – no harm done, but no magic solution here either.

I suppose that I could start probing the logic board to determine if I’m getting power over the USB cable, but I’ve tried the cable on both a USB wall wart, and more than one PC.  It is possible that the cable is busted – so I can try that tomorrow at work with someone elses cable.

At this point I’ve eliminated any obvious problems, and satisfied myself that opening (and reassembling) the iPod isn’t all that hard.  If it is the logic board, then I’m looking at $90 or so.  The Apple store $149 option is starting to look pretty reasonable.

If the 32G touch wasn’t $419 refurbished – then I might be thinking that was the ideal upgrade.  Any other option means I can’t simply carry all of my music with me and I may as well just get a $55 shuffle – or dump the whole iPod thing and get something that is Linux friendly.

Well, more on this later – shout out if you happen to know more about DIY ipod diagnosing.

Adding MythTV to the AspireOne

I have a MythTV based PVR that I setup a while back.  It turned our seldom used StarChoice satellite servce into something pretty useful, if you haven’t made the leap to having a PVR/DVR you owe it to yourself to try one out.  MythTV isn’t for everyone as there is a fair bit of configuration that you need to be able to manage, but there are some nice distros being put together now that make it much easier.

As its based on Linux, my PVR is effectively just another server in the house.  This means that I can do stuff like transcode the video to play on my iPod, or serve it up to other machines on the network.  Aside from the dedicated machine next to the TV, Jenn’s Mac and my Linux desktop both can run the frontend.  Now the AspireOne can too.

The Linpus OS that the AspireOne is running is based on Fedora8.  I’ve previously talked about installing additional software on the machine, so I’ll assume that you’ve done at least that to your machine if you’re trying to replicate this.

A few notes on life with the AspireOne thus far: Its been a fun toy.  The keyboard is small, but not too bad to work with.  I find the left shift key to be a little tricky to hit, but its just something you need to get used to.  When hacking the home screen menus (modifying group-app.xml) – you’ve got to be a little careful as getting something wrong (like missing an icon) can cause the system to get hung up on boot (Alt-F2 to the rescue).  It is a bit eerie working on any laptop with a SSD, as you don’t get the normal grinding drive feedback as to what is taking so long.  With the price dropping on these things, I’m tempted to buy another just to hack on.

On to installing MythTV.  My backend is running 0.20, and upgrading will mean changing all of the existing front ends to match.  Not something I’m keen on doing right now.  Google quickly found me a thread where someone had stashed the 0.20 rpms.  These RPMs turned out to be from ATrpms.net, so I needed to add the signing key.

rpm –import http://ATrpms.net/RPM-GPG-KEY.atrpms

I used the following command to install the downloaded 0.20 mythtv packages:

yum localinstall mythtv-frontend-0.20.2-175.fc8.i386.rpm

The result of this command pointed me at the set of missing dependencies, most of which were the other packages that I had already downloaded based on the thread where I found the 0.20 binaries.  There was one additional package that was not in the others repositories I was already pointed at, this was the libdca.so library, so I grabbed it from ATrpms.

[I suppose that alternatively instead of manually grabbing the various RPMs, I could have just added ATrpms.net to my yum repository list – but they don’t seem to still have the 0.20 version, so for my purposes it seemed like a localinstall was a better solution]

So simply appending the missing dependency RPMs which I had already downloaded locally got me to the point where yum was happy to install MythTV for me.  Once installed I was able to launch it from the XFCE4 menu.  Adding it to the group-app.xml was relatively trivial.

It seems to work well.  The only annoying thing is that if the front end detects no network connection, it falls into the setup sequence.  Since the AspireOne seems to be fairly slow to connect to the wifi network, this means you’ve got to be a little patient before launching MythTV.  If anything, I’d say that was my one pet peeve with the AspireOne – the boot time is very fast, but the wifi seems to lag behind – and with a netbook, the whole point is to connect to the network.

Solo 5150 Revived

Well tonight I took that old laptop that had developed sticky keys (a Gateway Solo 5150) and took it apart (again) to see if I could get it working again.  I disconnected the keyboard and cleaned the connectors which were quite dirty, I’m hopeful this will resolve the issue.  The machine seems quite happy now, but I’ll give it a few days before claiming total success.

The last time I had the machine apart and had pulled the keyboard out, I didn’t really manage to get it to fit back in properly.  Tonight I found some instructions that explained what I had done wrong.

The trick is documented on the Gateway site too.  The keyboard has these very small sliders that lock the bottom half of the keyboard in place (there are 5 in total).  The top is held in by some fixed tabs which are pretty obvious if you’ve got the keyboard out as I had.

Now of course, the AspireOne is still a lot more computer than this old clunky laptop, so it is unlikely we’ll use it very much at this point.  I still get a kick out of breathing life (and some amount of useful functionality) back into this old laptop.