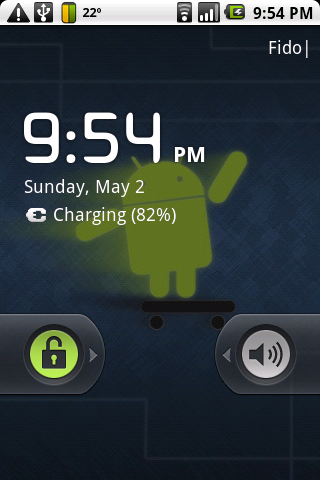
 Thanks to the hard work by the Android hacking community CyanogenMod 5.0.7-test1 is now available for the G1. My phone was already running CyanogenMod (CM 4.2.115.1) thus there wasn’t any need to root the device, but I did need to upgrade the SPL.
The CyanogenMod wiki has instructions that cover exactly what I wanted to accomplish: install DangerSPL and upgrade to the experimental CM 5.0.7-DS-test1. I’ll walk through the instructions I followed with some notes. With any type of firmware modification you’re clearly going to void any warranty you may have, and it is recommended to read through the whole procedure at least once before starting.
The prerequisites are: Rooted G1 (check) and a compatible radio (mine was 2.22.19.26I). You’ll need to download 3 files: DangerSPL, GoogleApps, and the new Firmware. Connect your phone via USB and place these files on the root of the SD Card.
You also need a recovery image. Mine is CyanogenMod 1.4 + JF, but Amon_ra is supposed to work as well. To verify you have a recovery image that is compatible, reboot your phone and hold down the home key – this will boot the recovery image.
To check that you are NOT already running the DangerSPL, enter fastboot mode. Reboot the phone while holding down the camera button. You’ll see something like:
DREA100 PVT 32B

HBOOT-0.95.3000

CPLD-4

RADIO-2.22.19.26I
The DangerSPL will have HBOOT-1.33.2005. To exit fastboot mode, press call (green), menu, and power (red).
Allow me to stress – these instructions are all on the CyanogenMod wiki – reproduced here only to allow me to comment, all credit goes to the CyanogenMod crew.
1) Verify that you meet BOTH the prerequisites (G1/Dream & Radio)
If you don’t know if you’re phone is rooted, then it probably isn’t. Try google for some help. To check the radio version look at Menu->Settings->About phone->Baseband version, the radio version is the 2nd part of the version info. Or reboot into fastboot mode to check the radio version.
2) Copy DangerSpl (spl-signed.zip), CM 5.0.x, and gapps-ds-ERE36B (& Ebi1 port if required) to the root of your sdcard. Reboot into Recovery (CM Recovery or Amon_ra Recovery both work)
The Ebi1 port is for 32a phones. Again I’ll refer to the fastboot screen indicating we’re are a 32b phone.
3) To reboot into Recovery, restart your phone and hold down the ‘home’ key before the G1 splash appears.
4) Make a Nandroid Backup (ext not required)
Steps 3 and 4 are pretty self explanatory.
5) Flash DangerSpl (spl-signed.zip). It will install and then ask you to reboot to finish the installation, so reboot. It will then finish installing and reboot into recovery so you can flash your ROM.
This is the “scary part”. The DangerSPL originated as Haykuro SPL, this modified SPL takes away some of the /cache and allocates it to /system and /data – effectively allowing for lager ROMs. You shouldn’t have to do this step again, once you have the modified SPL you’re good to go for ROM changes later.
6) Flash CM 5.0.x THEN gapps-ds-ERE36B (& Ebi1 port if required); then reboot (Boot may take longer than normal) DO NOT reboot between flashing ROMs!
This is the actual installation of the CM 5.0.7-test1 firmware. The google apps portion is split off to avoid copyright issues for the CyanogenMod crew (in theory you should really be extracting the google apps from your existing device..)
That’s basically it. I was a bit surprised that all of my settings made it across to the other side.
For anyone upgrading, I’d suggest you also review the normal upgrade link. If you read that page you will find the comforting note:
Note: G1 users need to have DangerSPL, the instructions there will leave you with CM 5.0.x installed, no need to follow these instructions after (unless you nandroid restore).
You may also want to review the troubleshooting section of that same page.
I happened to have the Dalvik Debug Monitor (ddms) running to capture some screenshots. It turned out to be quite useful as the 1st boot cycle is very long.
Issues so far
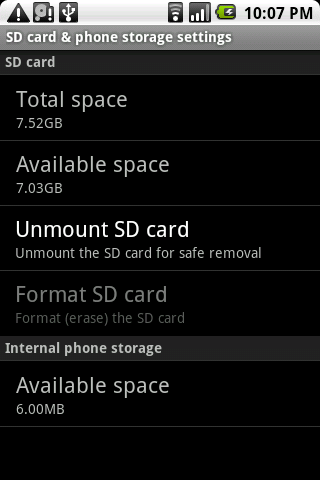
I had a fair number of apps installed, and once I had the DangerSPL and the new firmware installed, I immediately starting getting low on space warnings. With only 6MB free, I was having trouble starting some applications (GTalk).
The solution was to enable apps2sd. The easiest way for me to do this was to unmount the SD card and use my Ubuntu desktop to repartition it with GParted. Since GParted allows for partition resizing, it was trivial to add a new ext4 partition on the end of the card.
Now you’re not done yet. Once you put the card back and rebooted, you want to modify the setting that tells the system where to put newly downloaded apps (on the SD card). Menu->Settings->Applications->Apps2SD. Now for each installed application we need to toggle it to the SD card as well if we want to clear out some of the internal memory. First head to: Menu->Settings->Applications->Manage applications, then select each application and use the Move button to change it’s storage location.
There are some rough edges. Some of the stock apps (Gallery) I had linked on my home screen. The gallery didn’t work, until I erased the short-cut and dragged a new copy out. Wow – the gallery is one of the most improved areas I’ve noticed so far.
You do need to fix your Sync settings. Go to: Menu->Settings->Accounts & sync settings, click on your account and adjust the sync settings. Most of them seemed to be disabled by default.
Initially I thought: wow – this is way faster. After a while I either got used to the improved performance, or it isn’t really that much faster. The 2.1 features are very nice to have. I’ve also moved from Twidroid to the official Twitter client which is only available on 2.1.
Bugs:
Text messaging is sort of busted.
Poor battery life (workaround and also fixed in test2)
There are other issues too, but it is pretty remarkable how usable this is for an experimental version. For more details go visit the forum.
 This may be old news for many, and a couple of quick web searches show plenty of good advice on this matter. Still, I thought it was very cool when I actually tried it out so I thought I’d write it up.


