OTA HDTV in Ottawa


I’m always a little amazed at how much people pay monthly for TV service. We ran for years with no TV at all, and all the money we “saved” I easily spent on DVDs (and more I’m sure). Several year ago we decided that some amount of TV wasn’t a bad thing, it also gave me a great excuse to build a PVR based on MythTV. After shopping around StarChoice (now ShawDirect) seemed like the right fit. The basic package was cost effective and gave us enough TV. I liked the fact that we got HDTV in the base package, and that meant high definition hockey games and special events like the Olympics.

ShawDirect has a great policy (pdf) that lets you schedule seasonal breaks in service. I’ve been using one of those to try out using over the air (OTA) TV as our only source. We haven’t really noticed the lack of TV, even through the Stanley Cup finals (but our team wasn’t in it).

To move to OTA I needed two things: 1) a PC capture device for HDTV and 2) a set top box to convert the signal for use with my projector. The PC side of things came along as a deal from Dell – the Hauppauge WinTV HVR-950Q was on sale one day ($54.99). This came along with a tiny little antenna which surprisingly pulled several stations. The projector has no HDTV tuner (unlike most HDTV flat panel sets) and so it was off to eBay to get a set top box. This was the first time I had used the “Make an Offer” option on eBay and I was quite pleased with the price we negotiated. The tv tuner is known by several different brands: Centronics ZAT 502 HD / RTC DTA1100HD / Digiwave DTV5000HD.

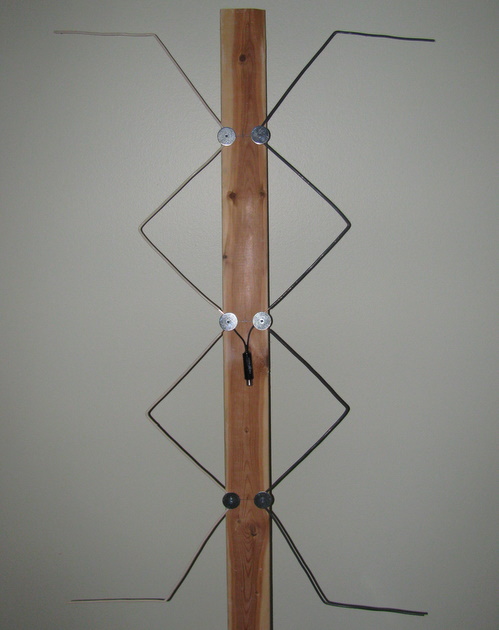
On the 2nd floor of the house I could easily pull in CBC to watch hockey using the dinky little antenna that came with the 950Q. To route the signal to the projector I needed to get a little creative and pull some RG6 from the attic to the basement, the MythTV box is also downstairs. In many situations almost anything will work as an antenna, and the simple bow-tie version I built with mostly stuff I had around already is pretty close to that.

My build was inspired by a write up I found using simple materials, the antenna I built is a Gray-Hoverman. I used a scrap of 1×3, some 14 gauge (2 conductor #14) electrical wire, some screws and fender washers. The only part I needed was a matching transformer. You can see the end result in the picture at the top of this post.

I have this antenna attic mounted, with 100ft of cable between it and the tv tuner. It works well, pulling in 5 HDTV stations all with little to no drop outs. I’d like to try to get PBS HD, but that may require a bigger antenna or an amplifier (a project for later).

Continue reading “OTA HDTV in Ottawa”

HP Color Laser Printer (CP1518NI) Refill

We print at home fairly infrequently, this meant that our inkjet printer ink cartridges were often gummed up or not working right when we did want to print. Moving to a laser printer was a good move, and the Samsung ML-2010 served us well, and was relatively easy to refill. The ability to refill the toner was one of my pre-requisites for a color laser printer – enter the HP CP1518ni, a reasonable cost but refill friendly printer.

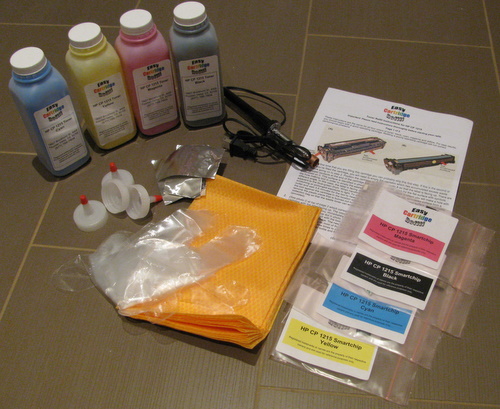
It took about a year to drain the toner down to the level where it needed a refill. So it was off to eBay to look for a deal. In 2009, refill kits were available and were about $100 for all four colors. By 2011 the price had dropped to $50 for all four colors, including reset chips and the cutting tool. I bought mine from easycartridgerefill and had a good buying experience. At the top of this post is a picture of everything that was shipped in the box: toner, cutting tool, instructions, funnel tips, sealing tape, gloves, microfiber cloth, and reset chips.

Step 1RTFM. The instructions are 2 pages of fairly detailed instructions. Having refilled toner before I just skimmed them, that was a mistake. The photo above you can see I’ve used the hole cutting tool on the wrong part of the cartridge.

Step 2 – We need to use the hole cutting tool to make a hole in the correct part of the cartridge (see below). For your first refill you only need one hole, the instructions cover a 2nd area to make a hole if you need to empty the ‘wastebin’ – as this was the 1st time I was doing a refill I skipped that part having already made enough extra holes.

Step 3 – Empty the toner cartridge prior to refilling. The instructions warn that mixing old toner with new is likely to result in less optimal results.

Step 4Fill using the new toner. If you look at the picture of the yellow toner bottle, you can see quite clearly that it is no where near close to full. This picture was taken before I used any toner, the bottles are quite over-sized. You may need to gently swirl the bottle around to loosen the toner prior to trying to pour it. Use the entire bottle, this may take some effort and patience.

Step 5 – Seal the hole with the provided tape. The tape provided was simply metallic duct work tape that you can get at HomeDepot. Toner is a very, very fine dust – it will leak out any tiny hole or gap.

Step 6 – Now we need to swap the tiny chip that provides status on the cartridge to the printer. Sadly, this chip also prevents the printer from continuing to use a toner cartridge after you’ve passed the estimated number of pages. The original chip is pictured on the left, and the refill (reset) chip on the right. The chip swap is very easy.

That’s it, we’re done – install your newly filled cartridge and start printing.

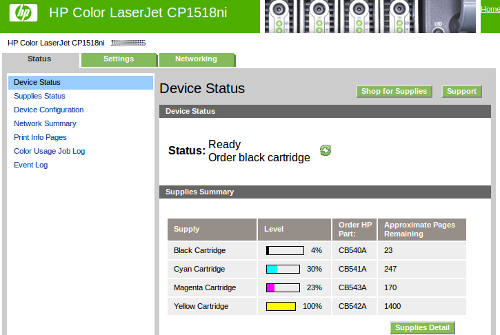
A quick visit to the web-ui shows a full yellow cartridge with 1400 page capacity.

There are some folk who apparently run the toner down to nothing by buying new reset chips only and swapping those until they are low on toner. This could save you a little money in the long run – but at $50 for a full refill kit it is hard to argue that you need to be that frugal. Sadly, the reset chips are not reusable.

I had a few mishaps on the way to complete success..

Continue reading “HP Color Laser Printer (CP1518NI) Refill”

iPhone 3G with 4.2.1 – jailbreak and unlock

Wow – where did the month of June go? I’ve kept busy, but haven’t been very good about posting to the blog – I’ll try to get back to my once a week posts.

Recently my Dad rediscovered my blog and found the iPhone 3G with 3.1.2 post. He also has an older Rogers iPhone 3G and wanted some help unlocking it for use with any carrier, especially for use in the States.

He had upgraded the iPhone 3G to 4.2.1. This came along with the baseband (modem) version 05.15.04. I believe that 4.2.1 is the most current version of iOS that can be run on this generation of the hardware, and from what I’ve been told many feel that 3.1.3 is better performing but will prevent you from running some of the more recent applications that require newer features.

One of the problems with 4.2.1 is that while it can be jailbroken, it doesn’t have an unlock due to the baseband (modem) version. So my first thought was – why not just put the phone into DFU mode, and install 3.1.3 on it?

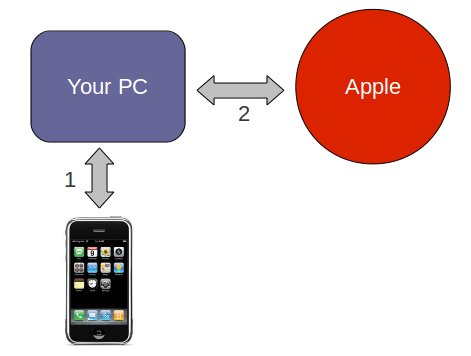
This is where I ran into the first problem. The firmware installed just fine, but we then got a 1015 error. There are two steps that happen when you’re installing a new firmware on your iPhone. (1) The firmware is installed (2) your PC calls home to Apple to verify the firmware.  There is a good write-up on this by Jay Freeman (saurik) that goes into details (read up on the signature server).

At this point I allowed iTunes to just restore back to 4.2.1 to get the phone back into a working state. Still not deterred, I figured there had to be a way to solve this problem. There is probably more than one solution, but I’ll focus on the one I used: it turns out that you can downgrade your baseband (modem) in 4.2.1 IF you have the right bootloader (5.08).

I used tiny-umbrella to check the bootloader version, I puzzled a bit over the information it was providing until I realized the bootloader version was tacked onto the end of the modem version. This is actually not a required step as the downgrade process will check for the correct bootloader anyways.

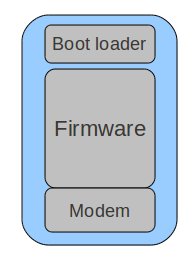
On the right is my conceptual model (potentially incorrect) of how the iPhone lays things out. There is the bootloader which is a little bit of code that runs when the phone is powered on. It knows enough to help recover if things are in a very bad state and there appears to be no firmware – or we’re in DFU mode. Breaking the bootloader would be a very bad thing.

The firmware and modem (or baseband) are bundled together for distribution, but occupy unique areas in memory and are installed somewhat independently. There are a number of hacks which allow you to prevent the modem from being upgraded (allowing for unlocking to still work).

My understanding of iPhone unlocking is that most of the unlocks are software tweaks to the modem. This is not a true unlock, but a patch that is run each time the phone is booted (or possibly more often). The reason you need to jailbreak your device in order to unlock, is you need to run some unsigned code to unlock the phone. No jailbreak, no unlock.

So, assuming you’ve got the 5.08 bootloader the steps are:

  1. Jailbreak 4.2.1 with redsnow (the latest)
  2. Launch Cydia and install FuzzyBand
  3. Modify FuzzyBand with a new ‘cert’ (download ICE2-05.15.04.cert)
  4. Run FuzzyBand to downgrade the modem/baseband
  5. Install ultrasn0w via Cydia

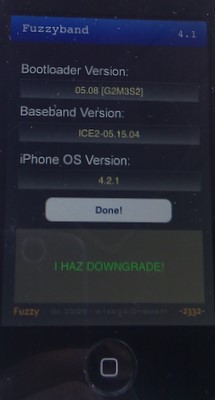
That’s it. At the end of step 4 you’ll see the “I HAZ DOWNGRADE!” as pictured at the top of this post.

I find it a bit odd that FuzzyBand in Cydia needs to be modified with an additional ‘cert’ file to identify the 05.15.04 modem/baseband. I used a trial version of DiskAid as I was using a Mac. The modification is simply reaching into the FuzzyBand application installed on your iPhone using DiskAid and adding the cert file to it, very easy. If you don’t modify FuzzyBand, it will refuse to downgrade the 05.14.04 modem, it also appears to check that you’ve got the right bootloader (I did) – so it tries fairly hard to be helpful.

Now that your phone is jailbroken and unlocked, sync it to iTunes to recover all of your apps an files. Do not upgrade the firmware again – or you will be back to square one (or worse, possibly locked out). Also consider capturing your SHSH blob.