WordPress migration

I’ve been slowly working on upgrading the server that hosts this website (along with other things such as email, news reader, backups, etc). I started a hard for me to believe 3 years ago. Somewhere along the way I experienced some sort of issue with the ASUS motherboard and after a few attempts to get it fixed via the RMA process, I ended up moving to a Gigabyte based motherboard. I’ve even done a hard drive swap since I started the upgrade process.

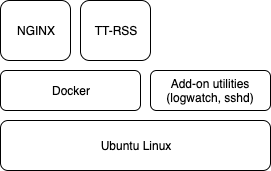
I started with a basic Linux install, layered on some useful system utilities and most importantly docker. Most of this is covered in the rebuild post. After that, I try to manage all of the “services” I want to run in containers. I’m cheating a bit and the containers are fairly monolithic, but this is fine for my needs as I’m primarily using containers as a way of managing the software versions vs. trying to build a scalable collection of micro-services.

When I initially started, I figured that I’d use the wordpress container. Now, as I run several wordpress based sites from lowtek, I was just going to run multiple containers and front it all with nginx to distribute the traffic, with of course nginx in a container too.

Along the way trying to get this setup to work, I learned a few valuable lessons about docker networking. The short version of this is if you want docker containers to be able to easily work with each other, create a docker user defined bridge network and make sure all of the containers you want to talk between each other are attached to that network. Now container A can talk to container B using the container name as the local DNS name and things just work.

WordPress generally doesn’t talk https, it’s really just http. This didn’t seem like a problem because nginx is pretty easy to setup with https and let’s encrypt to provide an always secure connection. Unfortunately since wordpress is running as a container itself, it doesn’t really know that it’s setup in a sub-directory nor that the correct URL for it is https. There are simple hacks you can do to the wp-config.php file to make this work, and I did finally succeed in getting all the bits happy. However, when I looked back at what I’d created – it didn’t make sense for the complexity I was dealing with. My nginx needed to reverse proxy to the wordpress containers. Each wordpress install needed extra magic to make it aware of where it was really running, and upgrades to wordpress were wonky because upgrading the container doesn’t really upgrade a running install (the files on disk are what matter).

So I bailed, and just installed wordpress into my nginx deployment. This was pretty straight forward. I added a MySQL container to host the data store for wordpress and everything fell together nicely. I just did a backup of the database on my old server, and an import on the new one.

Nginx makes it very easy to run a full https website. The linuxserver.io project has a well maintained image that includes let’s encrypt and everything I wanted. Unfortunately many links were to http:// – including images. Chrome, and I assume other browsers will follow, is starting to become more strict about mixed content pages. Also, Google search results tend to favour secured sites over non.

I found a good post that covered moving wordpress to a new URL, which is sort of what I want to do. I’m moving from http://lowtek.ca/roo to https://lowtek.ca/roo.

The key commands are:

This feels pretty scary, so two things. (1) I want to back up my database, and (2) I’d like to see what it is I’m about to replace.

Backup is actually really easy (this is why containers are cool).

To keep things a bit more brief, I’ll lay out the steps I took to success for the second part.

This only took care of one set of the links. I needed to also do post_content in wp_posts and meta_value in wp_postmeta. Reviewing my blog postings, nearly all of the posts/pages are now fully https with no warnings from Chrome about mixed content.

There were a few standouts. A couple of Creative Commons images I’d linked to needed to get fixed to use https. During the trip down memory lane I found a few busted posts due to images I’d linked which were no longer hosted at that location. I also came across the sad fact that some of my friends who used to host stuff, have let those expire or have changed it significantly enough the information I was linking to doesn’t really exist anymore.

This got me thinking about the state of the web today, and the fact that social media sites have taken over the websites people used to maintain themselves. It’s great to be able to easily communicate with friends and others via things like Twitter, Facebook or Instagram but it’s also unfortunate that there is a lack of diversity in how people are expressing themselves. There is also a lot less control you have over the information once you give it to one of these platforms to host for you. Maybe we’ll see the pendulum swing back a little.

Google Pixel XL

On average I upgrade my phone every 18 months. Sometimes I’ll hang onto a phone for 2 years, and other times it’s much less than that. My most recent phone I used for about 2 years – the Motorola X Play. It was a great fit for me, huge battery, headphone jack, SD card support for more storage and the camera was pretty good. I have for many years bought used phones, avoiding the high prices for new devices and still enjoying a regular flow of great hardware. The Moto X Play was great, it did everything I needed and I really didn’t have a strong urge to upgrade.

Buying used phones, means I’ve always got my eye on the used market. I’ve usually scoped out the set of possible phones I’d consider owning and watch for the street prices to drop under $200, my personal sweet spot for buying a phone. I think it was near the end of last year that the original Google Pixel started to dip into that range locally, and I got a recently refurbished from Google version from someone for a great price. This phone went to Jenn, who had been struggling a little with her Moto X Play and I knew she wanted a better camera.

This of course started me on the slippery slope of wanting a Pixel for myself. Still, prices were fairly high and the Moto X Play did everything I needed. The one thing that the Motorola didn’t have was a fingerprint reader, and this is a nice feature to have as my work apps require long passwords OR biometric access. When I wear my tinfoil hat, I’m not a big fan of fingerprint access – too easy to fool and impossible to change once you’ve run out of fingers and toes. On the other hand, accessing my phone is super fast and easy with a fingerprint vs. typing a really long password in every time.

Then I spotted a Pixel XL with 128GB of storage, but a cracked back glass. They were asking more than I was willing to pay, but the darn listing sat there for a couple of days and ate away at me. I offered quite a bit less than asking to knock it down below my $200 ceiling – it was a bit of a low ball price, but fair enough considering the damage to the phone, and I wasn’t willing to pay more than that.

Wouldn’t you know it, they accepted my offer. I almost walked away from this deal too, because the first time I was supposed to meet up to buy it – they had a schedule mix up and were a no show. That’s usually a sign to say that something isn’t right and it’s a bad deal. They were very apologetic, and I decided to meet up a couple of hours later – where they apologized again, included a nice craft chocolate bar, and knocked another $10 off the price! I have walked away from a couple of used sales where things didn’t feel right, but in this case aside from a schedule mess up there wasn’t anything off about this deal.

Recently Woot featured the same phone for $250 USD, now they are ‘brand new’ condition and come with a warranty, but I still think I’m laughing all the way to the bank with my find. Considering when the Pixel was first launched it was north of $1000, the depreciation as always has been harsh. While my used model may not have ‘like new’ battery life, I still get a solid day out of it.

The camera continues to be amazing, and 4GB of RAM makes a huge difference over the 2GB I had before. I also really like the AMOLED screens, which was one of the attractions to the Samsung Galaxy phones.

Of course, even though the Pixel has the latest version of Android on it (Pie) and looks like it may even get the next one, I went with a LineageOS build, I’ll have to write up that process later as it was a journey. On cold boot I get a pre-boot screen telling me dire things will happen because my boot loader is unlocked, but I can live with that.

It’s been over 9 weeks since I switched over to the Pixel, and I’m still in the honeymoon phase with it. I keep telling myself that I should really fix the back glass, but I’m not sure I’ll ever get to it.

Ubuntu 16.04 to 18.04 rebuild with new SSD

Way back in late 2016 I started building a new server to replace my aging server that runs this website, email, etc. I’m still slowly working towards actually swapping all of the services I run to the new hardware, a process slowed by the fact that I’m trying to refactor everything to be container based – and that I simply don’t seem to have a lot of free time to hack on these things. This has been complicated by the original motherboard failing to work, and my desire to upgrade the SSD to a larger one.

Originally I had a 60GB SSD, which I got at a great price (about $60 if I recall). Today SSD prices have fallen through the floor, making it seem sensible to start building 1TB raid arrays out of (highly reliable) SSDs. A little before Christmas I picked up a 120GB Kingston SSD for around $30. Clearly it was time to do an upgrade.

Back in 2016, the right choice was Ubuntu 16.04, in 2019 the right version is 18.04 LTS. Now while I haven’t moved all the services I need to the new server (in fact, I’ve moved very few) — there are some services which do run on the new server and my infrastructure does rely on them. This means that I want to minimize the downtime of the new server, while still achieving a full clean install.

Taking the server offline for ‘hours’ seemed like a bad idea, however since my desktop is a similar enough machine to the new server hardware it seemed like a good idea to use it to build the new OS on the new SSD. In fact, my bright idea was to do the install with the new SSD inside of a USB enclosure.

Things went smoothly, download 18.04.02, create a bootable USB stick, put SSD into a drive enclosure, boot with USB stick and do an install to the external SSD. Initially I picked a single snap, the docker stuff – I later changed my mind about this and re-did the install. The shell/curses based installer was new to me – but easy to use. The only option I picked was to pre-install OpenSSH server because of course I want one of those.

Attempting to boot from the newly installed SSD just didn’t work. It was hanging my hardware just after POST. This was very weird. Removing the SSD from the enclosure and doing a direct SATA connection worked fine – and it proved that the install was good to go.

For the next part, I’m using my old OS setup post as a reference.

Either 18.04.02 is recent enough, or the install has changed – but I didn’t need to do

since doing the above made no changes to the system as installed. Still, it doesn’t hurt to make sure you are current.

Of course, we still want fail2ban

I didn’t create a new SSH key, but copied in the keys from the old system. I did need to create the .ssh directory.

Once you’ve copied in the id_rsa files, don’t forget to create the authorized_keys file

It’s a good idea now to verify that we can access the machine via ssh. Once we know we can, let’s go make ssh more secure by blocking password based authentication. The password is still useful to have for physical (console) logins.

Let’s also setup a firewall (ufw)

Now as we will almost exclusively be using docker to host things, docker will be managing the iptables for us in parallel to ufw. So strictly speaking we don’t need 80 or 443 enabled because docker will do that when we need to. I did also discover that ufw has comments you can add to each rule – making a nice way to know why you opened (or closed) a port.

Staying on the security topic, let’s install logwatch. This requires a mail system – and as we don’t want postfix because that will interfere with the plan to put email in a docker container.. we are going to use nullmailer setup to send email to our mail server (hosted on the old server until we migrate).

Don’t forget to configure logwatch to email us daily

For docker we’re going to hook up to the docker.com repositories and install the CE version. To do this we need some additional support added to our base install.

We can now install docker.

I also like to be able to run docker as ‘me’ vs needing to sudo for every command

Don’t forget that you need to logout/login to have your shell environment pick up the permissions to do this.

A few more annoyances we’re going to address. Needing my password to sudo is inconvenient. I’m willing to trade off some security for making this more convenient – however, be aware we are making a trade-off here.

Don’t be me, either use visudo to verify that you’re modifying /etc/sudoers correctly. Making your user is easy, just add to the end of the file.

Another minor nit is while I was asked in the install to give a machine name, the /etc/hosts file didn’t get the name added as expected. Just adding it (machineName) to the end of the 1st line will fix things.

Things are almost perfect, but we haven’t setup automatic updates yet.

Then configure the unattended upgrades

Next is ensuring that the unattended upgrades get run, modify the file: /etc/apt/apt.conf.d/20auto-upgrades to look like below

We can test this using a dry-run

I did discover an interesting problem with docker and shutdowns. The automatic reboot will use shutdown to initiate a reboot in the middle of the night. When this happens you can cancel the shutdown, but this seems to cause docker with a –restart policy to not restart things.

It does appear that if you allow the shutdown to happen (ie: do not cancel it), then the docker containers do restart as expected.

I can’t really explain the shutdown and docker interaction issue. Nor the install of Ubuntu onto an external drive, and then that drive causing the machine to fail to POST properly.

Edit

Adding 3rd party repository to unattended-upgrade. Since I elected to pull docker from docker.com vs. the package provided via Ubuntu, I want to also have that repository be part of the automatic upgrades.

I first found this post which provides a path to figuring it out, but I found a better description which I used to come up with my solution.

This gives us the two bits of magic we need to add to /etc/apt/apt.conf.d/50unattended-upgrades – so we modify the Allowed-Origins section to look like:

Again, we can test that things are cool with

This will ensure that docker updates get applied automatically.