This is something I actually did back in February when we moved our computer room to make room for our new arrival. This is one of those DIY tasks that doesn’t take very long to do (a couple of hours tops), but you can put it off for ages (sort of like writing this post). Anyone dealing with a rats nest of cables behind / below their desk, maybe this will serve as a kick in the pants to do something about it.
The LifeHacker article inspired me, but clearly not enough to quickly leap on the idea and deal with my mess of cables. They actually have a whole category dedicated to cable management which is worth a browse if you are looking for ideas. The original concept came from a site which seems to be gone now, but can still be seen via the Way Back Machine.
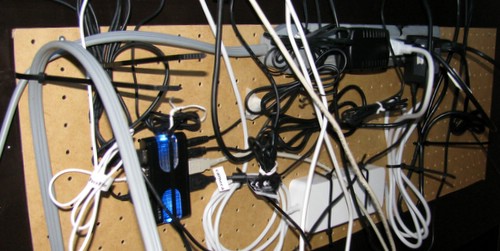
 So pictured above is my version of the peg board cable organizer. I’ve got a 2′ x 4′ peg board mounted on the back of the desk (between the desk and the wall). There are only 2 screws holding the board to the desk (upper left and right corners). I’ve used a couple of washers between the peg board and the desk to give it a bit of room for the cable ties. Everything is zip-tied to the board, power bar included. Since I’ve only got 2 screws at the top, I can bend the board (gently) away from the desk to get easy access to the back side to help route the zip ties.
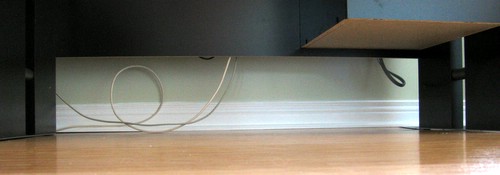
 The view from the front of the desk is what makes this worth doing. No clutter on the floor (ok, an errant ethernet cable and the USB to the printer). Even for my desk (pictured is Jenn’s) – where I need to plug and unplug things like my laptop regularly, this setup works well. I simply mounted the powerbar near the top of the peg board and that places the outlets near enough to the top of the back edge of the desk that its not a problem.
This project only took a couple of hours, it is very functional – and tidy too. What are you waiting for?

I’m trying to figure out the best thing for our remaining cluttered desktop setup right now – looking at the rain gutter thing – http://lifehacker.com/5299994/rain-gutters-as-cable-management-tools – but that doesn’t quite cut the mustard.
The pegboard + cable ties system seems like it would have two problems – a pain in the ass to get new cable ties inserted – how much room is there between the pegboard and whatever is behind it? – and the general pain that is using one-time-use cable ties. That looks like what you’ve used there.
I’m tempted to do this but mod it by cutting slots in the pegboard for velcro ties and then just installing a velcro tie every 4 inches square or so, to avoid those problems, because everything else about this seems pretty good, and would work for our setup.
> how much room is there between the pegboard and whatever is behind it?
Well, as I only used 2 screws to hold the top edge of the peg board – it will swing away from the desk providing plenty of room to get your hands back there to sort out the cable ties. The bigger problem is getting myself behind the desk (the peg board is between the desk and the wall).
As for one-time-use cable ties, I don’t reorganize very often. When I do, the associated foam packing etc, for the new equipment far outweighs a couple of plastic cable ties in terms of waste.
The suggestion to cut slots and use velcro is a good one, if you are willing to go to that effort. I found that the cable ties fit through the peg board holes with just a little effort (no drilling/cutting). A slight modification of your idea would be to use cable ties to secure velcro loops to the peg board. Ease of installation & re-use without any cutting.
You don’t have to use peg board. I used it because it was cheap and had holes for the cable ties. If you are going the velcro route – maybe there is some other material you could use as the backing?
ah yes, using pegboard and cable-tying velcro strips would be easier. You could basically put cable ties in every single pair of holes, and then slip the velcro around those as needed. sounding better.
I’d likely use pegboard, since you mentioned it, rather than some other surface, just because the holes would already be there for some future hacks anyway. Expanding a peghole hole to accomodate a velcro strip seems like it’d be pretty simple to do with a drill, though I’d experiment first. Might actually be that using the thin velcro strips, which is what I’d use, you could roll them up and insert them THROUGH the peghole holes also, they just wouldn’t be flush against the board.