GL.iNet GL-AR300M16 with OpenWRT 22.03.05

When travelling I usually just deal with the internet situation that is provided, I’ve got wireguard if I want to have ad blocking or reach to my home network. The other day I got looking at travel routers, and while TP-Link has some popular ones, the GL.iNet devices seem to have more flash and RAM for basically the same prices.

The GL.iNet AR300M16 was under $40 on amazon.ca, and it shipped (free) in a few days. Look at it, very tiny and cute – but more powerful than the Netgear WNR3500L that I’ve used in the past. The USB power supply I’m using is larger than the router.

Of course, I selected this device with OpenWRT in mind. While the stock firmware has some really nice features as a travel router – I think I can achieve the same things with plain old OpenWRT. The GL.iNet device family apparently uses an OpenWRT base and customizes it. There are a number of GL.iNet devices documented on the OpenWRT site, but nothing specific for the AR300M16. The AR300M is close, but has a different flash module setup.

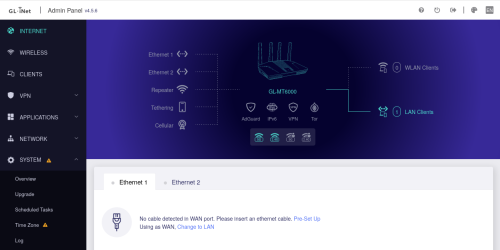
The first thing I did was just connect to the device, both wireless and wired. I knew that the OpenWRT install was going to require a wired only connection so I wanted to make sure that the laptop I was using was going to be able to successfully connect to the stock firmware over wire.

I was impressed at the quality of the user interface. I may have to give the stock firmware a proper try, but first let’s flash OpenWRT to it.

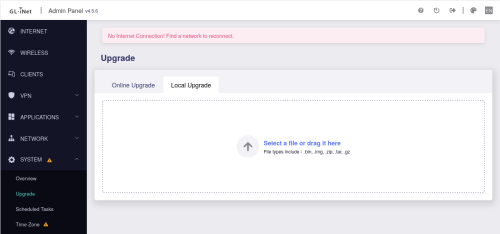
This turns out to be very easy. The stock firmware ‘local’ upgrade process will accept a .bin file. The OpenWRT firmware selector gives us an easy way to find a compatible firmware for the “GL.iNet GL-AR300M16” device.

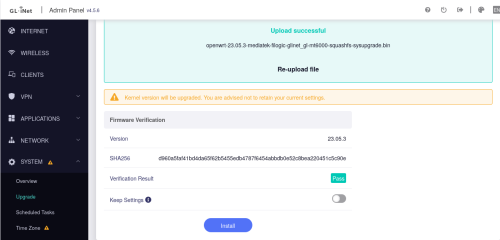
I started with the Kernel image. This is the recommended path for moving from stock as it’s a smaller image. The stock firmware was happy to accept this .bin file as an upload, but warned me that I was treading in dangerous waters.

No problem, I know what I’m doing (so I told myself). Hitting “Install” and off we went. I did made sure that before I flashed the firmware I was using a quality USB power supply that delivered more than 2A of power.

This went smoothly, but the IP address of the router changed from 192.168.8.1 to 192.168.1.1. This is a difference between the stock firmware defaults and the OpenWRT defaults.

I then used the OpenWRT firmware upgrade to flash the sysupgrade image. This went smoothly as well. Now I have a teeny tiny router with OpenWRT installed.

Next I need to figure out how I want to configure this particular device to be my travel router, allowing me to connect my devices to it – and have it use another wifi network as the upstream. Then explore adding some ad blocking and some other nice features.

OpenWRT 21.02 to 22.03 upgrade

Here are my notes on upgrading OpenWRT, they are based on my previous post on upgrading.

In this case I’m upgrading specifically TP-Link Archer C7 v2 – the process will be similar for other OpenWRT devices but it’s always worth reviewing the device page. I’ve also got some v5 versions, and this means a slightly different firmware, but the same exact process.

For a major version upgrade it is worth reading the release notes First start by reading the release notes – nothing seems to be specific to my device that requires any special considerations, so I can just proceed.

An upgrade from OpenWrt 21.02 or 22.03 to OpenWrt 22.03.5 is supported in many cases with the help of the sysupgrade utility which will also attempt to preserve the configuration.

I personally prefer the cli based process, so we’ll be following that documentation.

Step 1. While I do nightly automated backups, I should also just do a web UI based backup – this is mostly for peace of mind

Step 2. Download the correct sysupgrade binary -the easy way to do this is by using the firmware selector tool. I recommend that you take the time to verify the sha256sum of your download, this is rarely an issue but I have experienced bad downloads and it’s hard to debug after the fact.

It is recommend to check you have enough RAM free – thankfully the archer has a lot of RAM (which is used for the /tmp filesystem too) so I have lots of space.

Step 3. Get ready to flash – if you review the post install steps, you’ll see that while the sysupgrade will preserve all of our configuration files – it won’t preserve any of the packages.

This script will print out all of the packages you’ve installed.

Save the list away so you can easily restore things post install. There is a flaw with this script as I’ll point out later, but in many cases it’ll work fine for you.

On my dumb access points I get this list of packages

Mostly I have the prometheus exporter (for metrics) and rsync (for backups) installed. My main gateway has a few more packages (vnstat and sqm) but it’s similar.

Step 4. Time to flash. Place the firmware you downloaded onto the openwrt router in /tmp and run sysupgrade.

This is a bit scary — because you lose your ssh connection as part of the upgrade.  It took about a minute and a half of radio silence before the device came back.  However, I was then greeted with the new web UI – and over ssh I get the 22.03.5 version splash.

Step 5. Check for any package updates – usually I leave things well enough alone, but we just did a full upgrade so it’s worth making sure we are fully current. Note, this may mess with the script in step 3 since the install dates will change for other components.

If you get any packages listed, we can easily upgrade using opkg upgrade <pkg name>

Step 6.  Install packages captured in step 3. Do this by creating a simple script to opkg install <pkg name> for each package.

Post install, take a careful look at the output of the installs, and look for any *-opkg files in /etc/config or /etc. These are config files which conflicted with local changes.

Sometimes you will want to keep your changes – others you’ll want to replace your local copy with the new -opkg file version. Take your time working through this as it will avoid tricky problems to debug later.

When I upgraded my main router, vnstat seems to have been busted in some way. The data file was no longer readable (and it’s backup) – I suspect that some code change caused the format to be incompatible. I had to remove and recreated a new one. Oh well.

Things mostly went smoothly, it took about 30mins per openwrt device and I was going slowly and taking notes. There was one tiny glitch in the upgrade. The /root/.ssh directory was wiped out – I use this to maintain a key based ssh/scp from each of my dumb AP to the main router.

Bonus. I found a new utility: Attended Sysupgrade. This is pretty slick as it makes it very easy to roll minor versions (so 22.03.02 -> 22.03.05 for example) but it will not do a major upgrade (21.03 -> 22.03). I’ve installed this on all of my openwrt devices and will use it to stay current. It takes care of all of the upgrade steps above.. but it does suffer the same ‘glitch’ in that /root/.ssh is wiped out. The other downside is that the custom firmware that is built, breaks the script in step 3 – since the flash install date is the same for all of the components. I’ll need to go refactor that script for my next upgrade.

Brother Colour Laser Printer (HL-L3270CDW)

The HP 1518ni finally became too unreliable and it was time for a replacement, I was surprised to discover we bought it back in 2009 – 14 years is a pretty good run for any bit of technology. I’d done both toner refills, and aftermarket cartridges in that HP printer with fairly good success. If I was willing to toss another $100 towards new toner it probably would have gone on for more time, but far too often it would choke with the size of print jobs being sent from the various systems (32MB of RAM just doesn’t cut it anymore).

I spent a while searching through various options. We’ve recently gotten a subscription to Consumer Reports and I used that as a source to help decide between many options. Some of the multi-function printer & scanner combinations were pretty attractive. Initially I had 3 choices I was looking at in detail.

  1. Brother MFC-L3770CDW Printer – $599.99 – OEM and 3rd party toner options.
  2. Canon Color imageCLASS MF743Cdw Printer – $649.00 – OEM and 3rd party toner options.
  3. Epson EcoTank ET-2850 Printer – $399.99 – InkJet, but without the small cartridge problem.

The cost of the multi-function laser helped reduce my enthusiasm for them. The physical size of the units would have also been a challenge for the space I had currently for the printer. The InkJet option was something I seriously looked at, but after seeing an in-law’s regular InkJet printout, I immediately noticed the crispness difference relative to laser on text printing. Any of these three would be good choices, well reviewed and very capable machines.

A few more options I explored.

  1. HP Color Laserjet Pro M255dw – $484.99 – Single function, OEM toner only.
  2. Brother HL-L3270CDW Printer– $399.99 – Single function, OEM and 3rd party toner.
  3. Canon imageCLASS MF642Cdw Colour Laser Printer– $399.99 – Multi-function, OEM and 3rd party toner.

You’ll see that my choices have pivoted to laser printers only, and at a lower overall price point. The HP was eliminated based on price, but also it seems that HP has become very hostile to 3rd party toner. Now it’s not clear if Brother has also adopted a similar posture, there seems to be some evidence they have in newer firmware updates. I didn’t dig too deeply with the Canon, but suspect similar hi-jinks is happening. While I understand that from a product service and support point of view only allowing OEM consumables simplifies things, I wish they’d allow you to override it as an opt-out of support choice vs. forcing you down a path.

It became a bake off between the Brother and the Canon, while they were the same price point they offered different features. I really wanted to like the Canon, despite the Brother having better quality prints as per the reviews. Both appeared to have pretty solid OSX support, where the HP did not. In the end, the physical size of the Canon eliminated it as an option, it simply wouldn’t fit in the cabinet where I keep the printer.

The Brother neatly fits in the same space as the old HP. It had no problem with a wired connection and the web interface came up without any fuss.  From a client perspective, the Macs running OSX and Chromebooks also were able to connect to the printer just fine. So far printing has ‘just worked’ which is the ideal. I was able even to print directly from my Pixel 4a which worked surprisingly well. Having 256MB of RAM and current OS support is a huge uplift in usability.

Looking at firmware updates, I can see that the current latest version is 1.60. My printer status page says that I’m currently on: Main Firmware Version 1.33, Sub1 Firmware Version 1.14. Unless there is a super important reason to upgrade, I’ll not. The security risk is minimal relative to the pain of being blocked from using 3rd party toner. I may still buy OEM toner for the first while, but having the option to use cheaper toner is attractive.