Flour Tortillas

I’m a huge fan of Mexican food and while Fajitas are more Tex-Mex they are still yummy. The Lone Star is a local restaurant that is known for their Fajitas, and for me the shells really stand out. It turns out you can make as good (or arguably better) tortilla shells at home.

I tried several recipes until I came across this one. In all honesty they don’t vary that much, this is very basic cooking. With my thanks to the original authors, I’ll replicate it here with my notes:

3 cups unbleached flour
2 tsp. baking powder
1 tsp.  salt
4-6 Tbsp. vegetable shortening or lard
1 1/4 cups warm water (from the tap)

This should make a dozen tortillas, I often double the recipe and have loads of leftovers for the next day. In the batch I did for the photos I substituted one cup of the flour for whole wheat flour. I prefer just using unbleached flour, but this is a good way to make it a bit healthier. If you’re looking to replicate the Lone Star, make sure you go heavy on the shortening and skip the whole wheat flour.

Mix the dry ingredients in a large bowl. Cut in the shortening. Once this mixture is well mixed, add the water all at once.

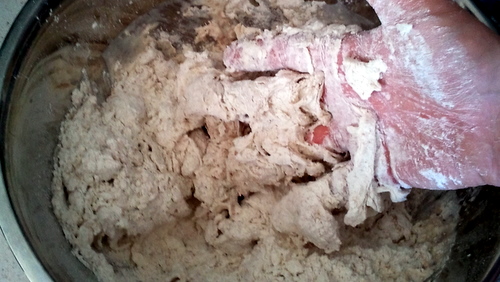
I mix it by hand and consider that one of the secrets to getting this to work well. Overworking the dough mixture will result in them being hard to roll and tougher when you eat them. Initially it should be really sticky, as you work (knead) the dough it will blend more and the stick should mostly go away. Give the dough 10mins or so to rest.

Now’s a good time to put a large frying pan on the stove, you want it to be really hot. Make your 12 balls of dough.

I use a large rolling pin and work directly on our counter tops. You shouldn’t need any additional flour to keep things from sticking, but don’t be afraid to use a little if you’re having trouble. Remember that rolling is a lot like kneading, so you want to avoid over-rolling it but these dough balls need to be smashed paper flat. I find that a little bit of counter stick helps me roll it out. My pattern is roll in one direction, pick it up and flip + rotate 90 degrees and roll the other way. Don’t worry about them being perfectly round, just make sure they are really thin.

It does take a bit of getting used to, but you should be able to roll and cook at the same time. Nearly continuous as it’ll take you almost as much time to roll as it does cook.

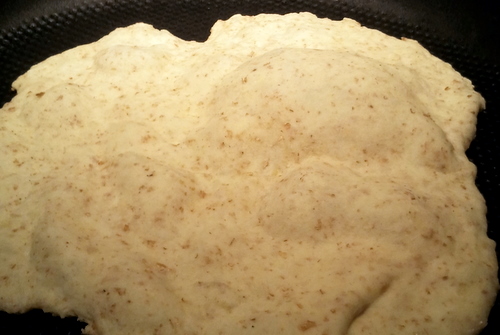
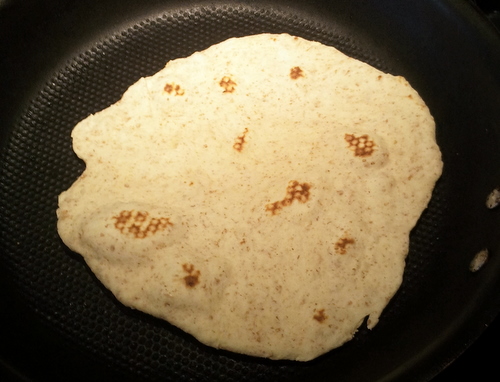
If your tortillas are thin enough, and the pan is hot enough – you’ll be rewarded with bubbles forming in the tortilla after a brief time in the pan. That’s when you want to flip it.

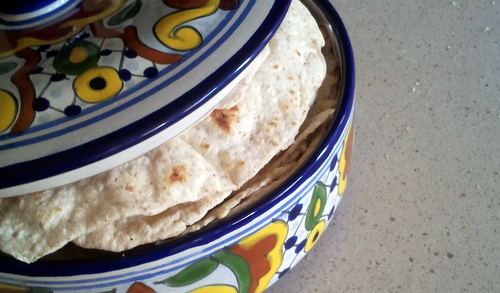
The last photo is a nearly done tortilla. They will be a bit dry and stiff coming out of the pan, we have a tortilla warmer that I stick them into and once they sit covered for a little they get nice and soft. Any covered container will work for this.

It takes some practice to get the pan heat right. I often start with it too cold (I haven’t let it heat up properly) and end with it almost too hot (smoking). The recipe is very forgiving, I often have the kids help and even with that chaos things work. If you’re having trouble getting it to go right, try some brand new flour. I’ve used old flour and bread products in general never seem to work with old flour.

How To: DD-WRT on the Netgear WNR3500L

I’ve been a fan of DD-WRT for some time, a Linksys WRT54GL is the heart of my home network. While I don’t have an immediate need for a new router, I’ve been thinking for some time that I should pick up a reasonable backup in case the WRT54GL fails. There are also some really interesting projects you can do with a modified router, and having a spare will let me tinker with some of those.

I came across a good deal on a refurbished Netgear WNR3500L, it was about half the price of a new unit. This was too tempting: N networking (I don’t really need it, but why not stay current?), gigabit wired networking (a must have), USB port (I wanted this for expansion options), but the feature that really sold me was 64MB RAM and 8MB ROM – more than enough for DD-WRT with all the features.

This particular router is also supported by Tomato another very popular firmware. There is also a somewhat suspect Netgear sponsored open firmware, the site seems to have instructions for installing an older version of Tomato – personally I’d steer clear of this. Unfortunately the other popular router firmware OpenWRT doesn’t currently support this router. Of course, I prefer DD-WRT which does support this router.

One of the reasons that I blog is to have a record of what I did, far too often I end up needing to do something again, or refer back when I’m doing an upgrade. Another reason is to help me get organized to do some of these things – finding the instructions is usually easy, understanding them and what you’re about to do takes some time. I probably spent 2hrs reading through forums and searching various things before I leapt in to flash the router, I strongly recommend you do the same. Also this write-up skips over some of the frustrating head scratching I do when things don’t work, that’s part of the learning process.

There is a v2 of this router, and v2 is NOT supported by DD-WRT. Apparently the boxes they come in are identical, but the router itself has a v2 marking. I did find a wiki that documents the v1 and the v2, I was able to match the FCC numbers listed to confirm I had a v1. For what it’s worth, my stock firmware was V1.0.2.50_31.1.25NA.

The DD-WRT site has some excellent instructions on doing the installation, I’ll avoid repeating those but will document the steps I took. I will repeat some of the cautions from the site:

  • The WNR3500L requires a NEWD-2, K2.6 build of DD-WRT
  • You will first need to upload a special .chk build (also K2.6) of DD-WRT to the router to go from Netgear’s factory firmware. Then you may install a .bin build of DD-WRT.
  • Spend some time browsing the DD-WRT Forums. There’s a lot of chaotic information to ingest.
  • Read the peacock thread.

Before we get started, let’s talk about the 30/30/30 reset. Yes, it’s over the top and very conservative. Weigh those 90 seconds against the potential problems you might run into trying to by rushing through this, sure building a JTAG connector to resurrect a bricked router might be interesting but it’s going to take you a lot more than 90 seconds.

The following steps should not be considered an alternate installation procedure, please use the official DD-WRT instructions – consider this a walk through of the official instructions:

  1. Power on the device. Give it a minute to finish booting, the front panel LEDs should stabilize.
  2. Plug in your linux box, it’ll automatically get an IP address (192.168.1.2)
  3. Perform a 30/30/30 reset
    a) With unit powered on, press and hold the reset button for 30s
    b) Without releasing the reset button, unplug the router, wait 30s
    c) Still holding the reset button, plug the router in and wait 30s
  4. Now wait for the PC to get an IP address assigned to it, this may take a minute or two be patient.
  5. As I’m using Linux Firefox will be the browser of choice
    Connect to 192.168.1.1
    user: admin
    password: password
    (the default user and password)
  6. Since the router isn’t connected to anything except my PC the automatic upgrade process will fail due to no internet connection, that’s fine.
  7. Click on “Router Upgrade” in the menu on the left side.
  8. Choose the .chk file you downloaded as per the DD-WRT site
  9. You will get a warning: “Warning! You are trying to download the firmware which the region is different from the current firmware you had.” – this is ok, continue.
  10. Wait for the upload process to complete.
    Once the upload is done, it will automatically move on to updating settings.
    A minute or so more it will show a DD-WRT screen.
  11. Start a timer for 5 minutes and wait. Yes, likely paranoid as we could have probably started the timer when we started the upload process, but again this isn’t something you really want to rush. Time for coffee.
  12. At this point we’re running DD-WRT, just not the version we want.
  13. Do another 30/30/30 reset
  14. It took my system about 2 minutes to get an IP address (192.168.1.101)
  15. DD-WRT will force us to set a username and password, for now I suggest the same as stock.
  16. Click on the Administration tab, followed by the Firmware Upgrade sub-tab.
  17. I set ‘After flashing, reset to’ ->  “Reset to Default settings”
    Pick the big file you downloaded as per the DD-WRT site.
  18. It will flip to a reset screen once the firmware has been installed
  19. Wait 5 minutes. If you’re really paranoid perform another 30/30/30 reset after that.
  20. Done. Configure your new router.

I primarily use Chrome, but have experienced problems with DD-WRT and Chrome in the past. It turns out this time that FireFox was unable to configure the router (but it did handle the firmware install just fine). Consider this a caution, if you’re having trouble with this process it might be your browser.

Restore Rogers Galaxy Tab 7 to stock

When I got my Galaxy Tab 7″ one of the first things I did was to see if I could collect the stock firmware in a format that was useful in case I ever wanted to restore the tablet back to it’s stock form. It turned out that the 2.2 based firmware was not easily available on the net, and neither was the 2.3 version.

The results of my work are captured in an XDA thread, but restoring from those captures was an exercise left to the reader. The 2.2 (froyo) image is captured directly from the device, I first rooted the tablet with SuperOneClick then used rotobackup to capture a heimdall friendly set of files for flashing. The original work was tracked in another XDA thread where you can read the blow by blow if you’re interested. For 2.3 (gingerbread) I was able to grab the intermediate files from Kies during the normal upgrade process – the rest of this post will talk about how to use those files to restore the P1000R to a stock 2.3 state.

I’m using heimdall version 1.3.1 on Linux, but other versions and platforms should work fine. I particularly like using Linux to flash the GalaxyTab as it doesn’t suffer the same driver madness that Windows seems to have, USB devices just work. I’ll assume you can find the download and extract the files.

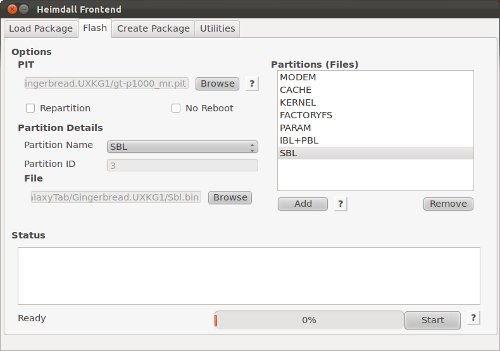
You’ll want to specify the PIT file – gt-p1000_mr.pit, it’s safe to select the repartition box as we’ll be doing the full monty here [sharp eyed readers will notice that the picture at the top of this post doesn’t have the box checked, that’s a mistake on my part – go ahead and check it]. The files map to the heimdall partition names as follows:

MODEM -> modem.bin
CACHE -> cache.rfs
KERNEL -> zImage
FACTORYFS -> factoryfs.rfs
PARAM -> param.lfs
IBL+PBL -> boot.bin
SBL -> sbl.bin

So click on the Add button and specify the partition type and files from the downloaded and extracted ROM.

Next you need to get your device into download mode. My preferred approach is to hold the power+volume down buttons until the download screen appears (yellow triangle with android digging). Now you can click start on heimdall.

Under Linux at least , this will hit 100% and then fail to reboot. That’s ok. Wait a minute or two to make sure it’s really done, then force it to reboot into recovery mode by holding power+volume up until you see the recovery screen.

Assuming the flash has gone well, the stock recovery will start up and automatically try to install some updates. You should see:

-- Updating filesystem...
E:failed to mount /dbdata (Invalid argument)
E:discard_filesystem_for_rfs:Can't mount /dbdata

-- Wiping cache...
Formatting /cache
Cache wipe failed.

Don’t panic. Remember that this update was expecting to have come from a properly installed 2.2 stock, we’re leaping into the middle of the process.

Using the recovery menus, select ‘factory reset + wipe data’ followed by ‘wipe cache’. One hint for those not used to the stock recovery image, the capacitive home button is used to select entries and volume up/down for navigation.

Now you can reboot. The first boot will take a while as it sorts things out and rebuilds the cache(s).  All should go well and you’ll be greeted by the stock home screen.