
Long gone are the days where X10 rules the Smart Home devices space and with ubiquitous WiFi and cheap ESP hardware we’re seeing IoT devices that connect to WiFi. The problem is that almost all of them want to call home and talk to some service in the cloud. Sure you bought the device, but do you really own it?
When I needed a WiFi controlled outlet, I headed off to the Tasmota Supported Devices Repository to determine which one I should buy. Tasmota is one of the options for alternative firmware for ESP devices. This gives you control over the software running on the IoT device, and most importantly the ability to use it without any cloud server that you don’t control. This is still annoyingly difficult, we really need the tech industry to adopt a better way to give people easy to use devices and software without insisting they give up all control.
Buying from Amazon, I didn’t have to wait long to get a cheap WiFi outlet. It is thanks to Michael Steigerwald and his talk “Smart home – Smart hack” that we have a way to over the air update some of the devices running the Tyua firmware. Unfortunately, to my dismay, I discovered that many of the Tuya based devices ship with a newer and more secure firmware preventing this hack from always working.
The tuya-convert project is pretty comprehensive, but still requires a fairly deep technical understanding to pull off. I tried a couple of ways to run the software before giving up and using a RaspberryPi. Once I decided to go with the Pi things were much easier.
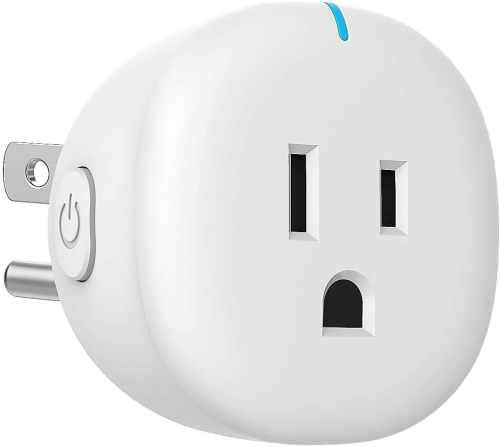
I got lucky as the Moko YX-WS01A appears to ship with old firmware, my next purchase may be more carefully researched. I was very careful to not connect it to the recommended software (smartapp.tyua.com) as that was likely to cause a firmware update. I really didn’t want to have to crack this thing open and hook up to the ESP physically. Maybe the Moko outlets will continue to ship the older, exploitable, firmware – but buyer beware.
Once I had the very basic Tasmota firmware installed, a tasmota_XXXXXX-#### network access point was available (where XXXXXX is a string derived from the device’s MAC address and #### is a number). I can now connect to this access point and configure the device to one of my WiFi networks by opening a browser on 192.168.4.1. Take care, if you mess up the WiFi password you may have trouble recovering the device.
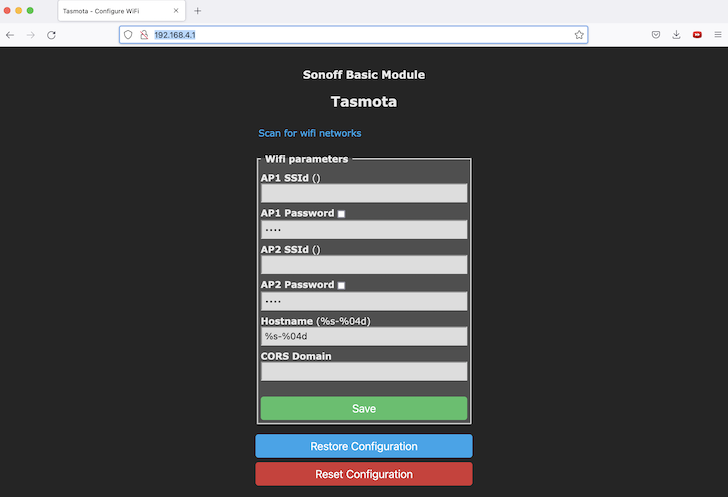
This screen is different than the Tasmota instructions, I suspect this is because the binary provided as part of tuya-convert is stripped down and does not have any specific hardware configured.
Once you configure a connection to a WiFi network, you’ll lose the access point connection, but you will be able to locate the device on the network you connected it to. It will appear with the device name tasmota_XXXXXX-####.
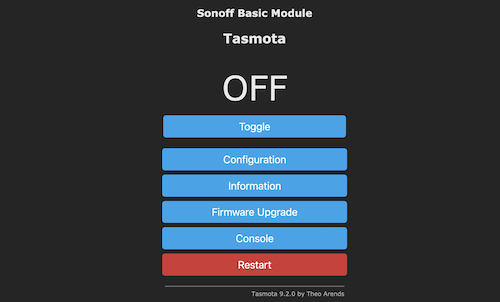
Before we go further, we’ll perform a reset 5 as advised on this page. It may not be needed, but it sounds like a good idea. This is easy to do with the Console provided on the web UI.
We can see that we’re back on version 9.2.0 – so next we’re going to update the firmware. Which firmware should we pick? This page provides a good overview of the various options. There are many ways to perform the upgrade – I’ve elected to download the .gz binary an provide that file to the web UI. I’ve also picked the default and recommended tasmota.bin.gz file. This will update me to version 10.0.0.
The performance of the web UI seemed quite slow, I have to keep reminding myself this is a very basic microcontroller that costs a few dollars. It’s pretty amazing it works. Post firmware upgrade the web performance does seem quite a bit better.
At this point I can hit the Toggle button and see the LED on the outlet turn off an on, but I don’t seem to be triggering the outlet itself. More configuration is needed.
From the web UI, choosing Configure then Configure Module I can see that this is setup as a generic device with only 4 GPIO pins. 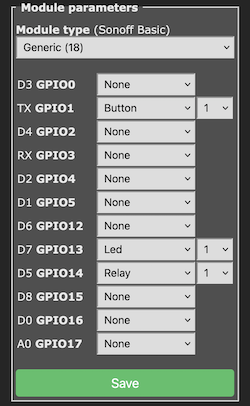 Using this template as a guide, I select
 Generic (18) and set the GPIO pins as indicated. This works great, and I can now toggle the outlet on an off via the Web UI.
A word of warning. Back when the device was acting as an access point – you can only attach one device to it, attempts to connect a second client will fail. I also had some weirdness configuring the module, but I think this was because I had multiple browsers / apps pointed at the one device. Go slow, and do one thing at a time.
As for app based control, there are several Android apps which will bypass the need for a MQTT setup and work directly against the HTTP endpoint. I tried several, but decided for my simple needs Tasmota HomeSwitch was a good match.
Using the app seems to mostly work, but has some latency at times depending where the device is at in terms of responding to the HTTP requests. I notice the same type of latency using the web app, but this represents itself more as slowness to load the page vs. waiting for a button press on the app to take effect.
Bonus – the device appears to persist it’s state (on/off) even if you unplug it from power. This is pretty useful as it means that if there a power failure, it will return to the previous state.
Sure it only supports up to 10A, but wifi control over power and I can keep it entirely on my own network is pretty slick.
This also worked on a dimmer switch https://templates.blakadder.com/topgreener_TGWF500D.html
But did not work on the regular switch I got https://templates.blakadder.com/gosund_SW1.html – I’ll be flashing that one the hard way.