I’ve flipped back and forth between reading physical books and eBooks over the last couple of years. I’m currently in an eBook phase, and it may stick this time. A sale on Kobo let me grab a few I had been meaning to read for next to nothing, now that I’ve bought a few I’m more likely to buy more.
Sometime you want to move some content into a format that can be easily read using one of the eReaders. Let’s consider two scenarios: a) You have a paper copy of something you want to scan and convert, b) there is a web resource that is formatted as pages but isn’t in PDF format. Under Ubuntu I like Simple Scan, it allows you to easily scan multi-page documents. If dealing with a web resource, a full screen browser window and Alt-Print Screen will perform a screen capture allowing you to save a series of pages quickly.
Simple Scan will save multiple scanned pages with filenames (Scanned Document-1.jpg) which sort nicely in order of scan. The screen shot utility uses filenames in the format “Screenshot at YYYY-MM-DD HH:MM:SS.png” so again we have perfect alphabetic sorting in the directory. Having the files in the directory in the correct order will be helpful later on.
Now with both scanning and screen capture there will be elements in the image that we want to crop. As we’re likely dealing with 10’s of pages, we don’t want to have to open GIMP on each of them and edit. Enter ImageMagick – a command line friendly tool for image processing. My screen resolution is 1680×1050 and the screen shots were all 1680×1026 (due to the Ubuntu desktop title bar). The screen shot contained the browser “chrome” as well as portions of the page I didn’t want. Using GIMP I was able to determine the upper left (491×126) and lower right (1170×1026) corners of the image, a little math told me the cropped image size was 679×900. I made a copy of one of the images and called it x.png, this let me experiment to make sure I got it right.
$ convert x.png -crop 679x900+491+126 y.png
Excellent, the resulting y.png file is properly cropped. Now I want to convert all of the files in the directory, and in fact I want to mutate them in place. It turns out mogrify is the the solution:
$ mogrify -crop 679x900+491+126 *.png
This will modify all of the images “in place” in the directory I’m using. For scanned images we have pretty much the same process yet the cropping dimensions will be different.
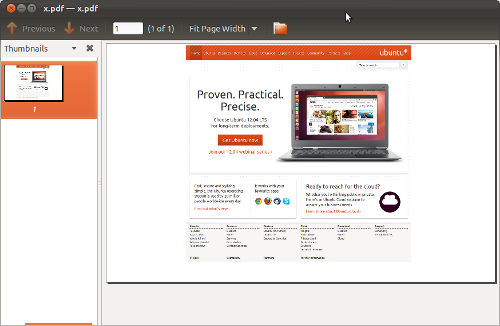
At this point I jumped the gun and converted all of the files in the directory into a pdf. Here is a screen capture of the PDF viewer showing a simple example to demonstrate the problem:
So while the cropped .png displays properly with no whitespace around it, the PDF clearly has additional whitespace. The ImageMagick identify utility helps explain what’s wrong here:
$ identify Screenshot\ at\ 2012-05-29\ 20\:26\:25.png

Screenshot at 2012-05-29 20:26:25.png PNG 679x900 1680x1026+491+126 8-bit DirectClass 1.263MB 0.050u 0:00.050
Ah, so the image still has the original size, but it’s been cropped to the corrected size. It turns out I want to apply an additional processing step to the images, +repage (to completely remove/reset the virtual canvas meta-data from the images)
$ mogrify +repage *.png
$ identify Screenshot\ at\ 2012-05-29\ 20\:26\:25.png

Screenshot at 2012-05-29 20:26:25.png PNG 679x900 679x900+0+0 8-bit DirectClass 1.263MB 0.050u 0:00.050
Now I’m ready to create a PDF file:
$ convert *.png book.pdf
This works like a charm because my files are in the correct order. The resulting PDF size is a little bit bigger than the sum of the individual image files. I did explore ways to reduce this, but all of them resulted in lower quality images in the PDF and that impacted readability.


More recently I’ve been scanning some documents (bills, etc) and have found that I can get reasonable PDF sizes which still look good directly from the scans, if I make use of the -quality flag.
$ convert -quality 72 invoice.jpg invoice.pdf
I’ve gone as low as -quality 30 will acceptable readability on the text. This doesn’t make much sense as 30dpi should be way under “readable”, so there may be something odd about the input image. On screen it looked fine.