DIY Repair Nikon Bayonet Mount

IMG_2784

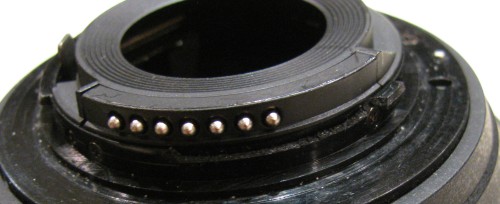
Nothing is quite as sad as a broken bit of equipment. Sadder still when it’s a fairly expensive component and repair costs at a shop are hundreds of dollars. This Nikon DX AF-S 18-55 VR lens took a kid + dog caused tumble to the ceramic floor, it was mounted on the camera and the impact busted the plastic mounting tabs (if you look closely at the picture above you can see the busted tabs).

On the bright side, if the tabs hadn’t given way something else might have taken more impact and broken. By carefully holding the lens on the camera it was possible to verify that it appeared to still be working fine.. if only it would stay mounted. Glue might have worked, but I wasn’t brave enough to slap a little glue onto an expensive lens. A few calls to local camera shops left me a bit shocked at the cost of repairs, it was not worth repairing as a new lens was almost the same price. What I found interesting was that even buying the parts from a local shop wasn’t an easy option, it seems Nikon is making it more difficult for repair shops to get parts.

I did find some reasonable web resources out there giving step-by-step information on replacing the mount. You can also pick up the required part via ebay. It turns out you can order the part directly from Nikon as well. Their email support was responsive within 24hrs, and I was able to call them directly with a credit card and have it shipped to me in a couple of days.

IMG_2781
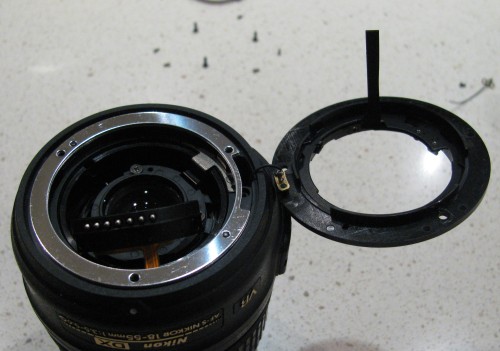
So with the correct part in hand, it was time to take things apart. I used both #0 and #00 Phillips screwdriver bits, my fingers and patience. I’ll avoid duplicating the instructions found elsewhere and simply provide a few comments on my experience:

  • The screws are very, very small. You’ll want to work in a brightly lit area with care not to lose any.
  • When reassembling and I was reaching with my fingers to get the tab with the electrical contacts from where it rested “inside” the lens, I managed to get a fingerprint on the lens. Using more caution you can avoid my mistake.
  • I messed up the first reassembly, the bayonet part of the new mounting ring needs to be in the ‘right’ place. Refer to the photo below: At about 10 o’clock there is a small metal pin. The bayonet should be clockwise side of that (say 11 o’clock). Everything fit, but the lens didn’t operate correctly on the camera.
  • Those metal rings, you don’t want to move them if possible. The good news is that three of the screws you take out fit down through those rings, making it relatively easy to get lined back up if you move them a bit.

IMG_2786

I’d never done this type of repair before and I was done well under an hour total. The second re-assembly was 15mins tops. Total cost: $10 + $15 shipping direct from Nikon Canada. If you opt for the ebay route, you may need to transfer the bayonet metal part from the original as most of them only offer the plastic ring – the official part is complete.


How to: Dell Inspiron 1525 repair

As the “computer guy” in the family from time to time a repair job will land on my doorstep. This was an older Dell Inspiron 1525 laptop that wasn’t booting anymore. This time it wasn’t some horrible virus that had eaten a system file, but the hard drive starting to fail (something I verified by booting a Live USB version of Ubuntu).

The very first thing you need to do at any sign of hard drive failure is run a complete backup. If you really care about some of the data, then I suggest you start with the bits you really care about (photos) and work your way outwards to a full backup. Don’t be shy about “wasting” backup drive space, this might be the last hour (or minutes) of functioning drive. I make this comment from experience watching a full backup stop due to total drive failure part way through the photo directories after successfully backing up a bunch of system files.

You can (as I have) try gddrescue or similar recover tools once you’ve done what you can with the drive in terms of backup. This might get you a little bit more data, but these tools are in my opinion last ditch efforts to salvage failing media. You can try the freezer trick, or even warming the drive up but don’t count on them working. It’s worth repeating: nothing beats regular backups – unless it’s automatic nightly incremental backups with off-site replication.

Replacing the failed drive is simply a matter of finding the manual, and buying a matching drive. If this were my personal system I’d be tempted to upgrade to a SSD, but there is still a big price difference. I booted from the Live USB Ubuntu for the first boot after install, this let me check the hardware was good to go and to peek at the SMART data. It was interesting to see that the SMART data says power cycles=4, I guess they really do test the drives at the factory.

Installing using the Dell Windows install disks went smoothly, the driver installation steps were annoying and kludgey feeling but not too horrible. Time then crawled to a stand still as I worked my way through the updates from Microsoft, one patch set at a time from 2008 (era of the install media) to present day. Many, many, many reboots later I had a clean install that was fully patched and ready to go back. If you find yourself having to do this more than once in a long while, consider using a more advanced technique.

Well, with the exception of the problem of a missing key. Amazingly the lack of the key didn’t prevent you from using it – the ‘T’ worked just fine, it just felt very wrong. I quick trip off to ebay and I was able to locate a suitable replacement. It turns out I needed a K26 type key, and that the same model had at least four variations. This website had a handy guide for selecting the type of key you needed.

Pictured above is what arrived in the mail. A rubber plunger, a plastic hinge and the key cap. First I needed to pop the hinge off of the key, the blade from my swiss army knife did the job worked well. Then I had to puzzle a bit over which way the hinge was supposed to go on the keyboard.

I hope the picture above helps others understand how it is supposed to fit on the keyboard – it was the image I had hoped to find on the internet when I was trying to figure it out. Some of the  youtube videos show using needle nose pliers to do the installation, I found that my fingernails did the job. One the hinge in on, simply plop the rubber plunger in the middle – large base down as pictured in the arrive in the mail shot. The key cap will just snap on when placed on top and pressed down – work the top first, then the bottom.

Replacing the missing key was very satisfying,  not very expensive and the improvement was both cosmetic and functional.

Drawdio

As a kid I had a couple of those 50 in 1 electronic project kits, it was great fun to build the various projects outlined in the instruction book. I’m still pretty keen to bust out the soldering iron, especially since I got a really nice one this year for fathers day. Along with the iron, I picked up a Drawdio kit (parts pictured above).

My 6 year old built the kit with me, and you can see we also had some extra help. You’ll note the use of safety goggles was mandatory.

Aside from the contents of the kit, we needed a soldering iron, solder, cutters, 3rd hand and of course goggles. The web based directions for the kit are very detailed and cover all you need to know. They suggest a multi-meter but I didn’t find I needed one.

My daughter handled the soldering iron but I was the one with the solder. This tag team worked well for most of the kit. Later in the build I took over some of the fiddly bits (the 555 timer and speaker).

Below is the final build picture. It took about an hour start to finish. The Drawdrio doesn’t need to be used with a pencil, you can optionally wire it into a lot of different things. Beyond being an easy starter project to put together – it’s a great way to teach electrical conductivity concepts.

A few tips. You’ll want to make sure the battery you use has a full charge. Be patient with getting a drawing to make noise, you’ll find you need a very dark line to make it start playing. Once started, it’s easy to keep things going ‘by ear’ adjusting on the fly as it comes in and out of electrical contact. If you’re looking for more copper tape, any stained glass store will have it in stock.

[Edit: check out the original Drawdio site by the inventor – Jay Silver]