OTA HDTV in Ottawa


I’m always a little amazed at how much people pay monthly for TV service. We ran for years with no TV at all, and all the money we “saved” I easily spent on DVDs (and more I’m sure). Several year ago we decided that some amount of TV wasn’t a bad thing, it also gave me a great excuse to build a PVR based on MythTV. After shopping around StarChoice (now ShawDirect) seemed like the right fit. The basic package was cost effective and gave us enough TV. I liked the fact that we got HDTV in the base package, and that meant high definition hockey games and special events like the Olympics.

ShawDirect has a great policy (pdf) that lets you schedule seasonal breaks in service. I’ve been using one of those to try out using over the air (OTA) TV as our only source. We haven’t really noticed the lack of TV, even through the Stanley Cup finals (but our team wasn’t in it).

To move to OTA I needed two things: 1) a PC capture device for HDTV and 2) a set top box to convert the signal for use with my projector. The PC side of things came along as a deal from Dell – the Hauppauge WinTV HVR-950Q was on sale one day ($54.99). This came along with a tiny little antenna which surprisingly pulled several stations. The projector has no HDTV tuner (unlike most HDTV flat panel sets) and so it was off to eBay to get a set top box. This was the first time I had used the “Make an Offer” option on eBay and I was quite pleased with the price we negotiated. The tv tuner is known by several different brands: Centronics ZAT 502 HD / RTC DTA1100HD / Digiwave DTV5000HD.

On the 2nd floor of the house I could easily pull in CBC to watch hockey using the dinky little antenna that came with the 950Q. To route the signal to the projector I needed to get a little creative and pull some RG6 from the attic to the basement, the MythTV box is also downstairs. In many situations almost anything will work as an antenna, and the simple bow-tie version I built with mostly stuff I had around already is pretty close to that.

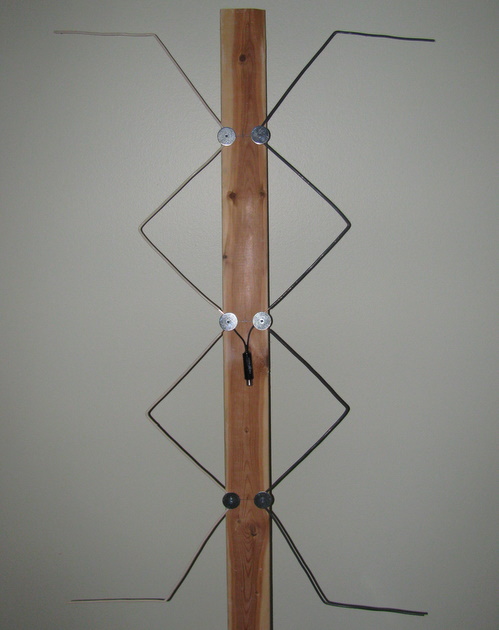
My build was inspired by a write up I found using simple materials, the antenna I built is a Gray-Hoverman. I used a scrap of 1×3, some 14 gauge (2 conductor #14) electrical wire, some screws and fender washers. The only part I needed was a matching transformer. You can see the end result in the picture at the top of this post.

I have this antenna attic mounted, with 100ft of cable between it and the tv tuner. It works well, pulling in 5 HDTV stations all with little to no drop outs. I’d like to try to get PBS HD, but that may require a bigger antenna or an amplifier (a project for later).

Continue reading “OTA HDTV in Ottawa”

HP Color Laser Printer (CP1518NI) Refill

We print at home fairly infrequently, this meant that our inkjet printer ink cartridges were often gummed up or not working right when we did want to print. Moving to a laser printer was a good move, and the Samsung ML-2010 served us well, and was relatively easy to refill. The ability to refill the toner was one of my pre-requisites for a color laser printer – enter the HP CP1518ni, a reasonable cost but refill friendly printer.

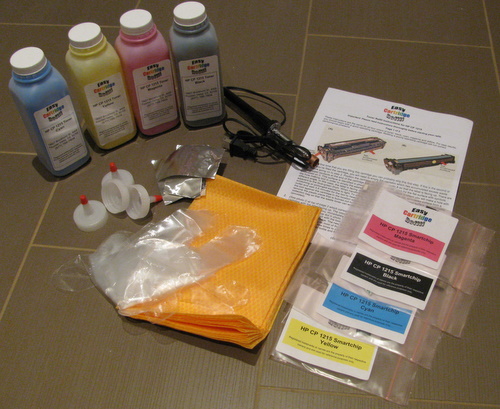
It took about a year to drain the toner down to the level where it needed a refill. So it was off to eBay to look for a deal. In 2009, refill kits were available and were about $100 for all four colors. By 2011 the price had dropped to $50 for all four colors, including reset chips and the cutting tool. I bought mine from easycartridgerefill and had a good buying experience. At the top of this post is a picture of everything that was shipped in the box: toner, cutting tool, instructions, funnel tips, sealing tape, gloves, microfiber cloth, and reset chips.

Step 1RTFM. The instructions are 2 pages of fairly detailed instructions. Having refilled toner before I just skimmed them, that was a mistake. The photo above you can see I’ve used the hole cutting tool on the wrong part of the cartridge.

Step 2 – We need to use the hole cutting tool to make a hole in the correct part of the cartridge (see below). For your first refill you only need one hole, the instructions cover a 2nd area to make a hole if you need to empty the ‘wastebin’ – as this was the 1st time I was doing a refill I skipped that part having already made enough extra holes.

Step 3 – Empty the toner cartridge prior to refilling. The instructions warn that mixing old toner with new is likely to result in less optimal results.

Step 4Fill using the new toner. If you look at the picture of the yellow toner bottle, you can see quite clearly that it is no where near close to full. This picture was taken before I used any toner, the bottles are quite over-sized. You may need to gently swirl the bottle around to loosen the toner prior to trying to pour it. Use the entire bottle, this may take some effort and patience.

Step 5 – Seal the hole with the provided tape. The tape provided was simply metallic duct work tape that you can get at HomeDepot. Toner is a very, very fine dust – it will leak out any tiny hole or gap.

Step 6 – Now we need to swap the tiny chip that provides status on the cartridge to the printer. Sadly, this chip also prevents the printer from continuing to use a toner cartridge after you’ve passed the estimated number of pages. The original chip is pictured on the left, and the refill (reset) chip on the right. The chip swap is very easy.

That’s it, we’re done – install your newly filled cartridge and start printing.

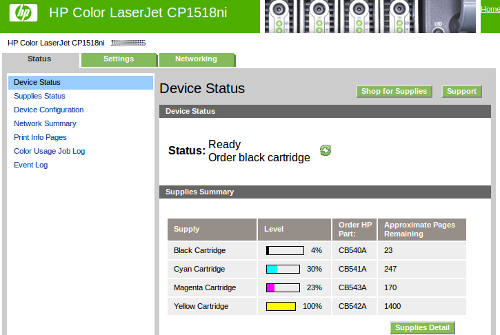
A quick visit to the web-ui shows a full yellow cartridge with 1400 page capacity.

There are some folk who apparently run the toner down to nothing by buying new reset chips only and swapping those until they are low on toner. This could save you a little money in the long run – but at $50 for a full refill kit it is hard to argue that you need to be that frugal. Sadly, the reset chips are not reusable.

I had a few mishaps on the way to complete success..

Continue reading “HP Color Laser Printer (CP1518NI) Refill”

Hacking Scrubbing Bubbles Automatic Shower Cleaner

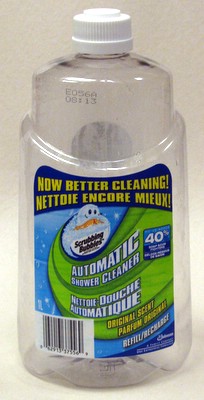
img_2757Like many, I enjoy a clean house.  There are plenty of gadgets out there that help you keep on top of the various cleaning duties – Scrubbing Bubbles: Automatic Shower Cleaner being one of them.  While some of the gadgets you pick up are really gimmicky, this one seems to help reduce some of the heavy cleaning the shower needs with minimal effort.

Now this doesn’t eliminate the need to clean the shower, and I should be honest here – when it does need cleaning I manage to neatly avoid doing the dirty work, but I can say that the Scrubbing Bubbles cleaner seems to lengthen the time between shower cleanings.

The only bummer is that the bottles are not refillable.  We stretch ours out by only using it every 2nd day or so (instead of every day as is recommended).  It still would be nice to be able to refill with a concentrate and dilute with water.  The catch is – the caps do not screw off, so you can’t open the bottles.

Let’s take a look at how the cap works:

img_2758img_2760

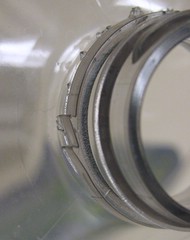
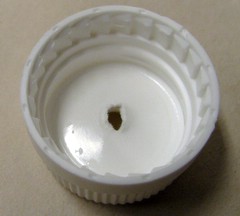
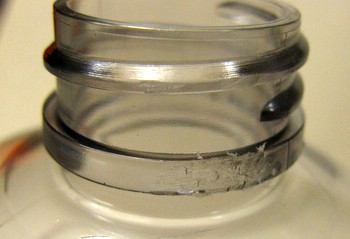
So on the left you can see a close-up of the threaded part of the bottle. Very sneaky, they’ve put a pair of small ‘ratchet’ nubs – there is another pair on the other side as well.  Looking at the cap, you can see the corresponding teeth.  Once tightened down, the cap is very solidly locked onto the bottle.

To hack this – you’ll need two of the scrubbing bubbles empty containers.  From one you will recover a cap, from the other the bottle.  To remove (destroy) the cap, I used a pair of wire cutters and a pair of needle nose pliers.  I started a cut up the side of the cap, then grabbed the edge of the cut with the pliers and peeled it back.  I used 2 or three cuts until I managed to free the cap from the bottle.  Removing (destroying) the bottle to recover a cap was easier, but I used the same basic approach: a small cut, followed by the pliers to twist the material away.  Go slow (and carefully with sharp tools!) since you want to avoid any damage to the part you are trying to keep.

img_2761

The bottle must be modified to removing the nubs.  The plastic is a hard plastic which seemed to respond nicely to a coarse file I had in my workshop.  A few minutes of work and I had smoothed over the two pairs of nubs – the cap now opens and closes easily.  Now we’ve got a refillable container.