 We print at home fairly infrequently, this meant that our inkjet printer ink cartridges were often gummed up or not working right when we did want to print. Moving to a laser printer was a good move, and the Samsung ML-2010 served us well, and was relatively easy to refill. The ability to refill the toner was one of my pre-requisites for a color laser printer – enter the HP CP1518ni, a reasonable cost but refill friendly printer.
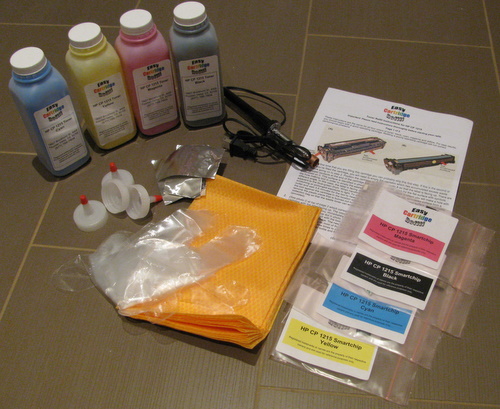
It took about a year to drain the toner down to the level where it needed a refill. So it was off to eBay to look for a deal. In 2009, refill kits were available and were about $100 for all four colors. By 2011 the price had dropped to $50 for all four colors, including reset chips and the cutting tool. I bought mine from easycartridgerefill and had a good buying experience. At the top of this post is a picture of everything that was shipped in the box: toner, cutting tool, instructions, funnel tips, sealing tape, gloves, microfiber cloth, and reset chips.
 Step 1 – RTFM. The instructions are 2 pages of fairly detailed instructions. Having refilled toner before I just skimmed them, that was a mistake. The photo above you can see I’ve used the hole cutting tool on the wrong part of the cartridge.
Step 2 – We need to use the hole cutting tool to make a hole in the correct part of the cartridge (see below). For your first refill you only need one hole, the instructions cover a 2nd area to make a hole if you need to empty the ‘wastebin’ – as this was the 1st time I was doing a refill I skipped that part having already made enough extra holes.
 Step 3 – Empty the toner cartridge prior to refilling. The instructions warn that mixing old toner with new is likely to result in less optimal results.
Step 4 –  Fill using the new toner. If you look at the picture of the yellow toner bottle, you can see quite clearly that it is no where near close to full. This picture was taken before I used any toner, the bottles are quite over-sized. You may need to gently swirl the bottle around to loosen the toner prior to trying to pour it. Use the entire bottle, this may take some effort and patience.
Step 5 – Seal the hole with the provided tape. The tape provided was simply metallic duct work tape that you can get at HomeDepot. Toner is a very, very fine dust – it will leak out any tiny hole or gap.
Step 6 – Now we need to swap the tiny chip that provides status on the cartridge to the printer. Sadly, this chip also prevents the printer from continuing to use a toner cartridge after you’ve passed the estimated number of pages. The original chip is pictured on the left, and the refill (reset) chip on the right. The chip swap is very easy.
That’s it, we’re done – install your newly filled cartridge and start printing.
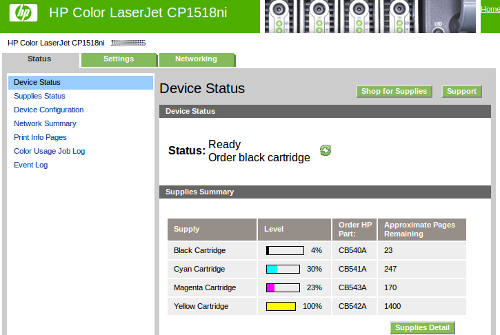
A quick visit to the web-ui shows a full yellow cartridge with 1400 page capacity.
There are some folk who apparently run the toner down to nothing by buying new reset chips only and swapping those until they are low on toner. This could save you a little money in the long run – but at $50 for a full refill kit it is hard to argue that you need to be that frugal. Sadly, the reset chips are not reusable.
I had a few mishaps on the way to complete success..
 The funnel tops for the toner bottles didn’t fit snugly enough to prevent leaking. This is a common problem with refill kits from my experience, but now that I’m doing 4 colors and not just one things get even messier. As you can see from the picture above, you can’t rush things. I’d also suggest picking a work area which can be easily cleaned and assume that you will get toner basically everywhere.
Not long after I installed the yellow, I started getting the following error:
 Power cycling the printer would resolve the issue (sometimes) – jiggling the reset chip and re-installing the toner cartridge would usually get me back in business if the power cycle didn’t. This was clearly not a useful state.
A quick note to the eBay vendor and a new chip was on its way to me – no additional charge. The chip arrived fairly quickly, and was packaged inside of a box (the chip would easily fit inside an envelope). So aside from the overkill packaging, I give the vendor top marks for service.
The new chip resolved the memory error problem. Then for some reason, I was having trouble getting our computers to print. The network connection would drop randomly and was so poor that I’d often not be able to print at all. After poking at various software things, swapping the router and almost every other thing I could think of – I finally decided to see if it was the network cable that was bad. Why it took me so long to try another network cable I can’t say, but that was exactly the problem.
One further oddity was the test page I was printing. The Google homepage under chrome renders just fine on my Linux box, but refused to print normally (missing colors). Printing pictures and other web pages works just fine.
Some of the problems I ran into I could have avoided by reading the manual and being more patient. Others were just bad luck. In the end it all worked out and I’m very happy with my refilled printer.


I was never a fan of colour inkjet printer, often it was cheaper to buy a new printer rather than ink cartridges replacement. This however is not the environmentally friendly approach, I prefer. Today, I have 3 inkjet printers, hand me down and they all works, but the cost and regular cleaning of the ink cartridges is prohibited at time, so our printing is limited mostly to black and white. More often than not, the colour ink cartridge just refused to perform. My ideal colour printer is still on some one’s drawing board.
Some years ago, I had a old mono laser printer, and the ink toner last a couple years. The replacement toner exchange, cost of about $50, no fuss, no mess. However, Jennifer donated it to her lab, when she completed her graduate study.
I like your solution, only if the price of the printer would be consumer’s friendly. The after market refill offer cost effective alternative. Perhaps the one irritating factor is the requirement to replace the IC chip that basically disable the printer. I hope the consumer will raise up and refuse to purchase product that limit open market parts and services. Today’s disposable product is counter productive and detrimental to our blue planet.
The black ran out shortly after I had done the yellow. It took nearly 11 months for the Magenta to get down to the point where it wouldn’t print (3 pages remained in the estimate, but the Mac couldn’t launch a print job).
Cyan is the last hold out with 85 pages to go.
The mess factor has gotten much better with experience.
A set of 4 reset chips are available from $5 – $10. As I know the cartridge isn’t empty when the chip says it is, I’m very tempted to do this to help squeeze out the life of the current toner cartridges.
Rebuilt 4 cartridge sets are available on eBay for $100, so that’s a tempting solution in the future. Refill kits from China are $30 or $45 from easycartridgerefill who is USA based and I’d recommend.
As I’ve seen in the past, the OPC Drum does degrade over time – so a new (or reconditioned) cart is needed to maintain high print quality. You can DIY replace the drums, but I’m not sure it’s worth it considering the cost of rebuilt ones off eBay.