Managing Cable Clutter

This is something I actually did back in February when we moved our computer room to make room for our new arrival.  This is one of those DIY tasks that doesn’t take very long to do (a couple of hours tops), but you can put it off for ages (sort of like writing this post).  Anyone dealing with a rats nest of cables behind / below their desk, maybe this will serve as a kick in the pants to do something about it.

The LifeHacker article inspired me, but clearly not enough to quickly leap on the idea and deal with my mess of cables.  They actually have a whole category dedicated to cable management which is worth a browse if you are looking for ideas.  The original concept came from a site which seems to be gone now, but can still be seen via the Way Back Machine.
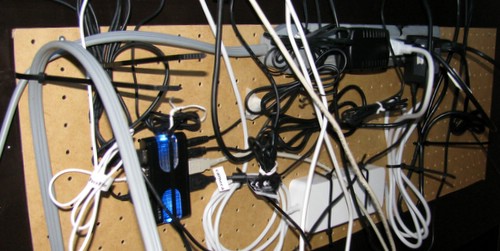
img_0670So pictured above is my version of the peg board cable organizer.  I’ve got a 2′ x 4′ peg board mounted on the back of the desk (between the desk and the wall).  There are only 2 screws holding the board to the desk (upper left and right corners).  I’ve used a couple of washers between the peg board and the desk to give it a bit of room for the cable ties.  Everything is zip-tied to the board, power bar included.  Since I’ve only got 2 screws at the top, I can bend the board (gently) away from the desk to get easy access to the back side to help route the zip ties.
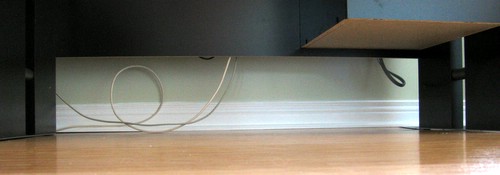
img_0673The view from the front of the desk is what makes this worth doing.  No clutter on the floor (ok, an errant ethernet cable and the USB to the printer).  Even for my desk (pictured is Jenn’s) – where I need to plug and unplug things like my laptop regularly, this setup works well.  I simply mounted the powerbar near the top of the peg board and that places the outlets near enough to the top of the back edge of the desk that its not a problem.

This project only took a couple of hours, it is very functional – and tidy too.  What are you waiting for?

Mounting a Wheelbarrow Wheel

We left our wheelbarrow out in a corner of the backyard all winter.  In the spring the tire had completely deflated, and as it is a tubeless tire (similar to car tires) it had come off the rim as well.  Simply sticking an airpump on the valve did nothing as the tire no longer touched the rim in a number of places letting all of the air out.

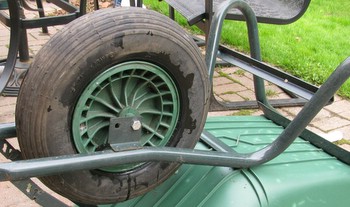
One solution img_1396would have been to simply buy a new tire.  I thought that being like a car tire, I could probably take it by a local garage and have them do it for me.  However, I had a nagging feeling there was some way to DIY so I finally got to searching for a solution.

It was very easy to find some good advice on the net (this is as you know, not always true).  So the value of this post is probably limited, but I learned something today so I thought I’d share.

Tools you need: rope, air pump, long screwdriver or sturdy stick, soapy water.

  1. Use the soapy water (1/2 water, 1/2 dish soap) to coat the beads of the tire (both sides) and the rim where it will mate up.
  2. Tie the rope snugly around the circumference of the tire.
  3. Stick the screwdriver through the rope and twist, causing the rope to tighten.  This should help you get the bead onto the rim on both sides [in my case, it was not quite there – but close enough to seal the gaps]
  4. Pump the tire.  This should cause the bead to set onto the rim.  Slowly release the twist while you pump.

That’s it – easy to fix with stuff you should be able to find around the workshop.

Deleting Channels From MythTV

MythTV is a DIY digital video recorder.  Building a box to do this isn’t much beyond putting together a PC and installing Linux, but its not something I’d expect a non-geek to dive into.  Geek or not – everyone should have some form of digital video recorder, it completely changes how you watch TV.

Of course, since my MythBox is using a capture card to grab video from my sattellite receiver it has no idea what channel has which show.  When I started with MythTV, there was a free service offered by Zap2It.com that offered up listing information in an easy to consume format.  The listings provide MythTV with guide information so it knows what is on, and when.  Today there is SchedulesDirect which is well run and inexpensive at $20 USD a year.

Over time, channels change and this is reflected by changes in the listing data.  MythTV detects these changes, and will add new channels automatically – it won’t remove channels that we listing information is no longer being delivered for.  I’m on an older version (0.20) but suspect there is a design decision here.

Using the UI to remove channels is pretty clunky.  The MythTV site has instructions on accomplishing this via the command line, and while I’m comfortable with the command line – it is a multi-step process which I dreaded doing.  So over a few months, more and more bogus channels that I didn’t actually have would get added.  For example – a new pay per view (PPV) channel would appear, new guide data would become available and I’d start seeing it as an available channel… grr

Of course, you still need to connect to SchedulesDirect and remove the unwanted channels from your subscription otherwise MythTV will just keep adding the ‘new’ channels back.  Tonight I wrote up a quick Perl script to automate the multi-step process – this makes removing unwanted channels quick and easy.

Usage: remove_channel.pl <channel number>


#!/usr/bin/perl

use Mysql;

# MYSQL CONFIG VARIABLES
$host = "localhost";
$database = "mythconverg";
$user = "root";
$pw = "";

# PERL MYSQL CONNECT()
$connect = Mysql->connect($host, $database, $user, $pw);

# SELECT DB
$connect->selectdb($database);

# DEFINE some MySQL queries
$findchan = "SELECT chanid FROM channel where channum = ".$ARGV[0];
$delchannel = "DELETE FROM channel where chanid = ";
$delprogram = "DELETE FROM program where chanid = ";

# EXECUTE THE QUERY
$execute = $connect->query($findchan);

while (@results = $execute->fetchrow()) {
print "chanid ".$results[0]."\n";
$connect->query($delchannel.$results[0]);
$connect->query($delprogram.$results[0]);
}