Samsung ML-2010 Toner Refill

In the fall of 2005 laser printers had fallen to the near $100 mark and our ink jet printer seemed to have an endless appetite for (expensive) ink cartridges.  It was time for a change, and while colour printing is nice – a lot of our printing needs were very basic.  At the time, staples.ca had multiple web coupons you could “stack” and cut a $199 printer down to $126, and there was a $30 mail in rebate on top of that.  I never got the mail in rebate due to the standard rebate avoidance techniques (by the time I found out what I needed months later, the box had gone into the trash).
The printer I bought was the Samsung ML-2010.  It was known to be easy to refill, and considering that a new toner cartridge was nearly $100 at the time – I knew I’d be going the DIY route when the time came.  A full 3 years later we still use this printer and it has been mostly trouble free.  The toner had finally gotten low enough that we needed to do something (taking the cartridge out and shaking it wasn’t helping much anymore).

I figured I’d be getting one of the toner refill kits from eBay, but which one?  I turned to redflagdeals.com and found this thread that pointed me at TonerKits.  While the thread was started back in 2004, but its still going strong at 47 pages with recent positive reports.  I purchased from TonerKits via eBay simply selected the right kit for my printer.  I paid $11.99 USD (7.99 + 4 shipping), but looking today – the same kit is $9.99 with free shipping.  The eBay transaction was quick, and smooth.

Refill Kit Includes:
1 – 100g black toner refill
1 – pouring spout w/cap
1 – set illustrated instructions

(there are cheaper kits with less toner, 100g will fill to ~75% level twice)

Pictured above is my toner cartridge and the 3 items I received from TonerKits.  The refill process was very simple. Continue reading “Samsung ML-2010 Toner Refill”

Kids Picnic Table

At one point growing up if you asked me what I wanted to do my answer was that I wanted to be a carpenter.  I liked building things, I still do.  Of course, as I got older I realized that being a construction worker was probably going to be hard work so my tune changed.  That and my fascination with computers resulted in me being a software developer.  I still do like to build things.

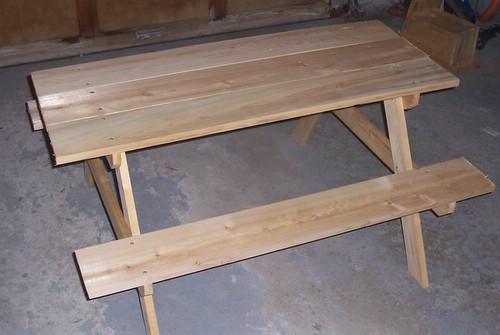
The other weekend Jenn suggested that I build a picnic table for our daughter Alison.  It seemed like a neat father/daughter project.  Jenn dug up some plans from the internet and we built one.

Other than an electric drill, you can do this all with hand tools.  If you’re hard core – you can use a manual drill (I’ve actually got one!) and do without power tools.  Of course, as we’re cutting wood here you can get into power saws etc, but as I wanted to let my 3 year old participate it seemed like the fewer power tools involved the better.

Total cost was about $40.  I used white cedar from Lanark Cedar and weatherproof deck screws that I got at the local hardware store.  It took a couple of hours, but if your more organized and need fewer juice breaks you can probably get it built pretty quick.

I originally thought that the 1×3 and 1×6 wood called for by the plans would be pretty skimpy, but as a whole the table is pretty solid.  The table top is about 19″ off the ground, making it impractical for an adult to sit at it.  Thus, if you’re the right size to sit at the table – it will hold your weight.  We actually made the table / seats about 6 inches longer than the plans called for.  Overall it was a very satisfying weekend project.

DIY Solid State Drive

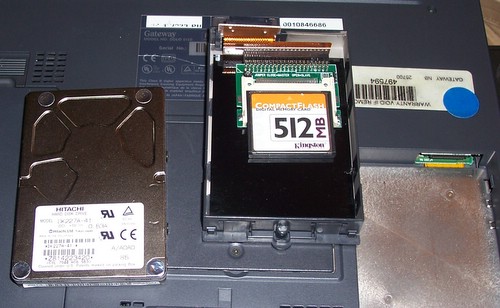
Now with the CF to 2.5 IDE adapter in hand, I’ve basically got a solid state drive for my laptop.  The trick of course is making it all work.  The first step is to get it physically installed in place of the failed hard drive.  The only tricky part here was determining where pin 1 was.

The adapter I bought has a little white triangle that identifies pin 1 (in the picture above, this is the left most pin).  The existing drive was a Hitachi DK227A-41.  Google helped turn up a useful diagram which helped me identify pin 1.

HITACHI DK227A SPECIFICATIONS REV. 1, K6601560 97/11/08

The second bit I stumbled a bit on was getting the laptop to identify this as a drive.  The CMOS auto setting didn’t detect it as a drive – so I needed to use the USER setting to punch in the right values.  I ended up using the values I found in this SanDisk document, but I’m certain others will work.  I also needed to dumb down the BIOS settings to allow me to boot from this drive, this meant turning off some of the fancy read pre-fetch and DMA modes.

As this is an old laptop – 233MHz with 64MB of RAM, I run Puppy Linux on it.  My previous experience installing Puppy on this particular laptop was painful, as it only has a floppy drive (no CDROM) and at the time I failed to find a boot floppy that enables USB support such that I could boot Puppy from it.  The route I took at the time was to format half of the 4Gig drive as DOS and make it bootable, then find an old Linux distro that had a floppy based install, borrow a wired PCMCIA network card from work and download the DOS based Puppy install over the network to the DOS partition.  Once there, I could reboot and install Puppy natively.  That was the story for Puppy 2.01.

Puppy 4.00 is an improvement in a number of areas.  WakePup is now something that comes as part of the LiveCD allowing me to create a boot floppy using my desktop system.  This boot floppy knows how to boot a USB key version of Puppy on this old laptop.  It just works.

Other nice features of Puppy 4.00 is the battery indicator now knows how to talk to the hardware in the laptop, supplying charge remaining information.  Additionally, the power off sequence works to actually shut the laptop off (2.01 didn’t).

With the laptop 1024×768 screen matching the LCD monitor Jenn uses on her Mac Mini – TightVNC on Puppy makes it this old laptop into a really nice wireless Mac terminal.  The default browser is SeaMonkey, but Firefox 2 is available in the package repository.

Using the DIY SSD is weird, the laptop is almost totally silent and for whatever reasons the drive light indicator doesn’t blink at all – so you have no way of knowing that you’re waiting on disk activity.  The performance seems to be about the same as it used to be, but no direct comparison is possible with the old drive making grinding sounds.  I’m running with a swap partition on the CF card, but even with only 64MB of RAM – running the common application load on this laptop I’m using zero swap. (hooray Puppy)

Some folk get worked up about reducing the number of writes to a CF card, I’ve decided not to worry and see how this works out.  The number of write cycles is fairly high on modern cards (1 or 2 million), I believe they have built in wear-levelling, and they are cheap.  I know my puppy powered laptop isn’t making that many writes to the filesystem, so I suspect the DIY SSD will last longer than the laptop.