Review: Nexus One

Recently one of the guys at work offered me his “old” Nexus One for a crazy price, so crazy I actually talked him into accepting more. I immediately wiped the ROM that was on there and installed cyanogenmod – for this review I’ll stick to my impressions based on using the Nexus One for the first couple of weeks.

First impression: Fast. So very fast. Second impression – argh, no physical keyboard – no buttons either! Then the fact that the Nexus has so much more RAM available than the G1 did starts to sink in, and the speed – did I mention it was fast? I was sold, but really hoped that the keyboard / button thing was going to quickly become a non-issue.

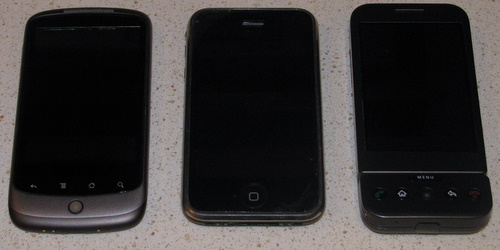
The headline photo is a comparison shot of the Nexus (far left), and iPhone 3G (middle) and the G1 (right). Things get interesting when we look at the side profile.

The Nexus is the thinnest of the bunch. Let’s take a look at some of the specifications

Nexus One HTC G1
CPU 1 GHz Snapdragon 528 MHz ARM11
RAM 512MB 192MB
Screen Size 3.7″ 3.2″
Resolution 480×800 320×480
Weight 130g / 4.6oz 158g / 5.6oz

Some big differences, with twice the CPU frequency and more than twice the RAM – even needing to drive the larger resolution screen isn’t going to be enough to slow it down.

After a few days I got used to the ‘soft’ buttons for home, menu, back and search. The ROM has haptic feedback (it vibrates) when you hit these buttons. Initially the back button gave me some trouble, specifically in twitter where the reply button on screen is just above the back button – I kept hitting reply instead of back. As I got more familiar with the phone this was much less of an issue.  I still manage to hit the home button when using the track ball for some reason.

Having a real headphone jack is very nice, something I really found annoying with the G1. Having the dock to charge means no messing with cables, you just drop it in. The predictive keyboard is actually quite good, and once you get used to using it – the on screen keyboard is just fine. I still sometimes miss the physical keys, but everything else on this phone is so nice I’m willing to live without them.

The Energy Detective

It has been some time since I got a TED 5000 unit (Nov 2009) – being able to visualize the whole house energy usage is pretty neat, and a nice motivator to see what you can do to save energy.  A while back it seems my TED had gotten stuck and was no longer reporting any usage.

Now this type of problem has happened before, so I wasn’t too surprised. I don’t check it regularly (my attention to it tends to be bursty) so it seems like every second time I go to poke at it, something is amiss and there is inevitably another firmware update available too.

The current versions are:

  • Gateway v1.0.383
  • Footprints v1.0.210

The upgrade instructions are clear and easy to follow. However, unlike previous problems a firmware update/reboot/power-cycle has not magically fixed the problem. Guess it’s time to poke around inside my electrical panel [warning – this can be fatal if you don’t know what you’re doing] and see if something is wrong.

There is a fairly good troubleshooting guide available, in my case it seems working through step 4 was was I needed to do. Finding out what was wrong was pretty easy, the red MTU wire was lose in the panel (Rant: why I don’t like having random people doing work in my house! This mistake was related to some renovations we had done).  Once I knew what was wrong with the hardware setup, it was easy to fix.

Then I noticed the new firmware seems to have some problem, here is the resulting graph:

After some further software / network diagnosis it seems that the gateway (webserver) is hanging up every once in a while. It appeared to be alive and responding for 140 seconds, followed by a 170 second period of failure. Looking at the graph, the red (voltage) square wave represents the alive (120V) dead (zero) pattern.

Ok, no problem let me just push the older firmware back on via the web interface. Bad idea – as the update took a bit longer than the 140 second window, and I managed to get the device into a non-responsive state. Now what?

Well, after some head scratching it occurred to me to download the installer program. This is a java based program, but thankfully it was able to find and restore my TED 5000. There were plenty of somewhat scary java error output messages on the console, but it did succeed after some amount of time. I also performed a full reset at one point – this too may have helped the recovery. So yes, I’m guilty of a bit of a hammer approach here – I’m just glad my TED is back to working. I will treat firmware updates with a bit more caution in the future.

I’m now using

  • Gateway v1.0.350
  • Footprints v1.0.185

Which may have bugs, but it seems to be working ok for me at the moment (at least my graphs are coming out ok).

There is a support forum which is somewhat helpful, but didn’t give me a great sense of comfort. There are a lot of very unhappy customers. The TED 5000 device is a very useful device, but has several technical problems.

  • There are many different (and valid) configurations to use the device in. I’m using one of the more simple setups, but the complexity impacts the software (firmware)
  • There are 3 different communication protocols being used: Zigbee wireless, power line communication and ethernet. Each has potential problems.
  • The firmware update is two separate files, and the web interface makes it too easy to do a bad firmware update.
  • The install of the device is non-trivial. So aside from firmware problems, the actual physical installation may be at fault.

External events can cause havoc too: Installing a new electronic device (or halogen light) may cause noise on the power line such that you disrupt power line communication. If you are using weather updates, there is an external web based weather service which needs to be reachable (and providing the service).

I keep meaning to cook up some RRDTool based graphs to track my usage as I really don’t like the built in TED web graphs all that much. There are also some nice DIY solutions out there for whole house power monitoring now.

I still like having the TED 5000, but I’m not sure I’d recommend it to people due to some of the problems. I’d love to see a simpler product that just provided the data stream and used a pogoplug or similar to handle the fancy graphing using an open source stack.

Unlocked iPhone 3G with 3.1.3

Jenn had been carrying around both her Samsung M300 and iPod Touch, far too often the phone wasn’t charged. Merging the two devices into an iPhone seemed like a sensible move.  She’s somewhat frugal like myself and doesn’t want to carry the cost of a data plan, so an unlocked phone seemed like the best path forward.

My first step was to locate a reasonably priced used iPhone.  With the new iPhone 4 out, you can just go pay full ticket and get an unlocked version if you want.  Yet, with the new model out – there are plenty of 3G and 3Gs devices on the used market.  I watched both usedottawa.com and ottawa.kijiji.com looking for a deal.  A good price was looking like $230 or so for the 3G, and $300 for the 3Gs (the 8Gb versions).

It only took a couple of days watching to come across a 3G going for a good price and I snapped it up.  There was one small snag when the previous owner decided to wipe the phone before I picked it up, they failed to plug it into power during the wipe and the battery gave out. This meant that the phone was non-functional when I got it, but as a bonus I ended up with a lower price.

Recovering from a bad wipe (or any other snafu with an iPhone) can usually be accomplished – you need to get into recovery mode, or if that doesn’t work device firmware update (DFU) mode. In my case DFU mode was what I needed. To get into DFU mode:

  1. Plug the phone into your PC
  2. Power it off
  3. Hold the Home button
  4. Hold the power/wake/sleep button
  5. After 10 seconds, release the power/wake/sleep button – keep holding Home
  6. Once iTunes detects the phone in recovery mode, release Home

The next step was to jailbreak the iPhone, this is necessary to install the unlock. Since I was using Windows to do this work (I didn’t want to mess with Jenn’s Mac) many of the how to guides didn’t apply.  I found one on iClarified.com that did work for me. There is some confusion as to if you need a SIM card to allow you to jailbreak with redsn0w or not – I did not need one installed at all in order to complete the jailbreak.  I simply followed the entire guide (including step 2) as I didn’t care about reflashing the 3.1.3 firmware (again).  It was easy – but pretty scary.  Read the guide completely and carefully.

After you’ve run redsn0w, you’ll probably want to reboot your windows box.  I found that without a reboot iTunes was not happy about the phone.

Now that you’ve got a jailbroken phone, you can install ultrasn0w to unlock it. The version of Cydia that was installed already had the correct repository enabled, so it was just a matter of installing it via Cydia.  I did find that Cydia was very slow, you need to be patient the refresh does take forever (15mins?).

Reboot the phone, install SIM card. Tada – I’m rocking an unlocked iPhone 3G. So very tempting to install this as the boot logo.

For what it’s worth, I did actually run through the entire wipe / jailbreak cycle twice. The first time something bad happened to Cydia causing it to completely fail for me. Re-doing the jailbreak worked fine the second time. One other useful resource I came across was jailbreakmatrix.com which helped me understand what options I had for jailbreaking and unlocking.

As you can see from the picture on this post, Jenn’s using PetroCanada Mobile as her provider. I didn’t have to do any magic to disable data usage, as the pay-as-you-go plan she uses has no data support.  There is something in the Cydia market that will let you control data usage if you need to do that. The iPhone works well as a phone, and sending an receiving text messages – data is provided exclusively over WiFi and for Jenn’s needs, that’s just fine.