Installing a custom ROM on the SGH-I727R

I’m a fan of running customized ROMs on my phone. There are three reasons: a) I like to tinker b) It provides added capability and longer currency for my phone c) I can get source for most of the code running on my phone. In this post I’ll talk about installing CyanogenMod 10, but a good part of this will be applicable to any after market ROM.

First I like to gather data about the state of the phone as it came to me. These details can all be found in the “About Phone” screen.

SGH-I727R
Android 2.3.5
baseband I727RUXKJ7
Kernel 2.6.35.11
Gingerbread.RUXKJ7
IMEI XXXXXXXXXXXXXXX
IMEI SV XX

I’ve omitted my actual IMEI, but you’ll want to record that as it is possible to accidentally wipe it out on some phones. Fortunately as this phone came to me in the actual retail box, the sticker on the box matched the details here too.

The next step is to spend some time reading up on how to modify the firmware (ROM) and how to restore to stock. I’ve said this before, but it’s worth saying again: there is a lot of mis-information out there about how to go about this. Primarily this is because people don’t really understand what they are doing and simply provide instructions that seemed to work for them, voodoo magic included. An example is this youtube video I came across – well, it does give you confidence that it can be done, but there is no need to root your phone before installing a custom recovery.

If you’ve done any searching at all, you’ll have come across the XDA Forums, I do recommend signing up and reading through the relevant forums. Learn to search for answers, and share what you do know with folks who don’t. The newb starting guide is a good place to start. Also since my primary target is CyanogenMod, usually a good place to start is with their wiki – however, in this case it wasn’t.

The first step is to get a custom recovery image installed. ClockWorkMod (CWM) is the preferred solution for CyanogenMod and I’m familiar with it. To install it we need a tool that will talk to the download mode of our phone, and we need to get our phone into download mode. The tool I prefer to use is heimdall, it worked well with my i9000 and it’s also friendly to Linux. The other option is Odin (download link), a Windows only tool.

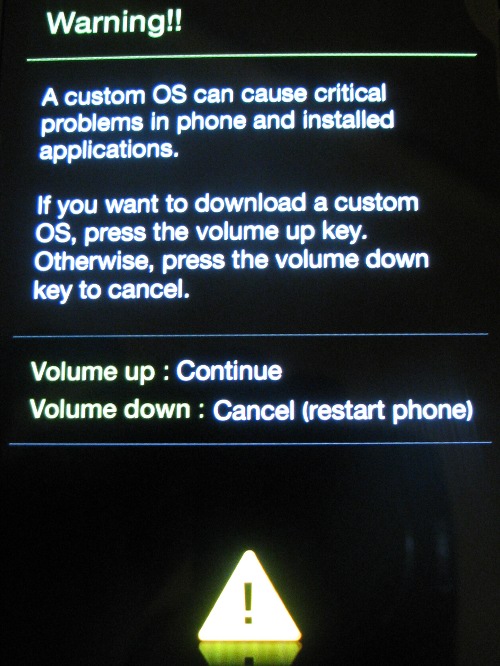
To enter download mode, the Rogers version is slightly different than the AT&T version – only volume down needs to be held with power (not volume up & volume down).

If you are successful you should be greeted by a screen as per above. Now assuming the USB cable is attached we can start the tool to send down the custom recovery image.

Sadly this is where I went off the rails a little, it turns out the version of heimdall (1.3.1) I had didn’t quite support the protocol being used by this phone. Upgrading to a newer version did fix the connection problem, but then it failed in another way I can only assume is also related to the protocol.

$ sudo ../Heimdall/heimdall/heimdall flash --recovery recovery.img
Heimdall v1.4 RC1

Copyright (c) 2010-2012, Benjamin Dobell, Glass Echidna
http://www.glassechidna.com.au/

This software is provided free of charge. Copying and redistribution is
encouraged.

If you appreciate this software and you would like to support future
development please consider donating:
http://www.glassechidna.com.au/donate/

Initialising connection...
Detecting device...
Claiming interface...
Setting up interface...

Checking if protocol is initialised...
Protocol is initialised.

Beginning session...
Session begun.

In certain situations this device may take up to 2 minutes to respond.
Please be patient!

Releasing device interface...

And that was it, my phone was busted.
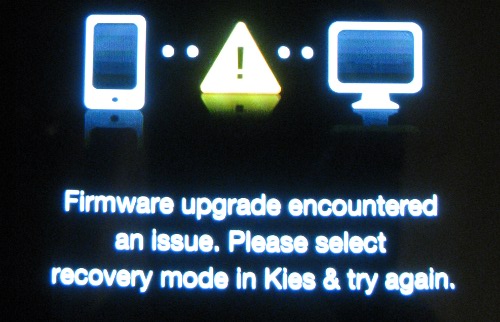
I did try several times to recover using heimdall and failed. So it was off to Windows to use the Odin tool to fix things.

I initially tried to simply install a version of CWM and then proceed from there, but I made a few mistakes. 1) I didn’t have the right version of CWM, I can’t explain this but I do admit I was thrashing a little here. 2) I did have some partial successes which probably left things in a somewhat dubious state causing my grief later when I was doing the right things (see log below).

E:Can't open /cache/recovery/log
E:Can't open /cache/recovery/last_log

The solution is to return to stock and start fresh. Thankfully Odin was quite happy to flash the stock version I got via XDA.

I did locate the correct version of CWM via the CM10 thread on XDA, I found the TeamChopsticks install guide quite helpful. Once I had the right mojo, things went smoothly.

Starting from stock
Install recovery via Odin, boot into recovery
Wipe & factory reset
Format /system
Flash CM10 nightly zip
Flash google apps zip (optional)
Reboot

I like to have SSHD running on my phone along with rsync to allow for nightly backups to happen. Unfortunately CM10 isn’t yet shipping with dropbear pre-installed, and the CM7 version doesn’t seem to be happy anymore. I’ve switched to using the DropBear SSH Server app, the one downside is that it doesn’t auto-start on boot. I’ve been in touch with the author and this is on his future feature list.

A few notes on setting up DropBear SSH Server. The very first run will ask you to grant it super user privileges, it needs these so you need to say yes. Once the first screen is all green, you can test the server – the default root password is 42. Once you’ve verified it’s working, we want to fix the password under settings. I use keyed logins, and the app does support importing keys from files – but only one key per file. Once you’ve setup some keys, you can disable password logins entirely.

In CM10 you’ll probably want to enable USB Storage under Settings->Storage, then press menu to bring up ‘USB computer connection’ where you can opt in for USB storage (it is off by default).

Somewhere during the set of events I managed to end up in a state where the Radio version reported in About Phone was ‘unknown’. Phone calls worked fine, and I ran a couple of days without noticing this. I did later reboot into recovery and install a more up to date radio/modem firmware (I727RUXLF3). While I was in recovery I initiated a backup which I can return to if things get really messed up, this is handy as it is stored on the external SD card and is available even if I’m not somewhere with a computer and need to fix the phone.

CM10 has a new over the air (OTA) update system, I used it for the first time tonight to move to the latest nightly. Very slick, but there didn’t seem to be an option to back-up my existing state.

So aside from a few heart stopping moments where my brand new phone was totally fubar‘d, this was overall a pretty typical experience with a new device. Plenty of little details to figure out, a few new tools to install/configure/learn and the excitement of new hardware (and software). I’m really pleased with the i727, the screen still feels really big (but not too big). It’s fast and the battery life is very good. Google Now also recently added the ability to enter calendar events, resolving one of the few things I found it couldn’t do – and yes, Google Now is pretty darn cool.

New Phone: Samsung Galaxy S2 LTE

Again I’m feeding my gadget habit by picking up a new to me phone. This time it turns out the phone is effectively brand new, it still had the factory plastic on the screen and came with the box and all new accessories. I’d been watching the local used phone market via kijiji for a while and this one popped up at a great price, I was lucky to be one of the first to respond with a firm offer to buy.

The phone model number is SGH-I727R and is locked to the Rogers network here in Canada. It is basically the same as the AT&T SGH-I727 model, this means there should be reasonable community support for 3rd party firmware (specifically CyanogenMod).

Even prior to purchase I usually do quite a bit of reading up on the potential of the device. While in general the technology upgrade is across the board, a couple stick in my head: 4.5″ AMOLED screen; 1.5GHz dual core; 8MP camera. Apparently this phone has the capability to be flashed over to work on AWS networks such as Wind, I doubt I’ll need this but it’s nice to have such a capable phone.

The first real hurdle I came across was unlocking the phone. I had seen enough material on the XDA Forums indicating that it wasn’t a big deal to unlock this model, but I had hoped it would be as easy as the i9000 was (a simple software patch). In the end I bought an unlock code via eBay, the price was very low and I had some amount of purchase protection through eBay in theory. I found the listing via a post on XDA by a member who’s quite active and has the same phone, this also increased my confidence that it was going work.

I made the eBay purchase at 8pm, there were several (I’m assuming) automated email responses pointing me at the website to submit my IMEI. In less than 6 hours I had an unlock code, I suspect if I had made the purchase at a more convenient time of day it would have been even quicker. Inserting my Fido SIM caused the phone to present the Network Lock Control Key screen, I was able to enter the 8 digit unlock code and unlock my phone. I don’t know, but I suspect that it may have requested the unlock over the mobile network, there was a few on screen messages indicating that it was ‘requesting’ the unlock. The unlock is persistent across firmware upgrades, and appears to be for all SIMs based on my testing.

In the hope that I could help identify a software only unlock, I did a little poking around on the stock firmware. In order to do this poking, it was necessary to gain root. I did this using the zergRush exploit. I was glad that I had a copy of zergRush cached away, as the file linked by the XDA post wasn’t available.

You will need adb installed and setup on your computer and communicating with the phone (you might need to turn on adb support under Menu->Applications->Development->USB debugging), assuming you’ve got that sorted out using zergRush is quite easy:

adb push zergRush /data/local
adb shell
cd /data/local
chmod 755 zergRush

Now when you run zergRush you’ll see something like:

$ ./zergRush

[**] Zerg rush - Android 2.2/2.3 local root
[**] (C) 2011 Revolutionary. All rights reserved.

[**] Parts of code from Gingerbreak, (C) 2010-2011 The Android Exploid Crew.

[+] Found a GingerBread ! 0x00000118
[+] Found a Samsung, running Samsung mode
[*] Scooting ...
[*] Sleeping a bit (~40s)...
[*] Waking !
[*] Sending 149 zerglings ...
[*] Sleeping a bit (~40s)...
[*] Waking !
[*] Sending 189 zerglings ...
[+] Zerglings found a way to enter ! 0x18
[+] Overseer found a path ! 0x00030730
[*] Sleeping a bit (~40s)...
[*] Waking !
[*] Sending 189 zerglings ...
[+] Overseer found a path ! 0x000307f8
[*] Sleeping a bit (~40s)...
[*] Waking !
[*] Sending 189 zerglings ...
[+] Zerglings caused crash (good news): 0x40322cd4 0x0074
[*] Researching Metabolic Boost ...
[+] Speedlings on the go ! 0xafd19b63 0xafd3975f
[*] Sleeping a bit (~40s)...
[*] Waking !
[*] Sending 181 zerglings ...

[+] Rush did it ! It's a GG, man !
[+] Killing ADB and restarting as root... enjoy!

Now when you connect again with adb you’ll be in a root shell. Now with full access to all of the files, I copied some of them down in the hope of spotting a change to one that controlled the locked state. Exploring the filesystem it seems that the i727 phone doesn’t have a nv_ram.bin file, nor were any of the potential candidates modified by the unlocking process. This was a failed experiment, but still fun to try. I will note that zergRush does leave the phone in a pretty sick state – UI is very, very sluggish – you’ll want to reboot as soon as you’re done messing around.

Review: Kobo Wifi

A little while back I picked up a Kobo Wifi e-Reader for $40 +tax with free shipping thanks to RedFlagDeals. I really didn’t need yet another gadget, but at this price point it was far too tempting. The Kobo refurbished page is still up, but lists as out of stock currently.

The device came with version 1.7 of the firmware installed, as soon as I connected it to my wifi network it found an update to 1.9. I stalled on doing the update as I wanted to experience it in the out of the box state for a bit. Initially I’d say I felt it was hard on the battery, no where near the 2 weeks / 10,000 page turns per charge they claim. I also noticed it was waking itself up from sleep mode regularly.

Updating the firmware over wifi was easy, once you struggled past the painful text entry of your wifi network password. Moving to 1.9 I noticed an improved wifi indicator along with the expected improvements. It was still waking itself up which turned out to be a simple matter of fixing the setting: Menu > Settings > General, and change the “Download Daily” flag to ‘No’. Battery life appears to be improving as I use the device, I can now get through several hundred pages across multiple days on a single charge, I suspect the refurbished unit still has the original battery.

The screen is really quite amazing, quite comparable to reading a printed page. Lacking a light is a bit of a bummer for me as I tend to read in bed, but I’ve got a flashlight app on my phone that I often use for reading in the dark. Comparing this e-Reader to a book is more accurate than trying to compare it to a tablet, it is very much a single purpose device. The screen size is roughly paperback sized (6″ diagonal) and while the device itself has a generous border it’s still easy to hold in one hand (7.2″ x 4.7″). There are a few font choices and sizes, I find medium to work well for me in contrast to other readers where I’ve tended to pick smaller than average font sizes. The flip-side of this may be that for people who want very large print, this may not go big enough.

I was particularly impressed with the weight. The specification page claims 221g (7.8oz), I weighed mine and it came in at only 196g. Compare this to my Samsung Galaxy S phone at 118g, or the iPad 2 at 600g. Having a nice light reading device makes it easier to have long reading sessions.

I’ve also used the Kobo app on Android, the reading experience is quite different. Additionally the app version appears to have features that the Kobo Wifi does not, this isn’t a deal breaker but it seems odd that they didn’t try to incorporate the Reading Life features in, or at minimum contribute to the statistics of books read, etc. (The Kobo Touch does have Reading Life) One thing the Kobo Wifi supports that the app doesn’t is PDF files, again odd they didn’t aim to provide a seamless experience across readers. One other gripe I have about the software is that while it supports both date and time, there doesn’t seem to be an easy way to get the time while reading – I really wish they had made it visible on the menu.

The E-Ink screen is a bit slow to refresh, it takes a bit longer than the time it takes to move your eyes from the bottom of the page to the top to start reading again. I’m a fairly fast reader so it may be more noticeable to me, but it isn’t so slow that I won’t use it to read.

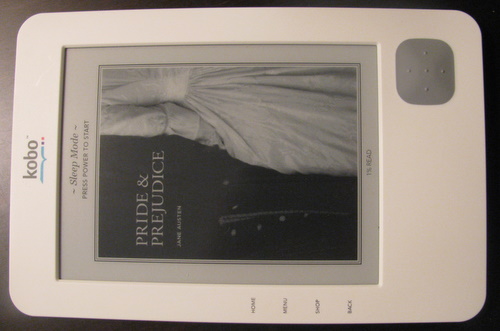
I do find the choice of button layout to be poor. Pictured above is my primary method of holding it. I really wish they had put page turn buttons on the side of the device (when I read on my phone, I use the volume up/down buttons for page turning and find this much more convenient). The four buttons on the side seem poorly thought out too, I’ll point out that I’d never used the back button until just now and it didn’t do what I expected.

You can use the shop button (once you’ve configured your wifi network) to synchronize your Kobo library or purchase books. Adding books manually is simple: plug the Kobo Wifi into your PC using the mini-USB cable, you’ll be given a choice to manage library or just keep reading (while charging). Choose mange library and it will appears as a USB drive, now drag and drop stuff. A nice feature is the USB drive contains the Windows/Mac software you can use to manage the books on the device. As I mentioned previously, PDF files are supported when added manually.

In general eBooks don’t take up a lot of space, so the internal memory will be plenty for most. Those that want to have a lot of books on hand can add a SDCard for additional storage.

Overall I’m quite pleased with the value for money. It may be a little dated, and missing some of the newer features but it does let you read eBooks in full sunlight or any well lit room.