Unlocking Samsung Galaxy S Vibrant (Bell)

I’ve been a big fan of unlocked GSM phones since my first one back in 2009. I’ve also been through a surprising number of different phone since then, but all of them have been 2nd (or 3rd) hand and have been a good price for a phone that still has lots of use left in it. My latest phone the Samsung Galaxy S Vibrant (i9000m) is no different, but it came to me locked to Bell.

I purchased the i9000m knowing it could be easily unlocked if you had the right magic. With the stock firmware, if you don’t have the phone unlocked you’ll see what’s pictured at the top of this post when you install a SIM card.

It turns out the forums have a great how to guide, with pointers to an app on the Android Market if you’re afraid of a little bit of hex editing. It should go without saying that I selected the hex editing route. I’ll describe the steps I used here, but  all credit to the folks in the forums for figuring this out.

I will assume that you’ve rooted your i9000m and you’re not incapable of using a hex editor.

Step 1: We’re going to copy some non-volatile memory off the phone that contains the ‘lock’. Perform the following commands on the phone (probably via ADB).

$ su
# cat /efs/nv_data.bin >> /sdcard/nv_data.bin

Now copy that file onto your PC for editing. Make a backup of the original before step 2.

Step 2: Edit that file, I used hexedit on Ubuntu. The lock bit is inside of the byte at 0x181469 in the file. See the green circle below, change that 01 into a 00 and save the file.

Starting at offset 0x181468 you should see the series of digits: ff 01 00 00 00 00 46 46

The XDA post describes it as follows:

There are 5 different types of locks in 5 different bytes

the FF byte should be left alone
the first byte after the FF is the network lock
the next byte is the network subset lock
the next byte is the sp lock
the next byte is the cp lock
the last byte appears to be a data lock.
the 46 46 should be left alone

Step 3: Use the modified file to update your phone. Let’s assume you copied the modified file to /sdcard/nv_data.bin on the phone, and again the commands below are executed on the phone.

$ su
# rm /efs/nv_data.bin
# rm /efs/nv_data.bin.md5
# cat /sdcard/nv_data.bin >> /efs/nv_data.bin
# chmod 755 /efs/nv_data.bin
# chown radio.radio /efs/nv_data.bin || chown 1001.1001 /efs/nv_data.bin
# reboot

That’s it, you’re unlocked. The unlock should persist across ROM (firmware) changes.

References: a great article with pointers to valuable information on the i9000 series.

A $200 tablet

Let me start by saying that the Apple iPad2 is an amazing device, and while it exceeds the price point that I want to talk about it is still a very good value if you treat it like a portable computing device. The lowest price I’ve seen is $299 for the 1st generation iPad, the iPod Touch sneaks under the $200 price point but only has a 3.5″ screen.

Some will point to the HP TouchPad starting this but the race to the bottom has been on for a while in the android tablet market. Of course at the very bottom are tablets like the Aakash, with a retail price in the $60 range. There is admitedly a big difference between the two; the TouchPad is high capability hardware at a fire sale price and the Aakash is a series of price/performance trade-offs.

If you simply want a cheap tablet, there are plenty in the sub $100 price point. It will have wifi, a 7″ screen, resistive screen input (non-multitouch), and a lower end processor. You’ll likely be stuck with the software that is installed on it, if you’re lucky it might have access to the Android Market or have ‘hacks’ available to expand it’s software capabilities. A fun device if you can live inside of its limits.

I’ve been looking at tablets for a while, and while the iPad is very nice I personally prefer an Android based device. As for price point, I had mentally set my price at $200 – in part influenced by the Nook sale that happened earlier this year.

What I liked about the nook is it has reasonable community support, including CyanogenMod. I had the chance to play with a Nook running CyanogenMod, it felt fine but I had missed the sale price and at the retail price of $250 it felt like there wasn’t enough to it. Recently the Nook Color has dropped to $199 and while it is still tricky to get in Canada, eBay has refurbished ones under $200 with shipping to Canada.

After looking around at various 7″ tablets I kept coming back to the Galaxy Tab. It had all the features I wanted and more, and as it turns out every once in a while they appear on kijiji for around $200. It does take a bit of waiting around, and I used the RSS feed [RSS] to watch the search term to keep me alerted when one was posted.

I suppose I should also drop in a reference to the very recently released Kindle Fire. This is a bold move by Amazon, but one that is an obvious evolution of their storefront if you think about it. There is currently problems getting them in Canada, but it is a very interesting device and price point. Certainly a direct threat to Apple due to the ecosystem Amazon is providing with the devices.

Let’s take a look at the three and compare a few features I think are key:

Nook Color Kindle Fire Galaxy Tab
Screen 7″ 1024×600 7″ 1024×600 7″ 1024×600
CPU 800MHz 1GHz(dual core) 1GHz
RAM 512MB 512MB 512MB
Storage 8Gb + MicroSD 8Gb 16Gb + MicroSD
Weight 450g 413g 380g
Camera none none 3.2MP + 1.3MP front
Wireless Wifi b/g/n + bluetooth Wifi b/g/n 3G GSM + Wifi b/g/n + bluetooth
GPS none none yes
Community Yes Not yet Yes

The Galaxy Tab beats the Nook on all fronts, but if 3G data, GPS and camera are not important features to you, the Nook looks very nice. The Nook probably has the strongest community support right now, but the Galaxy Tab is not far behind. The Kindle is very new, so there isn’t much of a hacking community yet (I’m sure there will be) and if you live in the US then the Amazon ecosystem looks very compelling.

I’ve actually purchased two Galaxy Tabs so far. The first I ended up passing along to my father in law who had been on the hunt for a tablet for some time. He had actually tried the iPad2 and Playbook out before settling on the Galaxy Tab. I think price point and functionality combined to meet his criteria. The second one appeared the other day for $150 including a leather case, how could I say no? Yes, that’s my $150 tablet pictured at the top of the post.

I haven’t had any time to play with it so we’ll see if it finds a niche in my gadget use, I’m encouraged by folks like Tim Bray who seems to prefer the 7″ tab vs. other more powerful and newer devices. It is a little tempting to turn it into a phone as it’d make the Galaxy Note seem a bit undersized, but I’d never live down the sidetalking comments at work.

Parting words:  WOW!  If this is the price point we’re at now the future looks amazing for gadgets with mind blowing technology.

Surface Mount Soldering: Repair Harmony 659

My friend Trent gave me a pair of broken Logitech Harmony 659 remotes. I bought into the programmable universal remote ages ago when I purchased a Pronto TSU 2000 – a remote I still use regularly to drive my home theater. I’ve watched with interest the Harmony remotes become more popular and lower cost and have often encouraged people to consider getting them. Having a remote control that everyone in your family can understand how to use means better use of the audio / video system you have. I was really pleased to get these two remotes and figured I could fix both of them.

The first step is opening the remote. There are four screws indicated by the green circles in the picture at the top of this post. Two of the screws are inside the battery compartment. Then there are 6 tabs the clip the top and bottom together – indicated with blue circles. A putty knife and some gentle pressure should get the remote apart without any damage. For things like this it’s important to take your time and be persistent (but not too forceful).

I have two broken remotes. One has a non-responsive keyboard, the other has the USB connector busted off the circuit board. It would probably be fairly simple to combine the two into a single working remote, but that would be taking the easy way out. In the picture above you can see the broken off mini-USB connector. One of the pads has come off the circuit board entirely and the remainder have broken lose of the solder connections. I suspect this failure was a combination of a poor soldering job at the factory, and accidental use of extra force on the connector in normal use.

Prior to doing this repair I had not done any surface mount (SMD) soldering. I went to youtube to learn a few of the techniques for how to do this successfully. I wasn’t working quite at the same scale as is possible, but this was well beyond doing a single pin at a time. Basically the technique is to spread some flux, and drag a loaded soldering iron tip over the pins.

I’ve got a reasonably nice soldering iron now, but I lacked many of the other useful tools such as a a flux pen or loupe. I did have handy some flux I’ve used for soldering copper pipe and a toothpick to apply it with. It worked fine – but don’t do as I did. It turns out that “Kester SP-30 is too corrosive for electrical or electronics soldering applications“. Ok, well lesson learned about making do – I’ll have to see what I can do about cleaning any residual flux off the board.

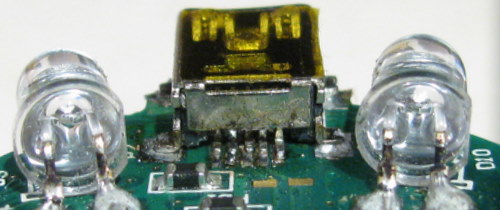
Above you’ll see the result of my first attempt. From a distance it appears to be all good. However, with a bright LED flashlight and my digital camera with 20x optical zoom told a different story.

Close, but not quite. There is some visible bridging of the solder between the pins. So clearly this wasn’t going to work and I needed to start over.

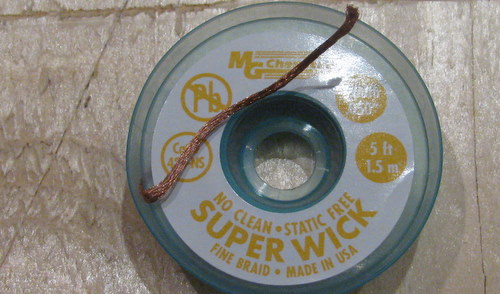
I used some solder wick to remove the old solder. This is a fine copper braid that you heat up in contact with the solder and it sucks up the solder and leaves a clean connection. I should have done this from the start – cleaning off all of the old solder. The result was nice clean solder pads ready for another try.

This time no bridging, just enough solder to get a contact and no more. It’s not as pretty as I’d like it to have been but it appears to work just fine. While this was a bit finicky, it wasn’t really that hard to do. I’ll be a lot braver about dealing with SMD parts in the future.

Initially I had some problems getting it to appear under Linux. I was able to A/B test the other broken unit (bad keypad) as it has a working USB port (very nice to have more than one to do comparisons with). So I started thinking that maybe there was a problem with my soldering work after all. Then I found some instructions on getting the remote into “safe mode”: With no batteries installed, hold the OFF button, plug in USB connection to computer. Once I did this, the remote did show up just fine under Linux. The only weird thing was that after the one time, it showed up even when I didn’t invoke “safe mode” – maybe that caused something to get reset? Before you think your Harmony is broken, try “safe mode” – it might just fix things for you.

I did flip over to Windows XP to run the Harmony software to actually program the remote. Later I may experiment with the Linux solution for working with the Harmony remotes.