Fixing a fake USB flash drive

IMG_2836


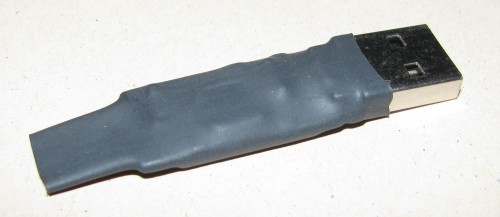
A couple of years ago I picked up a conference give-away flash drive (4GB), which at the time seemed like a pretty nice freebie. The trouble was it only every liked to play nice with my Windows machine, Linux would refuse to mount it. The headline photo is the final product, I failed to take a before picture but the leather + snap case on this USB thumb drive was hideous anyway.

Turns out it was a fake, good thing it was free. Still in my typical fashion I didn’t want to just throw it away, heck I’m still carrying around the mysterious AMD 1GB key I got ages ago. So this bogus 4GB key sat in my work bag for a long while before I finally got to investigating it.

The very first thing I did was use the linux command lsusb, this helped me clue in that there was something wrong (fake) with the drive. I found a forum post that helped me get started down the right path. I got a copy of ChipGenius which told me the following:


Description: [I:]USB Mass Storage Device(Generic Flash Disk)


Device Type: Mass Storage Device

Protocal Version: USB 2.00
Current Speed: High Speed
Max Current: 100mA

USB Device ID: VID = 0011 PID = 7788
Serial Number: 874BE199

Device Vendor: Generic
Device Name: Mass Storage
Device Revision: 0103

Manufacturer: Generic
Product Model: Flash Disk
Product Revision: 8.00

Controller Vendor: Alcor Micro
Controller Part-Number: SC708(FC8708)/AU6987 - F/W EC23
Flash ID code: ADD5949A - Hynix H27UAG8T2BTR - 1CE/Single Channel [MLC-8K] -> Total Capacity = 2GB

So this felt like progress: it's 2GB and not 4GB as Windows seems to think. Still not bad for free. I then used my camera to get some close up shots of the naked circuit board to confirm the data that the ChipGenius tool dug out.

IMG_2810

IMG_2806


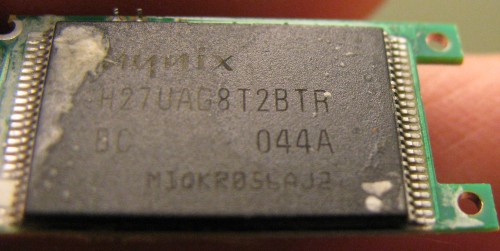
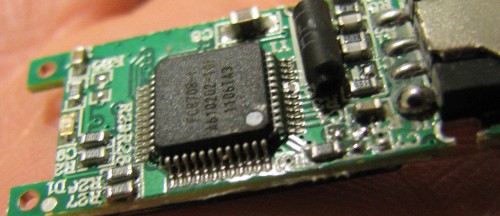
It was good to see that the values matched, this helped boost my confidence in the ChipGenius tool. I did find some references on the web claiming that sometimes ChipGenius is wrong, so it’s worth looking at the chips themselves.

Part of the output was also a link to a website, yet even with google translate the site left me guessing as to what I wanted to download – there were a lot of possible options. I choose one near the top “Series master, the Alcor MPtool AU6987T/6989 Yasukuni, production tools (2011.12.26.00)” as the title matches some of the data in the ChipGenius dump. In the end the stability of the site, language barrier and my inability to successfully download anything sent me off down other paths.

I then ended up searching on flashboot.ru with the controller chip number (FC8708) I was able to find and download (with a bit of google translate help) a tool that recognized the drive. The best way to find this tool is searching it’s name: FC_MpTool_FC8308_FC8508_FC8406_04.02.01.

FC MpTool

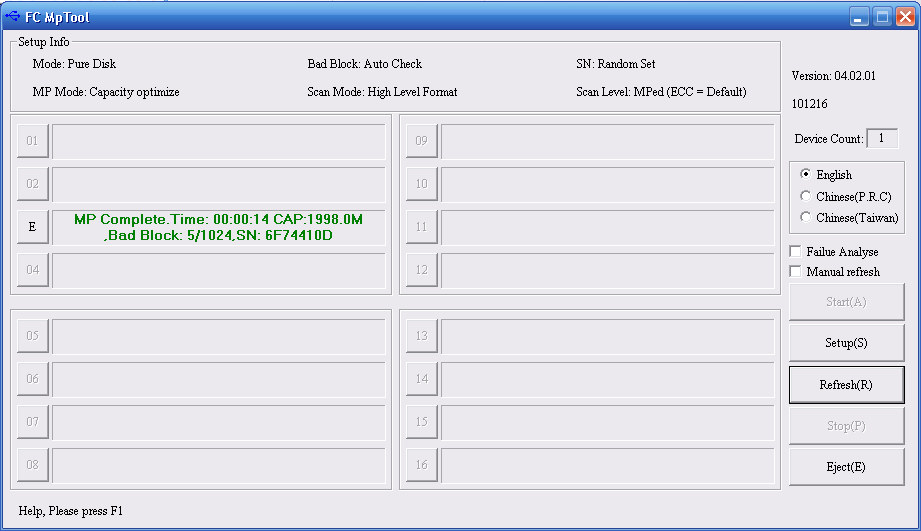
The user interface was mysterious, but clicking on the drive letter started a reformat.. which resulted in a 2GB flash drive. This newly formatted drive was quite happy under Linux.

In terms of performance, I benchmarked copying 7 x ~300MB video files (total 1.9GB) to the stick, this reported ~4.7MB/sec. There were certainly bursty updates in file file progress dialog in Ubuntu. This isn’t great, but again it was free and it works under Linux. I also tried zeroing the entire drive ($ sudo dd if=/dev/zero of=/dev/sdc) which reported: 2095054848 bytes (2.1 GB) copied, 335.285 s, 6.2 MB/s – again, not great but good enough.

A bit of heat shrink tubing applied to cover up the bare circuit board and I’ve got a hack worthy USB key.

Low cost APC UPS RBC33 replacement

IMG_2828

A couple of weeks ago my APC Back-UPS 1200 XS started beeping at me, the battery light was flashing, a clear sign the battery has packed it in. I wasn’t overly surprised as the unit is quite old (I’m guessing 8 years? I can’t recall exactly when I got it) – you should only really count on a battery to last 3 to 5 years so it’s done well for me.

While I don’t remember exactly when I bought the UPS, I do remember price matching FutureShop against BestBuy, the price difference was only $20 but it still made me laugh to do it as they are both owned by the same parent company – that and the price match gave me an additional 10% off of the difference in savings (yup, a whole $2). The manual says I should buy a RBC33 battery pack, these are nearly the same price I paid for the entire UPS ($99 + tax).

I looked locally and on the web for a reasonably good deal for a replacement battery pack. The prices had quite a range and I could have opted to go for a RBC32 which is cheaper but still nearly the cost of original UPS. In the end I opted to go for the DIY route and just buy compatible batteries and do a swap – ebay had the best prices, but amazon.ca had a vendor that was almost the same price and I thought I’d go that route as shipping would be quicker.

The batteries arrived fairly quickly (about a week), faster than I’d expect from any shipment from the US. The two batteries are an identical size match to the pair that form the APC battery pack. The original battery pack has a wiring harness and the two batteries are stacked with one inverted.

IMG_2829


The procedure was very simple, it took me under 10 minutes and I was stopping to take pictures as I went along. Start by peeling away the sticker from the side with the cable sticking out – put it aside if it still is sticky enough to re-use. Fold the batteries so they are side by side. Remove the cables from one battery, then remove the sticker on the other side and separate the batteries. Last remove the harness from the remaining battery.

IMG_2831IMG_2832


Reassembly is a matter of working in reverse. I suggest taking pictures as you go as it is a great way to reference which wire went where, but my photos are a reasonable guide as well. You could also watch this youtube video which covers the battery swap.

My completed battery pack looks a lot like a stock RBC33. If the original stickers don’t have any stick left, a little duct tape should work well.

IMG_2833

The batteries in the original pack were 9Ah and my replacements are only 8Ah, this will affect the runtime of my UPS – for my needs a few minutes of backup are enough to protect the system, the new battery pack should give me nearly 30 minutes. Generally the power is good in my neighbourhood, and if it is an extended black out we’re without power for hours.

I’ve seen a few battery packs from systems at work where the batteries have bulged and are clearly bad, mine actually looked fine so I may try to restore them later. I did also consider upgrading to sealed marine deep cycle batteries, but the cost was significant and I’m not convinced of the safety of the solution.

One footnote, I have the UPS plugged into my server and use apcupsd to monitor the status. When the old battery had failed and the UPS was beeping my logs filled with the following:

2013-04-07 23:20:49 -0400 Battery reattached.
2013-04-07 23:20:11 -0400 Battery disconnected.
2013-04-07 23:20:11 -0400 Battery reattached.
2013-04-07 23:19:07 -0400 Battery disconnected.

Occasionally the beeping would stop (and I assume the logging) but in a short while it would resume beeping (and logging).

Repair Acer AspireOne 532H Netbook Screen

IMG_2767The Acer AspireOne 10.1″ netbook is a handy secondary computer to have around. It’s quite capable of browsing the web, email and viewing photos. Most casual users could likely happily use it as their primary machine. Tablets have all but killed this market, I’m hopeful that the Google Chromebook will bring help back this form factor.

Unfortunately being a secondary computer means that it gets left around (on the floor) and stepped on. This was the sad fate of this particular netbook. It turns out that replacement screens are relatively inexpensive making it well worth fixing. First step was to boot the netbook connected to an external monitor to confirm the resolution of the panel and make sure nothing else was wrong. Armed with that, and a compatibility list  I was able to find a good price for one from a Canadian seller on ebay. Shipping was very fast and the screen came well packaged: boxed and inside a padded envelope.

IMG_2769

Disassembly is quite easy, this YouTube video covers it quite well. Below you’ll find some photos and my notes on the process.

Continue reading “Repair Acer AspireOne 532H Netbook Screen”