Managing docker containers with makefiles

 Image by Jason Scott, licensed under CC-BY-2.0.

I’m very old school when it comes to managing my personal infrastructure. When I came across Jessie Frazelle‘s blog on her personal infrastructure I was inspired to adopt a makefile based approach. There are a couple of others who’ve written about similar approaches.

Here is a generic version of my makefile for containers which are built and hosted on one of the container repositories

There are 3 targets: build, start, update. The update leaves the old container with a -old name. This is useful if you have to roll back to a previous version if for some reason the new container breaks. You could even create a rollback target that did this automatically.

Now, this is great if there is an existing container repository that has a container for you to pull, but things need to change if you are starting with a Dockerfile and building your own container.

Again, I’ve used the same build, start, update commands and have a built in assumption that the Makefile lives in the root of the git project. Instead of pulling from a container registry, we pull the latest from the git project and do a local build.

Having a very similar structure helps with consistency of managing my docker containers.

One day I would like to further enhance these makefiles to support checking for updates, be that a newer container build or git changes. Adding a post update check to ensure that the container has started would be very good too.

Installing docker-mailserver

Everyone should have their own domain name (or several). Having a website on your domain is easy and a sensible use of that domain name. Almost no one should run their own email server, it’s complicated and makes you responsible for all of the problems.

There are lots of providers out there that run email services and allow you to bring your own domain. ProtonMail would be a good choice, you can even bring your own custom domain and still use ProtonMail. Alternatives are offered by Google, and Microsoft if you want to go that route, both provide support for custom domains.

If you are still thinking of running your own mail server, then grab your tinfoil hat and let’s look at the best way to operate a mail server in the age of containers. I’ve run my own email for a long time, mostly following the Ubuntu setup. Using the docker-mailserver solves all of the email problems with a single container.

I will mention there are many alternatives: mailu, iredmail, etc. The docker-mailserver project stands out for me as they have avoided database based configuration and have stuck with ‘files on disk’ as the model.

This is a long overdue mail upgrade. I started doing this way back in 2017, but never really finished the work. The SSD rebuild disrupted how I was doing things, and changing email is a little scary. The hard drive that stores my email is very old. It is a Seagate Barracuda 40GB (ST340014A). The SMART information says that the Power Cycle Count is only 502, but the Power On Hours is an astounding 130442 (that is 14.89 years). Every stat is in pre-fail or old age, it is definitely time to move my email off that drive.

Before starting, take the time to read through the documentation. Once you think you’re ready to start installing thing the ReadMe is the right path to follow. I’m going a slightly different path than the recommended one which uses docker-compose, and will build out a basic docker deployment.

First I grabbed the following two files

And the setup script for v10.0.0 as I intend to use the ‘stable’ version vs. ‘edge’. It is important to get the matching setup.sh script for the version you are deploying.

I used the docker-compose.yml file to inform me how to configure my Makefile based docker approach. Most of the create options are a direct mimic of the compose file.

I walked through the mailserver.env file and made a few changes

  • ONE_DIR=1
    I’m not totally sure about this, but the documentation reads: “consolidate all states into a single directory (/var/mail-state) to allow persistence using docker volumes.” which seems like a good idea.
  • ENABLE_CLAMAV=1
    My existing email server uses ClamAV 
  • ENABLE_FAIL2BAN=1
    I’m a fan of fail2ban for protecting my server from abuse
  • ENABLE_SPAMASSASSIN=1
    My existing email sever uses SpamAssassin

The volume pointing to letsencrypt is sort of a placeholder for now. Once we get things basically setup I will be changing the SSL_TYPE to enable encryption using my existing letsencrypt certificate that my webserver container has setup.

I later added the following additional configuration to enable logwatch.

  • LOGWATCH_INTERVAL=daily
    Having an email centric logwatch email vs. combining it with my server logwatch, seemed like a good idea.

  • LOGWATCH_RECIPIENT=postmaster@lowtek.ca
    Where to send the email.

With my Makefile based docker approach I have build, start and update targets. I can manually roll-back if needed as the previous container is has a -old name. The first step is to build the container.

At this point we are at the Get up and running section. We need to start the container and configure some email addresses.

Assuming all goes well, the mailserver container will be running. If we poke around the filesystem we’ll see a few files have been created

  • config/dovecot-quotas.cf
  • maillogs/clamav.log
  • maillogs/freshclam.log

We should be able to run the setup script and add a user, and configure some key aliases.

The creation of the account will cause some additional files to be created

  • config/postfix-accounts.cf
  • config/postfix-virtual.cf

At this point we have a running email server – but we need to start getting data to flow there. You may have to open ports in your firewall on the docker host to allow external traffic to connect to this new container.

This is very encouraging, but there is still a list of things I need to do

  1. Create accounts and aliases
  2. Configure smart host sending via AWS SES
  3. Enable SSL_TYPE
  4. Set up DKIM
  5. Change the port forwarding to point to my container host
  6. Migrate email using imapsync

The rest of this post is details on those steps

Continue reading “Installing docker-mailserver”

DNS for lowtek.ca

It’s been 20 years I’ve had the domain lowtek.ca. Over that time I’ve had a few different ways to host the domain and the DNS records which point that domain the the IP address.

For a long time I had a static IP, this allowed me to set my DNS record and forget it. It was even, depending on my ISP, possible for me to have the reverse lookup work too. Paying a bit extra for a static IP was well worth it with a DSL connection, as you frequently got a new address. When I moved to cable, a static IP wasn’t an option, but the IP also rarely changes (once every year or two).

Back in the early days, domain registrars would charge for their DNS services or simply didn’t have one – this pushed me to look for free alternatives. I’ve used a few solutions, the most recent being some systems my brother maintains and I’ve got root access on, allowing me to modify the bind configuration files.

Recently I realized that rebel.ca would allow me to manage my DNS records, and it’s free.

Once logged into rebel.ca you can go to manage your domains. For a given domain you can then get to the DNS tab. On that tab under “Nameserver Information” you can pick one of three options:

  • Park with Rebel.ca
  • Forward Domain
  • Use Third Party Hosting

Until very recently I was using the Third Party Hosting option and pointing at the DNS servers managed by my brother. This worked well, but was another place to log into and I would have to re-learn the bind rules for editing my records because I rarely did any updates. With rebel.ca managing it, I get an easy web UI to change things.

I did find it odd that I had to opt to “Park with Rebel.ca” in order to start managing my DNS. Once you’ve selected this option, you can then use the “Advanced DNS Manager” to see the records that they have for your domain.

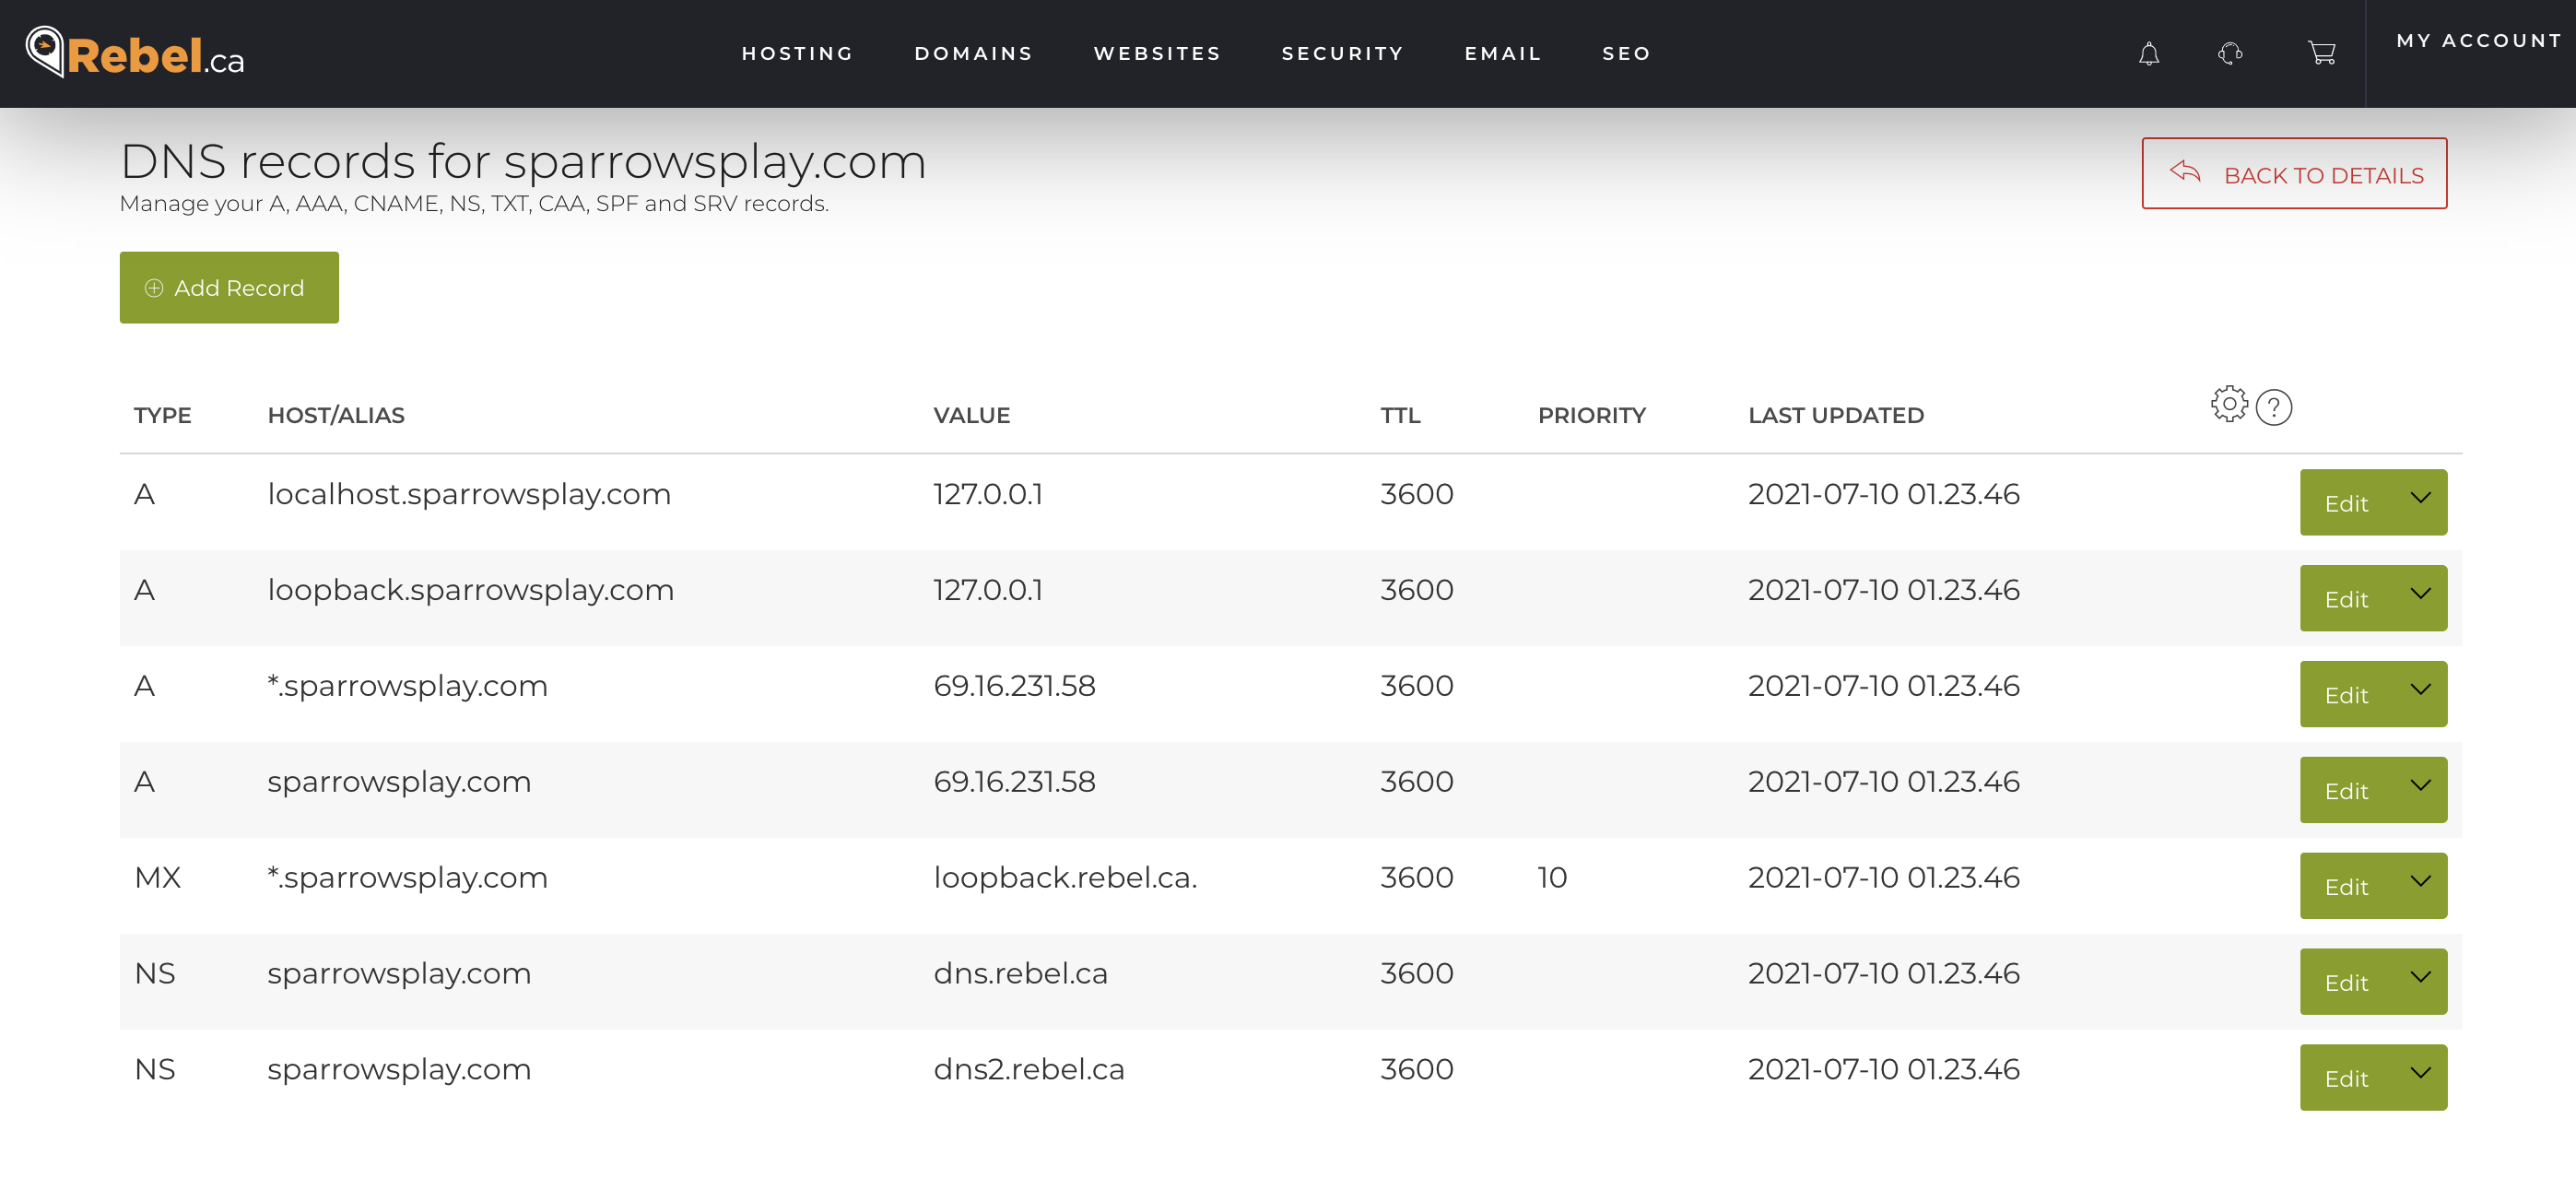
Here is what I got once I had parked my domain.

The IP address 69.16.231.58 reverse maps to lb04.parklogic.com, and parklogic.com appears to be a domain parking company. Visiting a parked domain appears to redirect to https://simcast.com/ eventually.

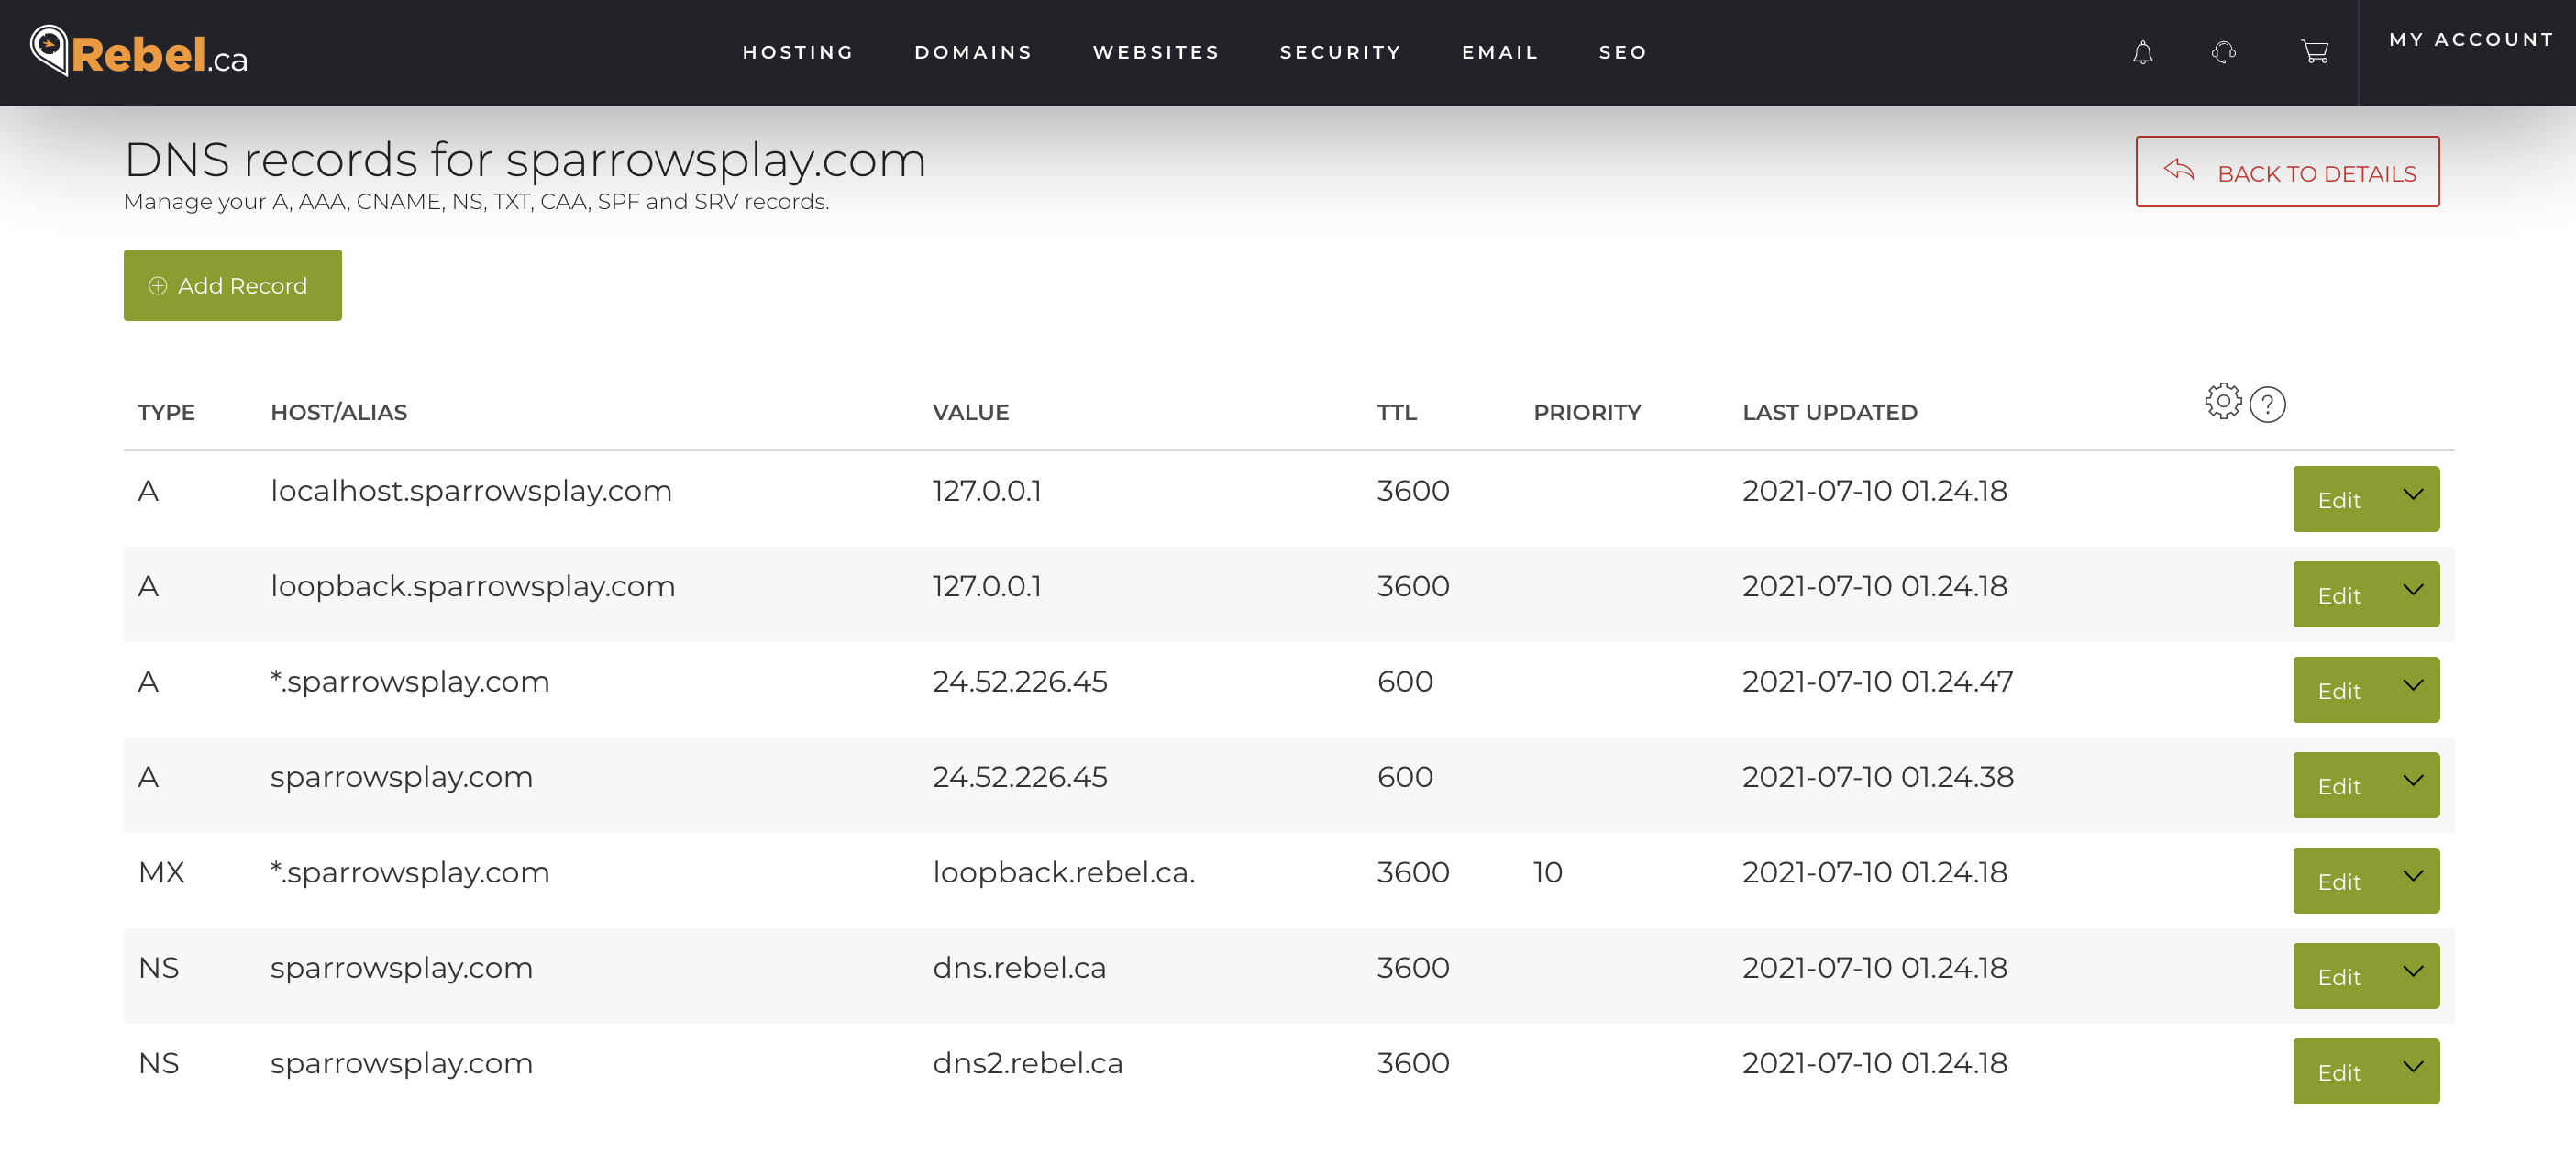
Since this particular domain only has a web server on it, I only need to make 2 changes to the default entry that was provided to me.

I could probably safely trim down some of the entries. I don’t need an MX record, nor the localhost or loopback entries. The wildcard could also be reduced to only the www subdomain. This works as is, and the extra entries shouldn’t cause any problems.

One thing that I’ve given up by moving to the rebel.ca DNS is control over the SOA record.  Let’s look at the differences in the SOA records.

My old nameserver

Rebel.ca nameserver

This boils down to these changes (old vs. rebel.ca)

  • Refresh: 10min vs. 3hrs
  • Retry: 2hrs vs. 1hr
  • Expire: 1000hr vs. 168hr
  • Minimum: 10min vs. 1hr

I’m a little concerned with the refresh value being so much different. I was worried this would impact how long it will take to roll out changes to the DNS records in general. Previously with a 10min refresh – I’d see fairly quick DNS changes. This is somewhat mitigated by the fact that my site(s) are not high traffic, so many times the values are not cached at all. This might burn me when my IP address changes – but hopefully for only ~3hrs. I can probably live with that if it turns out to be that long.

The retry and expire values are basically in the same range, so it’ll be fine.

The minimum is actually the SOA default TTL and is used for negative caching. This means that all the queries that don’t have a valid response are cached for this amount of seconds. Thus the 1hr time is aligned with the general recommendations. The previous setting of 10mins I think was wrong and would cause extra network traffic in some cases.

While I do not have control over the SOA record, I can control the TTL for specific records as you will have noticed in the screen shots above where I’ve set some of them to 600.

So for the sparrowsplay.com A record, I have 600 seconds (10min) set.

There is a lot of confusion about DNS records in general as is apparent in this stack overflow post. I know from experience with bind that if I forgot to update the SOA serial number, my changes wouldn’t flow. This I believe may be simply because the bind software was not deciding to change anything based on the serial number. As I read through things, the low TTL for the A records should cause my changes to flow quickly (10min vs. 3hrs).

Doing a quick test changing the record back to 69.16.231.58 and using one of the DNS propagation checking sites, I can see that some of the servers picked up the change immediately.  The ‘big’ nameservers: opendns, google, quad9 seemed to pick up the changes very quickly. I did see google and opendns give back the old address randomly in the middle of my refreshing for updates, so clearly there is a load balancer with many nameservers and not all of them are picking up the change (yet).

At almost precisely the 10min mark, all of the nameservers appear to have gotten the new IP address. This is very good news, meaning that the TTL for the A record determines how long it will take to make an IP change for my website.  This means that my earlier concern about the SOA record was mistaken, with TTL control over the A record I can quickly update my IP address.