

Everyone should have their own domain name (or several). Having a website on your domain is easy and a sensible use of that domain name. Almost no one should run their own email server, it’s complicated and makes you responsible for all of the problems.
There are lots of providers out there that run email services and allow you to bring your own domain. ProtonMail would be a good choice, you can even bring your own custom domain and still use ProtonMail. Alternatives are offered by Google, and Microsoft if you want to go that route, both provide support for custom domains.
If you are still thinking of running your own mail server, then grab your tinfoil hat and let’s look at the best way to operate a mail server in the age of containers. I’ve run my own email for a long time, mostly following the Ubuntu setup. Using the docker-mailserver solves all of the email problems with a single container.
I will mention there are many alternatives: mailu, iredmail, etc. The docker-mailserver project stands out for me as they have avoided database based configuration and have stuck with ‘files on disk’ as the model.
This is a long overdue mail upgrade. I started doing this way back in 2017, but never really finished the work. The SSD rebuild disrupted how I was doing things, and changing email is a little scary. The hard drive that stores my email is very old. It is a Seagate Barracuda 40GB (ST340014A). The SMART information says that the Power Cycle Count is only 502, but the Power On Hours is an astounding 130442 (that is 14.89 years). Every stat is in pre-fail or old age, it is definitely time to move my email off that drive.
Before starting, take the time to read through the documentation. Once you think you’re ready to start installing thing the ReadMe is the right path to follow. I’m going a slightly different path than the recommended one which uses docker-compose, and will build out a basic docker deployment.
First I grabbed the following two files
|
1 2 |
wget https://raw.githubusercontent.com/docker-mailserver/docker-mailserver/master/docker-compose.yml wget https://raw.githubusercontent.com/docker-mailserver/docker-mailserver/master/mailserver.env |
And the setup script for v10.0.0 as I intend to use the ‘stable’ version vs. ‘edge’. It is important to get the matching setup.sh script for the version you are deploying.
|
1 2 |
wget https://raw.githubusercontent.com/docker-mailserver/docker-mailserver/v10.0.0/setup.sh chmod a+x ./setup.sh |
I used the docker-compose.yml file to inform me how to configure my Makefile based docker approach. Most of the create options are a direct mimic of the compose file.
|
1 2 3 4 5 6 7 8 9 10 11 12 13 14 15 16 17 18 19 20 21 22 23 24 25 26 27 28 29 30 31 32 33 34 35 36 37 38 39 40 41 42 43 44 |
# # email # https://hub.docker.com/r/mailserver/docker-mailserver # NAME = mailserver REPO = docker.io/mailserver/docker-mailserver:latest # ROOT_DIR:=$(shell dirname $(realpath $(lastword $(MAKEFILE_LIST)))) # Create the container build: docker create \ --name=$(NAME) \ --hostname mail \ --domainname lowtek.ca \ -p 25:25 \ -p 143:143 \ -p 465:465 \ -p 587:587 \ -p 993:993 \ -v /path/to/mail/maildata:/var/mail \ -v /path/to/mail/mailstate:/var/mail-state \ -v /path/to/mail/maillogs:/var/log/mail \ -v /etc/localtime:/etc/localtime:ro \ -v $(ROOT_DIR)/config/:/tmp/docker-mailserver/ \ -v /path/to/etc/letsencrypt:/etc/letsencrypt \ --env-file $(ROOT_DIR)/mailserver.env \ --cap-add NET_ADMIN \ --cap-add SYS_PTRACE \ --restart=unless-stopped \ $(REPO) # Start the container start: docker start $(NAME) # Update the container update: docker pull $(REPO) - docker rm $(NAME)-old docker rename $(NAME) $(NAME)-old make build docker stop $(NAME)-old make start |
I walked through the mailserver.env file and made a few changes
ONE_DIR=1
I’m not totally sure about this, but the documentation reads: “consolidate all states into a single directory (/var/mail-state) to allow persistence using docker volumes.” which seems like a good idea.ENABLE_CLAMAV=1
My existing email server uses ClamAVENABLE_FAIL2BAN=1
I’m a fan of fail2ban for protecting my server from abuseENABLE_SPAMASSASSIN=1
My existing email sever uses SpamAssassin
The volume pointing to letsencrypt is sort of a placeholder for now. Once we get things basically setup I will be changing the SSL_TYPE to enable encryption using my existing letsencrypt certificate that my webserver container has setup.
I later added the following additional configuration to enable logwatch.
-
LOGWATCH_INTERVAL=daily
Having an email centric logwatch email vs. combining it with my server logwatch, seemed like a good idea. -
LOGWATCH_RECIPIENT=postmaster@lowtek.ca
Where to send the email.
With my Makefile based docker approach I have build, start and update targets. I can manually roll-back if needed as the previous container is has a -old name. The first step is to build the container.
|
1 |
make build |
At this point we are at the Get up and running section. We need to start the container and configure some email addresses.
|
1 |
make start |
Assuming all goes well, the mailserver container will be running. If we poke around the filesystem we’ll see a few files have been created
config/dovecot-quotas.cfmaillogs/clamav.logmaillogs/freshclam.log
We should be able to run the setup script and add a user, and configure some key aliases.
|
1 2 3 4 5 |
# Put a space in front of the command # This will prevent the shell from logging your password ./setup.sh email add myemail@lowtek.ca SuperSecretPassword ./setup.sh alias add postmaster@lowtek.ca myemail@lowtek.ca |
The creation of the account will cause some additional files to be created
config/postfix-accounts.cfconfig/postfix-virtual.cf
At this point we have a running email server – but we need to start getting data to flow there. You may have to open ports in your firewall on the docker host to allow external traffic to connect to this new container.
This is very encouraging, but there is still a list of things I need to do
- Create accounts and aliases
- Configure smart host sending via AWS SES
- Enable SSL_TYPE
- Set up DKIM
- Change the port forwarding to point to my container host
- Migrate email using imapsync
The rest of this post is details on those steps
1. Create accounts and aliases
For creating accounts, I just need to use the same setup email add command with different user/passwords. For aliases, I’ll shut down the server and edit the config/postfix-virtual.cf file as that will be quicker. I will also add some comments to the file.
My existing mail system uses /etc/aliases and doesn’t have the same format as the postfix-virtual.cf file, but some quick search and replace along with a manual scan for any minor problems made quick work of this.
2. Configure smart host sending via AWS SES
After many attempts to get my system to be recognized as a trusted email server, I finally gave in and started to smart host route all of my email. Your ISP probably provides this, but I was finding that mine was not being as reliable as I wanted. It is also nice to have independence from my ISP.
It turns out that Amazon SES (Simple Email Service) does a really great job. It is a little bit painful to get the restrictions removed from your account, but once you wait out the painfully slow support process you are approved to send something like 50k emails a month. The other very sweet part of using AWS SES as my mail relay is the bill. Every month they send me a bill for $0.01 – which they seem to just waive. I’ve never had a charge on my credit card.
The docker-mailserver project has a dedicated AWS SES setup page, but it seems that things have changed as is noted in the relay hosts page. Even after reading these I was a little confused as to how to properly setup setting things up as a relayhost for my outgoing email.
I ended up looking at the source of the docker-mailserver project to figure it out, or at least a path that worked for me.
There are two sections at the bottom of the mailserver.env file.
- Default Relay Host Section
- Multi-Domain Relay Section
We need to set up both of these to get the AWS SES setup correct. Let’s also reference the AWS documentation on configuring postfix with SES.
First we setup the default relay host (pick the right region for your SES)
|
1 |
DEFAULT_RELAY_HOST=[email-smtp.us-west-2.amazonaws.com]:587 |
This will configure docker-mailserver to try to send email to this relayhost, but we have to also configure the multi-domain relay section to provide the right authentication, otherwise it will fail to authenticate.
|
1 2 3 4 5 6 7 |
RELAY_HOST=email-smtp.us-west-2.amazonaws.com RELAY_PORT=587 RELAY_USER=SMTPUSERNAME RELAY_PASSWORD=SMTPPASSWORD |
The first two fields, are a decomposition of the DEFAULT_RELAY_HOST. The SMTPUSERNAME and SMTPPASSWORD you can create by following this AWS documentation. Once created, the credentials can be viewed only until you dismiss the dialog box. You probably want to copy them into your password manager.
Then if you think things are configured correctly, you can shell into the docker container and send a test email from the command line
|
1 2 3 |
docker exec -it mailserver bash # Now we are inside of the container, send a test email mail -s "Test email" user@gmail.com <<< 'Sending via AWS SES' |
3. Enable SSL_TYPE
I’m already running an nginx container that has letsencrypt built in to get me a certificate. That certificate is also already configured to support mail.lowtek.ca as a domain.
If you review the Makefile, I’ve already got the certificate as a host volume in my container. Looking at the documentation for SSL_TYPE, I need to add to my mailserver.env file
|
1 |
SSL_TYPE=letsencrypt |
I also want to make sure that inside the container I have a path /etc/letsencrypt/live/maildomain
Where maildomain is the fqdn (fully qualified domain name) of the mail container.
|
1 2 3 4 5 6 7 8 9 |
# again we will shell into the mail container docker exec -it mailserver bash # now inside the container look at root@mail:/# hostname mail root@mail:/# domainname lowtek.ca # hostname.domainname is the fqdn |
My nginx setup with letsencrypt is storing the certificate under /etc/letsencrypt/live/lowtek.ca – so I need to make some tweaks so this will work. My solution is to setup a symbolic link so things land under the right name.
Now inside of the container – I can see the right path.
|
1 2 3 4 5 6 |
$ docker exec -it mailserver bash root@mail:/# ls -l /etc/letsencrypt/live/ total 8 -rw-r--r-- 1 1000 1000 740 Dec 20 2019 README drwxr-xr-x 2 1000 1000 4096 Jul 13 21:38 lowtek.ca lrwxrwxrwx 1 1000 1000 9 Jul 13 21:39 www.lowtek.ca -> lowtek.ca |
Looking at the logs on startup, things look clean (they didn’t when I didn’t have the symbolic link). So I think I’m good here, which I was able to confirm once I had made the server live.
4. Enable DKIM
The docker-mailserver project encourages you to setup DKIM, and you should. I’ve previously setup DKIM, but since I moved to AWS I’ve been using their easy solution. SES will wrap all of your outgoing email with a DKIM key, so we can ignore setting this up.
After mail is flowing, you can verify that you’ve got all the right DNS magic (DKIM, Dmarc, SPF) configured using the Email Deliverability Tool. In general mxtoolbox is a great help. I was able to get a clean bill of health.
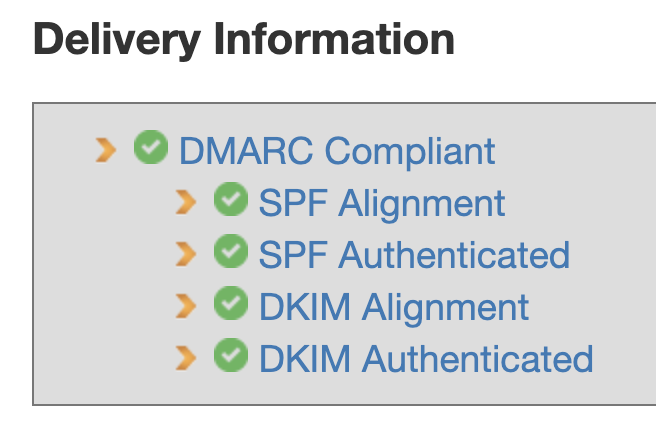
If I go digging into the details, I find one area where I get a “DKIM Signature Alignment” error. At first I thought there was still a problem, but as I dug into things I realized that this is just a warning. An email may have multiple DKIM signatures, and only one must match in order for DKIM alignment to be valid.
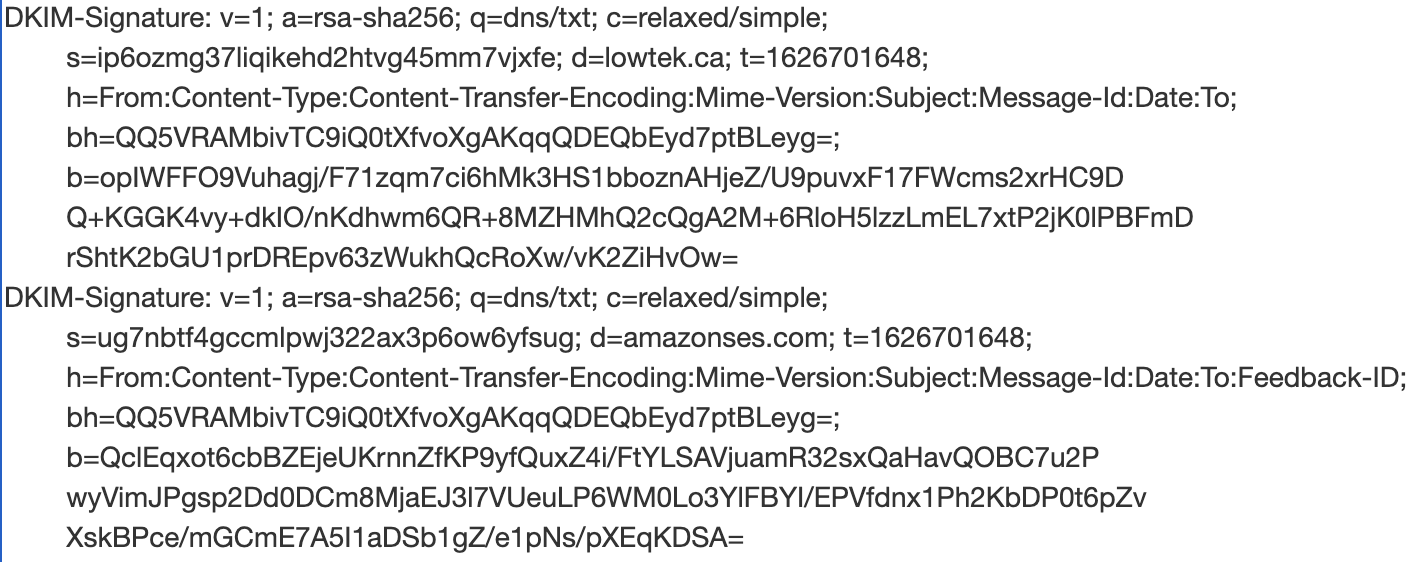
Email coming from my server is getting two DKIM signatures on it from AWS SES via the Easy DKIM support. One with d=lowtek.ca, and a second with d=amazonses.com.
5. Change the port forwarding to point to my container host
This is when things get real. Did I remember to move all of the aliases? I mostly did, but after watching some logs I realized I missed a few (and had a few bad edits) – easy enough to fix.
Switching the port forwarding was relatively easy. I was having trouble setting up the (many) email clients. I scratched my head a lot about this problem, even pulling out nmap which showed me that something strange was going on.
Then I figured it out, fail2ban was blocking me. Since all of the machines on my local network trying to reach lowtek.ca will appear to be coming from the IP of my main router, an I hadn’t changed all the clients to use the new user@lowtek.ca (vs. the older user) – I was having many failures to log in. These failures were trigging fail2ban to block the router IP, and thus all internal network access.
I temporarily removed the --cap-add NET_ADMIN from the container until I had fixed all of the email clients.
At this point my mail is live.
6. Migrate email using imapsync
In retrospect, I could have probably done this before going live and it would have minimized the pain I had while all my email sync’d over. Some email clients were pretty unhappy about this change, but as this is IMAP and all the mail lives on the server – deleting your client account and starting over isn’t that terrible.
I opted to use the docker container version of imapsync. This worked fairly well and I ended up with a simple script to call the imapsync utility inside of the container. I had to repeat this for each of the users I was migrating.
|
1 2 3 |
docker run --rm gilleslamiral/imapsync imapsync --addheader \ --host1 oldmail.lan --user1 myuser --password1 "secretpass" \ --host2 lowtek.ca --user2 myuser@lowtek.ca --password2 "secretpass" |
The --addheader is there because a fair selection of emails were missing headers, mostly from the sent folder(s). I also hit a problem with very large emails, as the default limit of the docker-mailserver is a reasonable 10MB.
Temporarily modifying the mailserver.env to have POSTFIX_MESSAGE_SIZE_LIMIT=0 allowed all of my old messages to be migrated.
Nice article!
How did you figure out how to migrate your /etc/aliases to the postfix-virtual.cf fomat?
I’m far from an expert with regex and I’m having some trouble with emails to “regexped”-aliases.
Thanks
Mike – I just manually converted the file – I used search/replace but that was imperfect.
Old format:
aliasX   user1

aliasY   user1, user2
Needed to be changed to:
aliasX@domain.ca    user1@domain.ca

aliasY@domain.ca    user1domain.ca, user2@domain.ca
——————————-
alias1 user1
aliasW userW, user2
aliasX userX
aliasY userY, userZ
——————————-
This should do the trick:
sed ‘:a;N;$!ba;s/\([\n]\)/@domain.de\1/g’ aliases | sed ‘s/\([,]* \)/@domain.de\1/g’ >> aliases.new
Result:
——————————-
alias1@domain.de user1@domain.de
aliasW@domain.de userW@domain.de, user2@domain.de
aliasX@domain.de userX@domain.de
aliasY@domain.de userY@domain.de, userZ@domain.de
——————————-
I missed the whole multi-domain section. It was mentioned but I don’t see the actual configuration.
If domainA.com is your main mx, do you have an mx record in domainB.com pointing to mx.domainA.com?
Assuming this is correct, where/how do you configure certificates to respond for the correct domain when an outside mail server (domainC.org) is trying to send/validate mail coming from (or going to) domainB.com?
I tried this using iRedmail and it seemed that postfix is maybe the responsible service for this. Is the configuration the same? SNI_MAPS and such or is there a different configuration for docker mailserver.
Totally appreciate the rest of your write up here.
Lou, in my setup the multi-domain section at the bottom of the mailserver.env file is configured to upstream all of my email to AWS SES. I have only a single domain I’m hosting email for, so I don’t have any direct experience to share with you.
How di you guys get permission from Amazon to use AWS SES?
I requested production access and it is was denied. I was honest about using it for private purposes, since I do not want to lie my way in. The 0.01 $ bill was also too good to be true 🙁
All other options seems to cost a lot. Any suggestion is welcome.
It’s been years since I did this – but as documented – the self service part only gets you into a ‘trial’ mode which is very limiting.
I was truthful about my goals, but I may not have said ‘private’. I would have represented my needs as a low volume email server for my domain. I wanted to fit into one of their use cases – but without claiming I’m going to send 10,000 of marketing emails.
I will agree that using SES this way is a bit outside the expected – but it isn’t doing anything spammy, nor are you going to create a lot of overhead for the service. I don’t see why they would not approve you. Oh, but it did take multiple back-and-forths with the support team before I was approved, I don’t have a record of that correspondence however.
FWIW – My bill of $0.01 has always been forgiven – so my outlay has been $0.
I will note that almost every ISP supports email of some form – and you can smart host through your ISP without any real friction.
Thanks for this article and your reply,
I contacted support again, asking why they denied it (if it was due to misconfiguration or my use case -learning & testing) and this time they granted me access, no further questions asked!
Now I feel responsible for NOT let some spammer get access to my mail server. As a self-host-beginner this causes me to feel a bit uncertain.
P.S. can you remove my last name from the previous post and this P.S. line please?