HTC Desire S-OFF

HTC phones have a security flag, this flag is normally “ON” and is indicated on the bootloader screen as S-ON. The purpose of the security flag is to prevent unsigned firmwares from being installed. Clearly if you want to modify your phone with custom firmware you need to be in the S-OFF state.

To access the bootloader screen: start with the phone in a powered off state; hold the volume down button; then press the power button. This should result in you entering the bootloader screen. Menu navigation is via volume up/down and the power button for select.

My HTC Desire was in S-ON, yet still running custom firmware. This was done by Unrevoked3. It switched the phone to S-OFF, installed a custom recovery image, then switched back to S-ON. I believe since the recovery image has the ability to install firmware you can dodge the firmware signature check (effectively bypassing hboot). Really the only reason to have S-ON is to make the phone look more like stock.

There are multiple ways to achieve S-OFF (including Unrevoked3), but what I primarily wanted to do was change the partition table to allow for more application storage on the phone. The partition table is part of the hboot, so changing this is a bit scary since if you mess up hboot you have no easy path to recovery. The good (and bad) news is that S-OFF is also achieved by flashing a new hboot.

Custom partition table hboots are hosted on the AlphaRev site. It is a information dense site. If you plan to do this, read all of it carefully. If you really don’t understand what it’s talking about, read some more or consider asking someone for help. This is not something you want to get wrong.

As with anything like this – do a backup of your stuff. Download the iso from AlphaRev and burn a CD, you’ll be booting your PC into the custom linux based image to do the changes. The tool is well scripted and pretty clear. Do not panic, and read what is on the screen carefully. Once the AlphaRev tool is done, you’re phone will be in S-OFF state and should have a bootloader screen similar to what is at the top of this post

Now we’re in S-OFF mode, we can flash an hboot with a custom partition table. If you had already achieved S-OFF you could skip the above steps and just start here to customize your partition table. Here are the steps I took:

  1. Boot into your recovery image (ClockworkMod Recovery) and do a backup
  2. Verify the MD5SUM of the hboot file you downloaded
  3. Place the phone in fastboot mode (bootloader)
    $ sudo ./fastboot flash hboot bravo_alphaspl.img (filename may differ)
  4. Reboot the phone
    $ sudo ./fastboot reboot-bootloader
  5. Erase the cache
    $ sudo ./fastboot erase cache
  6. Boot into your recovery recover image
  7. Wipe everything using recovery
  8. Restore the backup you made

If your phone is stuck in S-ON, then fastboot isn’t an option.

The benefits of the custom partitions is significant. The NexusOne had 196MB of internal storage, the stock HTC Desire only 148MB. With the custom partition table hboot, I now have 288MB. The trade-off is the partition table I’m using now won’t fit the stock ROM, but reverting to a different hboot is easy enough by repeating the steps above.

You’ll notice that the AlphaRev process customizes your splash screen. If you’re not happy with this they provide a link to the stock splash screen. Enter the bootloader again, and issue:

$ sudo ./fastboot flash splash1 desire_stock_splash1.img

And you’ll be back to looking like stock. Creating your own custom splash screen is also quite easy to do. If I get inspired to change mine, I’ll write up details on how – but a bit of searching will get you the answer too.

Drawdio

As a kid I had a couple of those 50 in 1 electronic project kits, it was great fun to build the various projects outlined in the instruction book. I’m still pretty keen to bust out the soldering iron, especially since I got a really nice one this year for fathers day. Along with the iron, I picked up a Drawdio kit (parts pictured above).

My 6 year old built the kit with me, and you can see we also had some extra help. You’ll note the use of safety goggles was mandatory.

Aside from the contents of the kit, we needed a soldering iron, solder, cutters, 3rd hand and of course goggles. The web based directions for the kit are very detailed and cover all you need to know. They suggest a multi-meter but I didn’t find I needed one.

My daughter handled the soldering iron but I was the one with the solder. This tag team worked well for most of the kit. Later in the build I took over some of the fiddly bits (the 555 timer and speaker).

Below is the final build picture. It took about an hour start to finish. The Drawdrio doesn’t need to be used with a pencil, you can optionally wire it into a lot of different things. Beyond being an easy starter project to put together – it’s a great way to teach electrical conductivity concepts.

A few tips. You’ll want to make sure the battery you use has a full charge. Be patient with getting a drawing to make noise, you’ll find you need a very dark line to make it start playing. Once started, it’s easy to keep things going ‘by ear’ adjusting on the fly as it comes in and out of electrical contact. If you’re looking for more copper tape, any stained glass store will have it in stock.

[Edit: check out the original Drawdio site by the inventor – Jay Silver]


Review: TPU GEL Case for HTC Desire

The NexusOne had a nice dock, however the dock really wasn’t compatible with any cases. It did have a screen protector on it (from zagg). For my (new to me) HTC Desire I have no dock, so I thought I’d get a case and a generic screen protector. I’d dropped the NexusOne once or twice and cringed as it hit the ground. No major damage was done, but I did add a dent or two.

You can see what I bought above. It was a $2.99USD from an eBay seller, shipping from HongKong included. Based on the stamps on the envelope, it cost about $0.70 postage to ship it.

The case was exactly what I expected. A slightly flexible case with all the right holes for camera, headphones and power. The power and volume buttons are covered but function well. It is a good snug fit over the phone. The case adds some bulk to the phone, but not a lot of weight. I’m still quite pleased with the case after having it on the phone a couple of days.

The case is described as TPU GEL. Thermoplastic Polyurethane (TPU) is a type of plastic, the GEL is I suspect used to describe the flexibility of the case, as there are TPU cases which are hard plastic. Jenn has a Kate Spade silicon case for her iPhone 3G and it’s quite a bit more rubbery than this one.

The use of screen protectors is almost a religious issue. I hadn’t had a phone with a screen protector until the NexusOne, and it came to me with one installed. The HTC Desire does have Gorilla Glass on it, however it isn’t immune to small nicks and scratches.


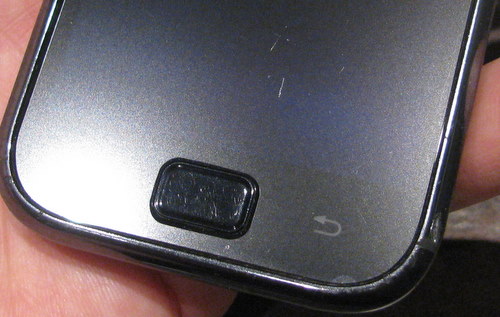
Hopefully you can see the numerous small nicks on the screen in the picture above. You didn’t see them in normal lighting conditions, but the were there. I figured for the price, I couldn’t really go too wrong.

The screen protector is the typical generic screen protector. They include a small cleaning cloth as well. The instructions read a little like engrish, but are understandable. The screen is by no means anti-glare, the resulting finish is high gloss and I did have a few minor bubbles. Compared to the zagg which had a very distinctive feel to it, this one feels just like the bare screen.

I ran into the usual problems when applying the screen protector. The first film you take off exposes the sticky adhesive that will bind the screen protector to the phone. Of course it will pick up every free dust particle in the area – and even a grain of dust will show up as a bubble on the screen. Using the dusting cloth too close to the adhesive is a great way to get more stuff stuck to it. I found that the corner of the protective film used as a pick was useful for clearing dust bits out of the way – even off the adhesive.

One tip I may try in future is to do this in the bathroom. Run the shower to make the room a bit steamy, this will reduce airborne dust. Then make sure you’ve got good bright lighting and go to it. If you can get it perfectly aligned the first time that’s best, the more you mess with it – the more you are dealing with small bubbles. Large bubbles can be worked out prior to removal of the 2nd film.

Looking at the final product of my efforts below, you can see a number of imperfections in the application. Dust trapped below the screen protector as well as a few circular artifacts which are air bubbles. The screen protector also didn’t quite seal down in a couple of corners (likely where I handled it too much). None of the imperfections are highly visible in normal usage.

Apparently Steve Jobs had commented (on iPod’s) that stainless steel looks beautiful when it wears, and I have to agree. The rate at which I seem to change phones lately (about once a year) it is unlikely that I really need to worry about protecting the device all that much. Without any case or screen protection, it is likely this phone will last the 3 years or so before it is completely obsolete – I’ll still feel much better the next time I drop it onto the pavement.