A $200 tablet

Let me start by saying that the Apple iPad2 is an amazing device, and while it exceeds the price point that I want to talk about it is still a very good value if you treat it like a portable computing device. The lowest price I’ve seen is $299 for the 1st generation iPad, the iPod Touch sneaks under the $200 price point but only has a 3.5″ screen.

Some will point to the HP TouchPad starting this but the race to the bottom has been on for a while in the android tablet market. Of course at the very bottom are tablets like the Aakash, with a retail price in the $60 range. There is admitedly a big difference between the two; the TouchPad is high capability hardware at a fire sale price and the Aakash is a series of price/performance trade-offs.

If you simply want a cheap tablet, there are plenty in the sub $100 price point. It will have wifi, a 7″ screen, resistive screen input (non-multitouch), and a lower end processor. You’ll likely be stuck with the software that is installed on it, if you’re lucky it might have access to the Android Market or have ‘hacks’ available to expand it’s software capabilities. A fun device if you can live inside of its limits.

I’ve been looking at tablets for a while, and while the iPad is very nice I personally prefer an Android based device. As for price point, I had mentally set my price at $200 – in part influenced by the Nook sale that happened earlier this year.

What I liked about the nook is it has reasonable community support, including CyanogenMod. I had the chance to play with a Nook running CyanogenMod, it felt fine but I had missed the sale price and at the retail price of $250 it felt like there wasn’t enough to it. Recently the Nook Color has dropped to $199 and while it is still tricky to get in Canada, eBay has refurbished ones under $200 with shipping to Canada.

After looking around at various 7″ tablets I kept coming back to the Galaxy Tab. It had all the features I wanted and more, and as it turns out every once in a while they appear on kijiji for around $200. It does take a bit of waiting around, and I used the RSS feed [RSS] to watch the search term to keep me alerted when one was posted.

I suppose I should also drop in a reference to the very recently released Kindle Fire. This is a bold move by Amazon, but one that is an obvious evolution of their storefront if you think about it. There is currently problems getting them in Canada, but it is a very interesting device and price point. Certainly a direct threat to Apple due to the ecosystem Amazon is providing with the devices.

Let’s take a look at the three and compare a few features I think are key:

Nook Color Kindle Fire Galaxy Tab
Screen 7″ 1024×600 7″ 1024×600 7″ 1024×600
CPU 800MHz 1GHz(dual core) 1GHz
RAM 512MB 512MB 512MB
Storage 8Gb + MicroSD 8Gb 16Gb + MicroSD
Weight 450g 413g 380g
Camera none none 3.2MP + 1.3MP front
Wireless Wifi b/g/n + bluetooth Wifi b/g/n 3G GSM + Wifi b/g/n + bluetooth
GPS none none yes
Community Yes Not yet Yes

The Galaxy Tab beats the Nook on all fronts, but if 3G data, GPS and camera are not important features to you, the Nook looks very nice. The Nook probably has the strongest community support right now, but the Galaxy Tab is not far behind. The Kindle is very new, so there isn’t much of a hacking community yet (I’m sure there will be) and if you live in the US then the Amazon ecosystem looks very compelling.

I’ve actually purchased two Galaxy Tabs so far. The first I ended up passing along to my father in law who had been on the hunt for a tablet for some time. He had actually tried the iPad2 and Playbook out before settling on the Galaxy Tab. I think price point and functionality combined to meet his criteria. The second one appeared the other day for $150 including a leather case, how could I say no? Yes, that’s my $150 tablet pictured at the top of the post.

I haven’t had any time to play with it so we’ll see if it finds a niche in my gadget use, I’m encouraged by folks like Tim Bray who seems to prefer the 7″ tab vs. other more powerful and newer devices. It is a little tempting to turn it into a phone as it’d make the Galaxy Note seem a bit undersized, but I’d never live down the sidetalking comments at work.

Parting words:  WOW!  If this is the price point we’re at now the future looks amazing for gadgets with mind blowing technology.

HTC Desire S-OFF

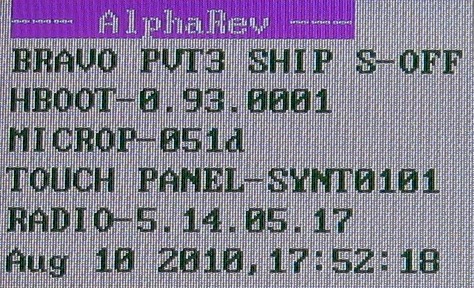
HTC phones have a security flag, this flag is normally “ON” and is indicated on the bootloader screen as S-ON. The purpose of the security flag is to prevent unsigned firmwares from being installed. Clearly if you want to modify your phone with custom firmware you need to be in the S-OFF state.

To access the bootloader screen: start with the phone in a powered off state; hold the volume down button; then press the power button. This should result in you entering the bootloader screen. Menu navigation is via volume up/down and the power button for select.

My HTC Desire was in S-ON, yet still running custom firmware. This was done by Unrevoked3. It switched the phone to S-OFF, installed a custom recovery image, then switched back to S-ON. I believe since the recovery image has the ability to install firmware you can dodge the firmware signature check (effectively bypassing hboot). Really the only reason to have S-ON is to make the phone look more like stock.

There are multiple ways to achieve S-OFF (including Unrevoked3), but what I primarily wanted to do was change the partition table to allow for more application storage on the phone. The partition table is part of the hboot, so changing this is a bit scary since if you mess up hboot you have no easy path to recovery. The good (and bad) news is that S-OFF is also achieved by flashing a new hboot.

Custom partition table hboots are hosted on the AlphaRev site. It is a information dense site. If you plan to do this, read all of it carefully. If you really don’t understand what it’s talking about, read some more or consider asking someone for help. This is not something you want to get wrong.

As with anything like this – do a backup of your stuff. Download the iso from AlphaRev and burn a CD, you’ll be booting your PC into the custom linux based image to do the changes. The tool is well scripted and pretty clear. Do not panic, and read what is on the screen carefully. Once the AlphaRev tool is done, you’re phone will be in S-OFF state and should have a bootloader screen similar to what is at the top of this post

Now we’re in S-OFF mode, we can flash an hboot with a custom partition table. If you had already achieved S-OFF you could skip the above steps and just start here to customize your partition table. Here are the steps I took:

  1. Boot into your recovery image (ClockworkMod Recovery) and do a backup
  2. Verify the MD5SUM of the hboot file you downloaded
  3. Place the phone in fastboot mode (bootloader)
    $ sudo ./fastboot flash hboot bravo_alphaspl.img (filename may differ)
  4. Reboot the phone
    $ sudo ./fastboot reboot-bootloader
  5. Erase the cache
    $ sudo ./fastboot erase cache
  6. Boot into your recovery recover image
  7. Wipe everything using recovery
  8. Restore the backup you made

If your phone is stuck in S-ON, then fastboot isn’t an option.

The benefits of the custom partitions is significant. The NexusOne had 196MB of internal storage, the stock HTC Desire only 148MB. With the custom partition table hboot, I now have 288MB. The trade-off is the partition table I’m using now won’t fit the stock ROM, but reverting to a different hboot is easy enough by repeating the steps above.

You’ll notice that the AlphaRev process customizes your splash screen. If you’re not happy with this they provide a link to the stock splash screen. Enter the bootloader again, and issue:

$ sudo ./fastboot flash splash1 desire_stock_splash1.img

And you’ll be back to looking like stock. Creating your own custom splash screen is also quite easy to do. If I get inspired to change mine, I’ll write up details on how – but a bit of searching will get you the answer too.

Nexus One vs. HTC Desire

Since February my phone has been the Nexus One. When I got it I wrote up a brief review where I compared it to the iPhone 3G and the HTC G1, so I guess this is a sort of exit review for the Nexus One as my new phone is the HTC Desire (also known as the Bravo or A8181).

The HTC Desire is almost the same hardware as the Nexus One. The wikipedia page has a good feature comparison so I’ll try avoid going over that ground. You can see from the photo at the top of this post that they share pretty much the same form factor. The Desire has a little bit of the HTC chin design where the Nexus did not. The Nexus notably has the three brass dots for the docking station which the Desire does not.

Looking at the back, things are pretty much identical. The Nexus One has a band of exposed aluminum frame (which can host an engraving), and the power button is slightly different likely due to the small difference in back cover design. The size, general shape, and weight of the phones are basically identical. I do notice that the Desire feels ‘flatter’ for some reason, and it almost feels as if it is a slightly more refined phone.

The Desire has a Super LCD vs the Nexus AMOLED. There is a visible difference here, and one that sticks in my head. In day to day use it isn’t bothersome, but more than just a subtle difference. The Super LCD tends to have washed out blacks, and appears a little bit dimmer to my eye. In every other aspect the two displays are equivalent, enough to make the differences a non-issue for day to day use. The Desire has a gorilla glass screen, where the Nexus did not.

The dock was a nice feature on the Nexus, just drop it in and it charged. I rarely plugged it into a microUSB connector. However the dock also discouraged the use of any sort of bumper case for the Nexus, I’ve got a case on order for the Desire already.

So while these two phones are quite similar, the button layout is not. Let’s compare the HTC G1 (top), Nexus One (middle), and HTC Desire (bottom):

The G1 actually had buttons dedicated to phone functions, it also had 5 function buttons vs. 4 in the later phone. The Nexus had touch sensitive buttons, which took some getting used to after having real buttons. The track ball was transparent and allowed for coloured notifications. The Desire swaps the track ball for an optical track-pad, some people really dislike this but I haven’t found it to be a problem. The back and search button is a rocker, effectively working as independent buttons.

Looking across the layouts, the home button has wandered around in different locations for every one. Search and menu are fairly consistent, but I’m not sure it helps much. Layout changes like this really mess with your head/muscle memory.

In stock form there are bigger differences between the two devices. However, both are fairly friendly to root and flash with your favorite community ROM. I’ve been running CyanogenMod since I got the G1 and continue to do so with the Desire.

Looking at the internal storage is where we notice some big differences. Nexus One: 196MB, Desire: 148MB. Having come from the Nexus meant that I very quickly started to hit out of storage problems, forcing me to move more of my apps to the SD Card. Everything fits without resorting to apps2sd or other hacks.

Speaking of hacks, you can change this if you are willing to flash a new HBOOT – this is of course somewhat scary as messing up HBOOT may be difficult to recover from. It also requires the phone be in S-OFF (developer) mode, allowing modification of /system while Android is running. Contrary to most of the material out there you can run in S-ON mode and have custom firmware, there are some limitations but no deal breakers (my Desire is currently S-ON).