LIRC vs ir-keytool

Related to my recent IoT hacking, what started me down this path is the long term annoyance of my X10 lighting being unreliable. X10 has always been problematic due to it’s use of power line communication, this has gotten worse as we add more and more noisy electronic devices that cause additional feedback onto the house wiring.

With the X10 light switch I had an IR-543 which mapped IR (infra red) and the rest of my home theater gear is all IR controlled, so a single remote could control everything including the lights. Another nice feature of the X10 light switch I had was soft on / soft off – meaning that when you turned the lights off they would dim down to off, and the same for on. At the start of a movie this is pretty nice.

Of course with a wifi enabled light switch, how do I get IR control? This seemed like a good reason to DIY a solution and build an IR controller / repeater based on a Raspberry Pi. I found that it’s relatively easy to control Tasmota devices with curl, so I was able to easily turn the lights on or off using a simple program. I was pleased to discover that the new light switch also had the soft on / soft off behaviour.

To build an IR device on Linux, I first thought of LIRC as I’ve used this in the past. As I dug deeper, it seems the LIRC project is quite dormant and I was fighting with a lot of stale tooling. I was succeeding in getting something working with the various remotes I wanted to use but it felt like it was a lot of work. Then a friend mentioned ir-keytable to me which led me to the more modern IR control in Linux solution.

The short version of the story is that the ir-keytable support is in a similar state as the LIRC work. I believe this boils down to the fact that IR control is still very niche, and there are lots of hardware variables due to many different remote controls. If you want to do something simple: receive IR input to control a linux machine, then ir-keytable is the way to go. More complex situations may require LIRC. Both approaches have their challenges but ir-keytable is the more modern solution.

The rest of this article will be about getting ir-keytable going on Raspberry Pi OS with a TSOP4838 IR receiver. For my application I have a more complex set of requirements so I’ll be continuing with an LIRC based solution, but more on that another time.

Continue reading “LIRC vs ir-keytool”

Low cost APC UPS RBC33 replacement

IMG_2828

A couple of weeks ago my APC Back-UPS 1200 XS started beeping at me, the battery light was flashing, a clear sign the battery has packed it in. I wasn’t overly surprised as the unit is quite old (I’m guessing 8 years? I can’t recall exactly when I got it) – you should only really count on a battery to last 3 to 5 years so it’s done well for me.

While I don’t remember exactly when I bought the UPS, I do remember price matching FutureShop against BestBuy, the price difference was only $20 but it still made me laugh to do it as they are both owned by the same parent company – that and the price match gave me an additional 10% off of the difference in savings (yup, a whole $2). The manual says I should buy a RBC33 battery pack, these are nearly the same price I paid for the entire UPS ($99 + tax).

I looked locally and on the web for a reasonably good deal for a replacement battery pack. The prices had quite a range and I could have opted to go for a RBC32 which is cheaper but still nearly the cost of original UPS. In the end I opted to go for the DIY route and just buy compatible batteries and do a swap – ebay had the best prices, but amazon.ca had a vendor that was almost the same price and I thought I’d go that route as shipping would be quicker.

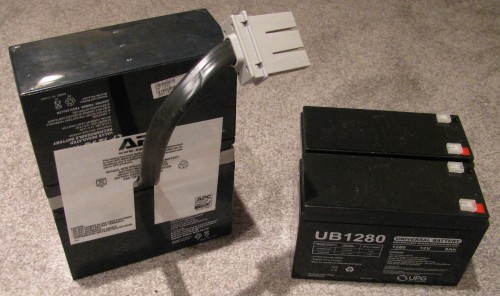
The batteries arrived fairly quickly (about a week), faster than I’d expect from any shipment from the US. The two batteries are an identical size match to the pair that form the APC battery pack. The original battery pack has a wiring harness and the two batteries are stacked with one inverted.

IMG_2829


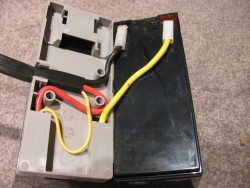
The procedure was very simple, it took me under 10 minutes and I was stopping to take pictures as I went along. Start by peeling away the sticker from the side with the cable sticking out – put it aside if it still is sticky enough to re-use. Fold the batteries so they are side by side. Remove the cables from one battery, then remove the sticker on the other side and separate the batteries. Last remove the harness from the remaining battery.

IMG_2831IMG_2832


Reassembly is a matter of working in reverse. I suggest taking pictures as you go as it is a great way to reference which wire went where, but my photos are a reasonable guide as well. You could also watch this youtube video which covers the battery swap.

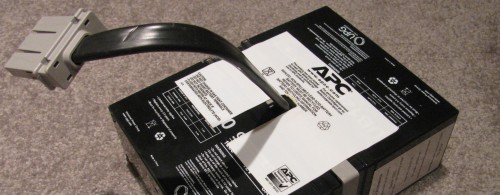
My completed battery pack looks a lot like a stock RBC33. If the original stickers don’t have any stick left, a little duct tape should work well.

IMG_2833

The batteries in the original pack were 9Ah and my replacements are only 8Ah, this will affect the runtime of my UPS – for my needs a few minutes of backup are enough to protect the system, the new battery pack should give me nearly 30 minutes. Generally the power is good in my neighbourhood, and if it is an extended black out we’re without power for hours.

I’ve seen a few battery packs from systems at work where the batteries have bulged and are clearly bad, mine actually looked fine so I may try to restore them later. I did also consider upgrading to sealed marine deep cycle batteries, but the cost was significant and I’m not convinced of the safety of the solution.

One footnote, I have the UPS plugged into my server and use apcupsd to monitor the status. When the old battery had failed and the UPS was beeping my logs filled with the following:

2013-04-07 23:20:49 -0400 Battery reattached.
2013-04-07 23:20:11 -0400 Battery disconnected.
2013-04-07 23:20:11 -0400 Battery reattached.
2013-04-07 23:19:07 -0400 Battery disconnected.

Occasionally the beeping would stop (and I assume the logging) but in a short while it would resume beeping (and logging).

Repair Acer AspireOne 532H Netbook Screen

IMG_2767The Acer AspireOne 10.1″ netbook is a handy secondary computer to have around. It’s quite capable of browsing the web, email and viewing photos. Most casual users could likely happily use it as their primary machine. Tablets have all but killed this market, I’m hopeful that the Google Chromebook will bring help back this form factor.

Unfortunately being a secondary computer means that it gets left around (on the floor) and stepped on. This was the sad fate of this particular netbook. It turns out that replacement screens are relatively inexpensive making it well worth fixing. First step was to boot the netbook connected to an external monitor to confirm the resolution of the panel and make sure nothing else was wrong. Armed with that, and a compatibility list  I was able to find a good price for one from a Canadian seller on ebay. Shipping was very fast and the screen came well packaged: boxed and inside a padded envelope.

IMG_2769

Disassembly is quite easy, this YouTube video covers it quite well. Below you’ll find some photos and my notes on the process.

Continue reading “Repair Acer AspireOne 532H Netbook Screen”