Windows Vista Recovery

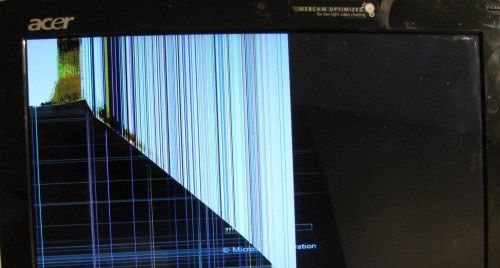
Like many geeks, I’m the family tech support. Somehow my nephew’s Windows Vista laptop had stopped booting. You’d get the blue screen of death (BSoD) on boot. Using F8 on boot also resulted in a BSoD. I even tried using a Vista recovery disk and it too crashed and burned in the same way.

My first thought was to check that the hardware was ok. Running some diagnostics from an Ubuntu live CD indicated that side of things looked fine.

So I tracked down the Vista Install disks, maybe I’d need to do a full re-install or at least it’d give me a way to move forward. What? Another BSoD?! This time instead of ignoring the data on the BSoD I wrote some of it down, it the main error code was: 0x0000C1F5. Searching for this turns up the specific problem, there is even a Microsoft knowledge base article. Of course the fix that is supplied by Microsoft won’t help you until you can actually boot Vista again.

I though I could solve the issue using Linux as was described in one of the forums. While I could easily boot Linux and poke around, there was no sign of a $TxfLog log file. I suspect in this particular case there was some other file that was corrupted, but which one? A bit more digging around and I found another Microsoft knowledge base article.

This ended up being the solution: Windows 7 knows how to recover from this type of filesystem corruption. The knowledge base article suggests that you use a Windows 7 Beta installation disk – I wasn’t able to find one of these. What I did find was some Windows 7 recovery images, these will work for what we need to do.

Burn the image to a CD or DVD. Boot the Windows 7 Recovery disk to the point where it’s going to try to recover, now shut down and cancel the recovery. The Windows 7 Recovery disk should have repaired the Vista filesystem so we can now boot from the hard drive into recovery mode and the system will perform it’s “self repair” fixing things up.

So while the BSoD screen can be intimidating, taking a bit of time to read the screen and take note of some of the magic numbers can help guide you to the right solution. Or just call up the geek in your family and get them to fix it.

Ubuntu Apache2 “trusted” SSL Certificate from StartSSL

I own the domain lowtek.ca and host a couple of personal projects as well as this blog on it. One of the areas is behind a password and that part of the site I redirect over to https to ensure that the communication is encrypted. While the whole Certificate Authority infrastructure has currently become questioned, the value of having a SSL connection between your browser and (hopefully) a specific destination machine still has value. I found a humorous youtube video that describes SSL basics if this is new to you.

If you were watching the tech news, you’ll have seen several of the CA’s had security breaches. Even StartSSL which this post will talk about using had some issues, but it seems that it wasn’t as bad as the others. There has even been some research into how to attack / break SSL entirely. The web is a scary place if you think too much about this stuff. Today SSL is the most convenient web security story there is, and for the most part it works well enough.

For most people hosting personal websites the simple path is to use a self signed certificate.  The one downside to this is that whatever browser you are using will not recognize the certificate as valid, you’ll either be prompted to download and remember it – or just trust it for this one session. The manner in which browsers trust commercial web sites https connections is the certificates are issued by one of the root CA’s (Certificate Authority). The CA is a trusted 3rd party which the browser can check with to validate the certificate the website is offering up.

Ubuntu has some guides on creating certificates. What I’ll try to do here is provide a specific example of using StartSSL to generate a free certificate that is accepted by most web browsers. Much of the details come from another blog that I referenced when creating my StartSSL certificate.

You’ll probably want to use FireFox. The web interface at StartSSL.com can be a bit finicky and FireFox is known to work – I used the somewhat old 3.6.25 version. Of course the first step is to sign-up and create an account on StartSSL. They use email confirmation and my greylisting caused a bit of a hiccup here, waiting a few minutes and resubmitting the sign-up succeeded just fine. Then there will be a wizard that takes you through the rest of the sign-up process.

At the end of your account sign up you’ll be encouraged to back up the client certificate that has been installed into your browser. As I understand it, they use the client certificate as a form of authentication that it is really you they are connected to. The FAQ has details on backing up the client certificate. If for some reason you lose your client certificate they have a FAQ for that too.

Next we want to return to the “Control Panel” and use the “Validations Wizard” to do the “Domain Name Validation”. This will require another email validation to ensure that you are the owner of the domain (you’ll need to be able to receive email for that domain).

Now we can actually create a certificate. There are pay options for certificates, but we want to use the free version. Use the “Certificates Wizard” to create a “Web Server SSL/TLS Certificate”. Again I’ll reference the very useful blog post from jasoncodes.com that describes this set of steps (I will replicate here for completeness).

The first step of creating a certificate we can skip, as we plan to create our own Certificate Signing Request (CSR) locally. Execute the follwoing on your server, obviously replacing mydomain.ca with your domain name:

openssl req -new -newkey rsa:4096 -days 380 -nodes -keyout mydomain.ca.key -out mydomain.ca.csr

There will be several questions posed to you during this, here is a dump of the questions and some example answers:

Country Name (2 letter code) [AU]:CA
State or Province Name (full name) [Some-State]:YourStateOrProvince
Locality Name (eg, city) []:YourCity
Organization Name (eg, company) [Internet Widgits Pty Ltd]:SomeName
Organizational Unit Name (eg, section) []:
Common Name (eg, YOUR name) []:mydomain.ca
Email Address []:secret_email@mydomain.ca

Please enter the following 'extra' attributes
to be sent with your certificate request
A challenge password []:
An optional company name []:

Some of the answers can be blank as should be evident above. If you’re having trouble with the 2 letter country codes, check on wikipedia. I did find a reference that suggested that the common name must exactly match the host name of your server, you might note that I’m not using a www prefix here. This will allow me to re-use this same certificate for email and other things in theory, it also follows the no-www approach. I opted to leave the challenge password blank.

The second step of the wizard on StartSSL for creating a certificate will ask for a cut & paste of the mydomain.ca.csr we just created. Paste the entire contents of the file in, and move on to the next step where you should see that the request was received.

Moving along the next step is to “Add Domains”, since we’ve only validated one domain this should be easy. As part of this process it will ask for one sub domain. I used “www” since that will still resolve correctly to the lowtek.ca domain.

The remainder of the steps should be straight forward, you’ll arrive at the “Save Certificate” screen. You’ll want to save three things: 1) Text box contents as mydomain.ca.crt, then save-as the 2) intermediate and 3) root CA certificates (last two should be sub.class1.server.ca.pem and ca.pem respectively).

Now we need to install into Apache2. I’ll assume you’re running Ubuntu.

We’ll start by copying the .crt and .pem files we saved from the final step on StartSSL into the /etc/apache2/ssl directory. We also want the .key file that was created when we made our CSR copied to the same directory.

Again I must credit jasoncodes.com, this is almost verbatim from his site. Run the following as root.

cd /etc/apache2/ssl
mv ca.pem startssl.ca.crt
mv sub.class1.server.ca.pem startssl.sub.class1.server.ca.crt
cat startssl.sub.class1.server.ca.crt startssl.ca.crt > startssl.chain.class1.server.crt
cat mydomain.ca.{key,crt} startssl.chain.class1.server.crt > mydomain.ca.pem
ln -sf mydomain.ca.pem apache.pem
chown root:root *.crt *.key *.pem
chmod 640 *.key *.pem

Now we need to modify the apache config file /etc/apache2/sites-available/ssl and add the following within the <VirtualHost> block:

SSLEngine On
SSLCertificateFile /etc/apache2/ssl/mydomain.ca.crt
SSLCertificateKeyFile /etc/apache2/ssl/mydomain.ca.key
SSLCertificateChainFile /etc/apache2/ssl/startssl.chain.class1.server.crt

Check that your Apache config parses as valid:

apache2ctl -t

And then restart Apache with the new config:

sudo /etc/init.d/apache2 reload

Here is the the verification process verbatim from jasoncodes.com:

Run the following after restarting Apache to check the certificate chain:

echo HEAD / | openssl s_client -connect localhost:443 -quiet > /dev/null

You should see something like:

depth=2 /C=IL/O=StartCom Ltd./OU=Secure Digital Certificate Signing/CN=StartCom Certification Authority
verify error:num=19:self signed certificate in certificate chain
verify return:0

A depth of 2 and a return value of 0 is good. If the certificate chain is wrong, you’ll probably see something like:

depth=0 /description=12345-ABCDEF123456/C=XX/O=Persona Not Validated/OU=StartCom Free Certificate Member/CN=host.example.com/emailAddress=hostmaster@example.com
verify error:num=20:unable to get local issuer certificate
verify return:1
depth=0 /description=12345-ABCDEF123456/C=XX/O=Persona Not Validated/OU=StartCom Free Certificate Member/CN=host.example.com/emailAddress=hostmaster@example.com
verify error:num=27:certificate not trusted
verify return:1
depth=0 /description=12345-ABCDEF123456/C=XX/O=Persona Not Validated/OU=StartCom Free Certificate Member/CN=host.example.com/emailAddress=hostmaster@example.com
verify error:num=21:unable to verify the first certificate
verify return:1

I was pleased to see that it all verified correctly for me. Visiting https://lowtek.ca resulted in a green lock icon under Google Chrome.

The StartSSL certificate expires in 1 year, so next year around this time I’ll be doing the same process. There is another CA (AffirmTrust) I came across that offers free 3 year certificates, I have no experience with them but would be interested to hear if anyone tries them out. There is CACert as well, but it doesn’t appear to be included in any of the browsers – limiting the usefulness of a certificate from them.

Unlocking Samsung Galaxy S Vibrant (Bell)

I’ve been a big fan of unlocked GSM phones since my first one back in 2009. I’ve also been through a surprising number of different phone since then, but all of them have been 2nd (or 3rd) hand and have been a good price for a phone that still has lots of use left in it. My latest phone the Samsung Galaxy S Vibrant (i9000m) is no different, but it came to me locked to Bell.

I purchased the i9000m knowing it could be easily unlocked if you had the right magic. With the stock firmware, if you don’t have the phone unlocked you’ll see what’s pictured at the top of this post when you install a SIM card.

It turns out the forums have a great how to guide, with pointers to an app on the Android Market if you’re afraid of a little bit of hex editing. It should go without saying that I selected the hex editing route. I’ll describe the steps I used here, but  all credit to the folks in the forums for figuring this out.

I will assume that you’ve rooted your i9000m and you’re not incapable of using a hex editor.

Step 1: We’re going to copy some non-volatile memory off the phone that contains the ‘lock’. Perform the following commands on the phone (probably via ADB).

$ su
# cat /efs/nv_data.bin >> /sdcard/nv_data.bin

Now copy that file onto your PC for editing. Make a backup of the original before step 2.

Step 2: Edit that file, I used hexedit on Ubuntu. The lock bit is inside of the byte at 0x181469 in the file. See the green circle below, change that 01 into a 00 and save the file.

Starting at offset 0x181468 you should see the series of digits: ff 01 00 00 00 00 46 46

The XDA post describes it as follows:

There are 5 different types of locks in 5 different bytes

the FF byte should be left alone
the first byte after the FF is the network lock
the next byte is the network subset lock
the next byte is the sp lock
the next byte is the cp lock
the last byte appears to be a data lock.
the 46 46 should be left alone

Step 3: Use the modified file to update your phone. Let’s assume you copied the modified file to /sdcard/nv_data.bin on the phone, and again the commands below are executed on the phone.

$ su
# rm /efs/nv_data.bin
# rm /efs/nv_data.bin.md5
# cat /sdcard/nv_data.bin >> /efs/nv_data.bin
# chmod 755 /efs/nv_data.bin
# chown radio.radio /efs/nv_data.bin || chown 1001.1001 /efs/nv_data.bin
# reboot

That’s it, you’re unlocked. The unlock should persist across ROM (firmware) changes.

References: a great article with pointers to valuable information on the i9000 series.