My printrbot simple shipped with 1lb of black PLA filament. This was great to get started, and it’s amazing how many prints I was able to do with so little plastic. I’ve still got probably 1/2 of the original black left, but I really wanted to do other colors.
I’d seen people coloring their filament using sharpies, and lately it seems that there are some very simple ways to do this with good success. I’ll probably try this next time I want to get some more colors and just buy a 1kg spool of natural PLA.
I had decided I wanted white, clear, and maybe one color (purple?). This sent me down the path of looking at the various places I could order from and trying to justify the shipping costs on top of the $20-$40 price per kg. Worse still, the printrbot store was actually out of stock on all but black when I had the burning desire to buy more filament.
Then I came across seacans.com – really nothing stood out about this vendor over others with the exception that they offered a 2kg rainbow pack for the price of 2kg of filament. Looking at the site today it seems they no longer carry this useful sampler of 8 colors, but they still have very good prices.
There are many options for filament – but my experience with seacans.com was positive. I would use them again.

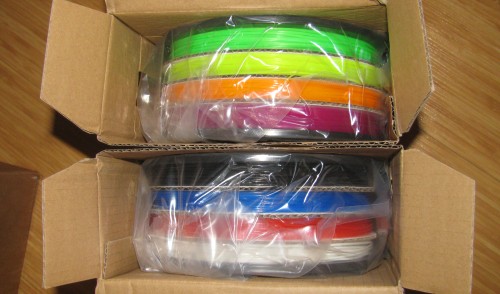
The shipment came double boxed. Each spool of filament was bagged in plastic with a desiccant pack. I’ve done quite a bit of printing with the new colors, and in general it’s been successful.
Measuring the thickness of the filament is interesting. The black that shipped with my Printrbot is 1.78mm. The rainbow pack from seacans.com varies across the colors: purple 1.72mm, orange 1.73mm, yellow 1.64mm, green 1.69mm, black 1.76mm, blue 1.69mm, red 1.70mm, and white 1.68mm. It is possible the size varies more across the length of the material. Since the Printrbot filament is not on a spool, I can easily test multiple locations over the entire length and it seems to be pretty consistent at 1.78mm.
With my prints – I haven’t noticed any big variations on the quality of the prints due to the thickness differences. With a 5% size difference you’d think it might show up more in the prints.
Initially I did have some trouble with the extruder gear grinding the filament down and failing to feed. I solved this with a fan (more on that in a future post). I’m not sure this can be simply attributed to the ‘cheap’ filament, but overall heat of the room (summer vs. winter) and feeding from a spool (more drag on the material).
If you can find a ‘rainbow’ pack, it’s worth a 30% premium over single color spools. I’ve had a lot of fun with the 7 new colors (I had black before). I also would suggest that cheap filament, while it may have some quality variation on size – is just fine for the hobby printer folks like myself.