When rate limiting (and firewalling) goes wrong


Recently I experienced a few power failures that lasted hours. This means that when the power is back, all of my infrastructure reboots and reconnects. For the most part this is 100% automatic, but the last time I ran into an interesting problem.

My pi-hole was running with the default rate limiting of 1000/60. This means that each device can make up to 1000 requests per minute, and if it exceeds that it will be put on a deny list for 60 seconds.

It turns out that my main server that runs a bunch of docker containers makes a lot of DNS requests when everything is starting up all at once. This creates a storm of requests to the pi-hole and the server ends up being blocked for DNS requests (responding with REFUSED) due to rate limiting.

Unfortunately the behaviour of enough of the containers is to retry when this happens. This causes more DNS requests to be made as the retry logic runs. These retries cause another wave of requests which cause the server to be blocked again. Some of my containers entered error conditions due to unexpected DNS failures, so these needed to later be restarted but at least they stopped contributing to the problem.

My email container was pretty unhappy, it really wants to be able to use DNS, even when receiving email. Since my server had been unavailable for a while, there were external email servers trying to deliver mail that had been queued – this contributed to the load. Additionally I couldn’t connect any email clients to the server which left me scratching my head a little, more on that later on.

The ‘fix’ was easy enough. Modify the pi-hole DNS rate-limiting setting to 0/0 to remove any rate limiting. This is imperfect, but at one point I saw 30,000 requests in a minute from my struggling server and I think I’d rather have no limit and deal with that problem than hit the limit and run into this denial of service issue.

Now that the pi-hole was happy, I was able to get most of my containers to be happy with a little poking at them. Email was still sad, and this took me a coffee break to realize what was wrong. The email container was receiving email just fine, but I could not connect with a client. This felt like a networking problem, but how could that be?

I had forgotten (again) – that the email server has fail2ban running in it. This scans logs looking for suspicious activity and will ban an IP for a period of time by inserting a firewall rule. Furthermore, as I use the domain name to configure my email client – this resolves to the external IP. The external IP means that the client talks to my OpenWRT router which provides NAT and then redirects/maps that external IP back into my network. This has the effect that the originating IP looks like it is my router, not the client machine on the internal IP address. This process is called NAT reflection, or NAT hairpinning.

While NAT reflection is a super handy feature for my OpenWRT router to have, allowing me to easily from inside my home network visit a machine I’ve exposed via port mapping to the outside world using the same DNS entry that points at the external IP address — it means that services on that machine see my router IP as the client IP. When any of the machines in my house have problems connecting to my email server, in this case because I had DNS REFUSED errors on the email server, fail2ban decides that is a bad client and bans it. Thus banning all traffic originating from my home network.

This is easy to fix once you understand what is happening, I just needed to unban my router IP and my email clients could connect.

Lint – the unseen foe

I’ve seen this a few times and it’s always surprised me until I’ve figured it out. Hopefully this brief post helps someone else one day.

Years ago a friend of mine had me over to help take his phone apart. The headphone jack had stopped being reliable (yeah, way back in the day when it was normal for you to plug in headphones). We had fun taking the phone apart, but in the end it turned out that the headphone jack was jammed full of pocket lint. Yup. Some careful digging with a pin and tweezers and we cleared out an alarming amount of lint that had jammed up the port. This fully restored the headphone jack function.

One of my kids had the same thing happen to them. Janky headphone jack, and yup – the bottom was stuffed full with pocket lint. Just be very careful poking around in the port. It’s not very big and you can mess stuff up. Lint is soft and will come out with some gently coaxing.

Lately my ~1.5yr old Pixel 4a had stopped reliably charging. The USB-C cable would fit in fine, but not stay put. It would also pop out very easily. This morning after another failed to charge overnight incident I again inspected the USB-C port. It looked fine. Probing very gently with a pin, it soon became obvious there was some lint in there. Then I pulled out more and more.. an alarming amount. There was a lot of lint. Now I can look into the port and see the shiny plastic bottom, not a dark matted blackness. The USB-C cable seats nice and deeply and doesn’t pop out easily.

Given phones probably live a good percentage of their lives in your pocket, this isn’t a surprising outcome. Still – cleaning out lint wasn’t even close to the first thing I thought of doing in any of these cases. I’d even checked what my warranty and repair options were. The fix was 2 minutes of careful work.

Samsung Galaxy S7 Battery Swap

Sure, the Samsung S7 is a 6 year old phone at this point – but it’s perfect for my son who’s in grade 7 and doesn’t really need a phone. The other day it stopped turning on – when you plugged it in, it would indicate the battery was at 100%. I could even get it to power on while plugged in, but removing the USB power would result in an immediate black screen as it powered off hard.

I sort of dreaded opening this phone up because it’s one of the ones that is glued shut. I was pleasantly surprised, as a little heating with the heat gun and the all metal back came up pretty easily using a suction cup. After that there were some phillips screws to remove and I was able to see the battery.

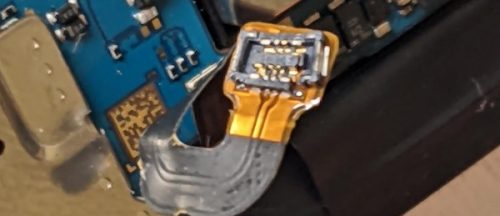
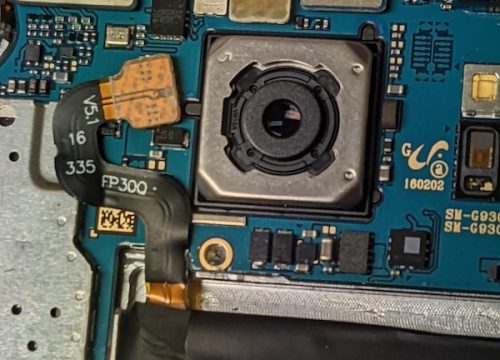
It was clear there was a problem here – the connector should be squared up with the rest of the circuit board. If you look closely – you can see that the battery has also shifted down significantly within the phone, nearly 2mm.

Taking a close look at the cable – you can see the connector is a little busted up despite my photo being a bit out of focus.

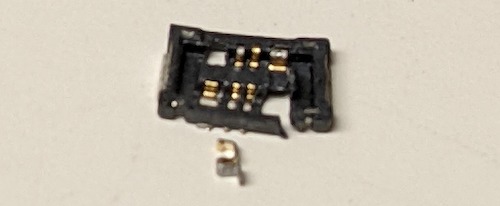
I attempted to reconnect the cable, but soon found out that the connector was badly damaged and it snapped off the cable completely.

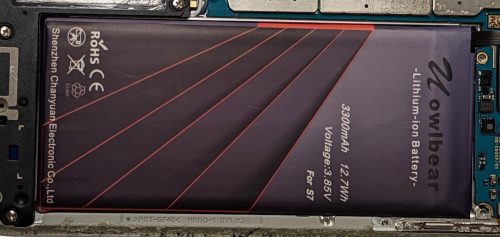
Oh well. Off to search up buying a new battery for this phone. A quick look around and it seems there are lots of choices – some as low as $16 (eBay), and the normal crazy mark-up ones at $60-$90. I opted for one of the Chinese made knock off brands off of Amazon that came with tools (junk) and the adhesive to re-attach the back. It also claimed to be 3300 mAh vs the stock 3000. It was at a slight premium vs. eBay, but only a couple of bucks and the reviews were good. Worth the $25 and it shipped to me the next day.

My pricing logic for stuff like this is to avoid the cheapest prices – these are often very cheap for a reason. There is a step up from the cheapest where you’re going to get basically the same part up to the next price plateau – if you can discern the price notches you can basically buy at certain quality levels. The danger with all of these is that lots of unethical sellers will slap OEM labels on parts that are not, so often paying a high premium is not buying quality at all. It’s always a gamble which is frustrating.

The battery I’m replacing was already previously replaced. I think this is why the battery didn’t fit very well in the phone.  The poor fit is likely what resulted in it breaking off (when the phone was dropped, probably multiple times if I know my son). If you fit the broken battery into the compartment properly there is a significant gap at the bottom.

Again, this is nearly 2mm gap. The OEM battery is tape/glued in – but I suspect it also fit much more snugly in the space. If you are replacing a battery – consider if it will slide around and either tape – or pad it – to avoid the battery moving. I know that I’ve done battery swaps and left a gap in the past – I probably won’t in the future.

The new battery fits like a glove. Top to bottom, almost no space to move around. So I didn’t bother taping it in place, I’m pretty confident it’ll stay put.

While I’m not a fan of glued shut phones – I did use adhesive to re-seal the phone. Hopefully I won’t have to go back in at all. In a couple of years this phone will basically be too old to use. While it’s still running stock firmware, it does appear that there is an unofficial but current LineageOS build for it.

The S7 got a 3/10 score for repairability – but it wasn’t really that bad to get at the battery. The places where it got hit on the score was replacing some of the other components – I’ve certainly had more than 1 USB charge port go bad, and gluing that to the screen seems like a really bad idea. There really needs to be a better trade of for waterproofing and repairability.